TallyPrime gives you great flexibility in setting up your Chart Of Accounts. It allows you to group your ledger accounts right at the time of creating your accounts chart. Your reports and statements reflect the desired classification at all times.
List of accounts displays the existing chart of accounts, listed as groups, in alphabetical order.
- Gateway of Tally> Chart of Accounts > select master type you want to see in Chart of Accounts.
- Alternatively, press Alt+G(Go To) > type or select Chart of Accounts > select master type you want to see in Chart of Accounts and press Enter.

[26- Accounting Setup-TallyPrime Book]
3.1. Account Groups in TallyPrime
Groups are collection of ledgers of the same nature. Account groups are maintained to determine the hierarchy of Ledger Accounts, which is helpful in determining and presenting meaningful and compliant reports. Using this you can generate reports, which are meaningful as well as compliant with laws.
At the highest level, accounts are classified into Capital or Revenue – and more specifically into Assets, Liabilities , Income and Expenditure .
TallyPrime provides you with 28 Pre-defined Groups, of these 15 are Primary Groups and 13 are Sub-Groups . You can also create your own groups, either as Sub-groups or Primary Groups.
The lowest level would be the Ledger Account. All Voucher entries are passed using ledgers.
| TallyPrime has Pre-Defined Ledgers for Cash (under Cash-in-hand group) and for the Profit & Loss A/c (under primary group). |
| 15 Primary Groups | 13 Sub Groups |
| Balance Sheet ( 9 Groups) | |
| Branch / Divisions | |
| Capital Account | Reserves & Surplus |
| Current Assets | Bank Accounts
Cash-in-hand Deposits (Asset) Loans & Advances (Asset) Stock-in-hand Sundry Debtors |
| Current Liabilities | Duties & Taxes
Provisions Sundry Creditors |
| Loans (Liability) | Bank OD A/c
Secured Loans Unsecured Loans |
| Investments | |
| Fixed Assets | |
| Misc. Expenses (ASSET) | |
| Suspense A/c | |
| Profit and Loss Account (6 Groups) | |
| Direct Incomes | |
| Direct Expenses | |
| Indirect Expenses | |
| Indirect Incomes | |
| Sales Accounts | |
| Purchase Accounts |
Out of the 15 Primary Groups, 9 Primary Groups appear in the Balance Sheets that are Capital in nature and 6 Primary Groups appear under Profit & Loss account which are Revenue in nature.
3.1.1. Create Account Groups (under Single Group) one-by-one:
1. Gateway of Tally > Create > type or select Group and press Enter.
Alternatively, press Alt+G (Go To) > Create Master > type or select Group and press Enter.
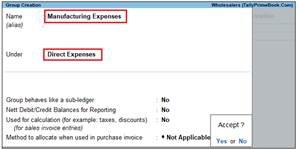
2. After giving Name to the Group, In the field Under , from the List of Groups displayed, select the parent group under which the group has to be classified.
For example, Manufacturing Expenses under Direct Expenses .
[27- Accounting Setup-TallyPrime Book]
A new group created under primary will not be reflected in reports until you pass masters / transactions for that group.
You can also View any Groups…
Go to Gateway of Tally > Chart of Accounts > Groups > Enter
You can also Alter / Modify any Groups …
Go to Gateway of Tally > Alter > Groups > Select or type Group Name and Press Enter to Alter
Delete a Created Group (No Default Group)
Groups can be deleted from the alteration screen, provided no transactions has been made or no sub-groups has been created .
Just Pres Alt+D in Alternation screen, and press Y.

[28- Accounting Setup-TallyPrime Book]
3.1.2. Advanced Configurations for Account Groups
1. Gateway of Tally > Create > type or select Group and press Enter.
Alternatively, press Alt+G (Go To) > Create Master > type or select Group and press Enter.
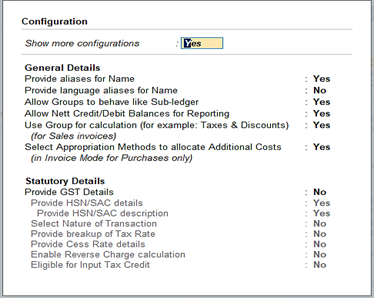
2. Select F12: Configure (Group Configuration) and enable ‘Yes’ – Show more Configurations.
The group creation screen with advanced options is displayed as shown below:
[29– Accounting Setup-TallyPrime Book]
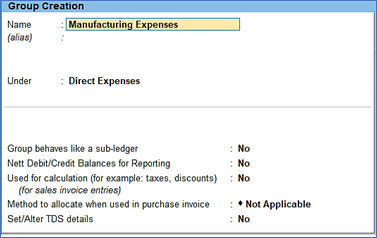
In the Group Creation screen :
[30– Accounting Setup-TallyPrime Book]
1. Enter a name for the group.
2. Enter a group category. If a group is created under Primary you must select from asset, expenses, income or liability.
3. Select the Nature of Group .
4. Select Yes for the option Group behaves like sub-ledger? to allow groups to act as a ledger.
When the option Group behaves like sub-ledger? is set to No , all the ledgers that are grouped is displayed in detailed mode.
When the option Group behaves like sub-ledger? is set to Yes , the ledgers grouped under the same is not displayed in detailed mode.
5. Set Nett Debit/Credit Balances for Reporting? to Yes to display net debit or credit balance in the report (whichever is higher).
6. Set Used for Calculation (e.g. taxes, discounts)? to Yes if ledgers under this group have percentages for discounts or taxes to be used in invoice entry. This is displayed while passing voucher in invoice mode and for automatic calculations.
7. Select Method to Allocate when used in Purchase Invoice from the Allocation Methods list to allocate the expense of the item in the ratio of the quantity or value.
[Practical Assignment-1]
Creation of Account Groups
Create the following Accounts Groups with Normal Letter (Italic Letters are Default (or Pre-defined) Group) …
| CURRENT LIABILITES (Pre-defined)
DEPOSIT RECEIVED ADVANCES RECEIVED SUNDRY CREDITOR (pre-defined): DISTRIBUTORS CLEARING & FORWARDING AGENTS CREDITORS FOR EXPENSES PROVISIONS (Pre-defined) EXPENSES / OUTSTANDING PAYABLE FIXED ASSETS (Pre-defined) OFFICE EQUIPMENTS SUNDRY DEBTORS (Pre-defined) DEALER RETAILER LOAN & ADVANCES (ASSETS)-Pre-defined LOAN TO STAFF LOAN TO OTHERS ADVANCES INDIRECT EXPENSES -Pre-defined SALARIES & STAFF EXPENSES MARKETING EXPENSES ADMINISTRATIVE EXPENSES FINANCIAL EXPENSES ADMINISTRATIVE TAXES DEPRECIATION |
3.2. Ledgers in TallyPrime
A ledger is the actual account head to identify your transactions and are used in all accounting vouchers.
For example, purchase, payments, sales, receipts, and others accounts heads are ledger accounts. Without a ledger, you cannot record any transaction.
All Ledgers have to be classified into Groups. These groups and ledgers are classified into Profit and Loss or Balance Sheet.
The creation and usage of Groups in TallyPrime has been explained earlier. Now you will learn how TallyPrime works with Ledgers.
Pre-defined Ledgers in TallyPrime
There are two pre-defined ledgers available in TallyPrime, they are:
(i) Cash
This Ledger is created under the Group Cash-in-hand. You can enter the opening balance as on the date of books beginning from. You can also alter the name and even delete the Ledger.
(ii) Profit and Loss Account
This Ledger is created under the Group Primary. Previous year’s Profit or Loss is entered as the opening balance for this ledger. The balance entered here is treated as the opening profit/loss and shown in the Balance Sheet as opening balance of Profit and Loss account in the Liabilities side.
You cannot delete this ledger, but you can modify the same.
3.2.1. Creating a Single LEDGER:
1. Gateway of Tally > Create > type or select Ledger and press Enter.
Alternatively, press Alt+G (Go To) > Create Master > type or select Ledger and press Enter.
[31- Accounting Setup-TallyPrime Book]
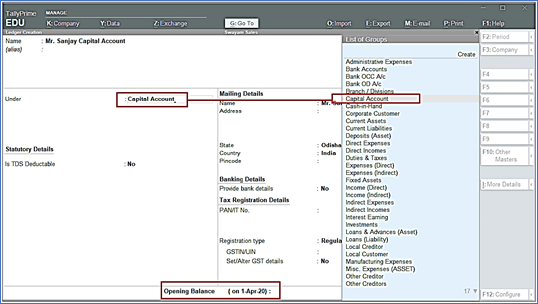
2. Name Box : enter the name of ledger, alias is used for short name.
3. Select the group under which the ledger will be created.
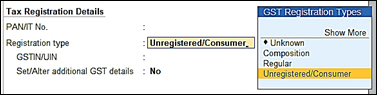
4. You can select Tax Registration type : Regular (required GST No) or Unregistered/Consumer (No GST No require)
[32- Accounting Setup-TallyPrime Book]
5. Enter the Opening Balance.
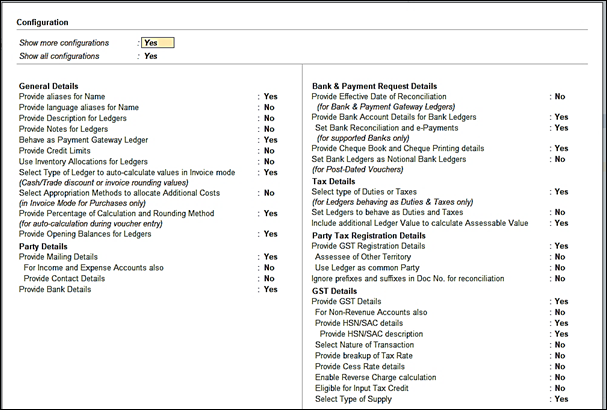
F12 : Configure ( Ledger)
Configuring F12 (functional key): You can also configure your ledger creation as per your requirement by using ‘F12’.
To view and show all Configurations…you have to enable Yes of two option inside Configuration screen.
Show more configurations : Yes
Show all configurations : Yes
[33- Accounting Setup-TallyPrime Book]
3.2.2 Displaying, Altering and Deleting Ledger Accounts
You can alter any information of the ledger master with the except for the closing balance under the group stock-in-hand.
To display/alter a ledger
- Gateway of Tally> Alter > type or select Ledger Name and press Enter to Alter.
Alternatively, press Alt+G (Go To) > Alter Master > type or select Ledger and press Enter.
To delete a ledger
- Press Alt+D andpress ( In Alternation mode screen of Ledger)

[34- Accounting Setup-TallyPrime Book]
| Note: You can delete the ledger if no vouchers have been created under it. If you want to delete a ledger for which vouchers have been created, you have to first delete all the vouchers from that ledger and then delete the ledger account. |
3.2.3. Creating a Current Liabilities / Assets Ledger
Accounts like Outstanding Liabilities, Statutory Liabilities and other minor liabilities can be created directly under Current Liabilities and Assets can be classified as Current assets and Fixed assets.
The Ledger Creation screen appears as shown above in Para- 3.2.1. :
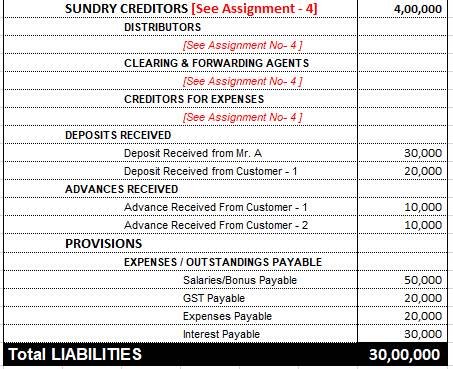
[Practical Assignment-2]
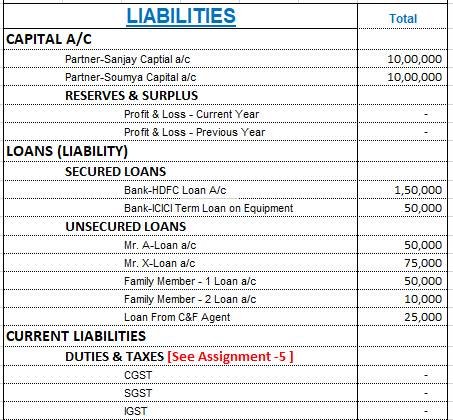
Creation of Asset & Liabilities
Create the following Assets & Liabilities Ledgers with Opening Balance as given:
In our given Practical Assignment, you must remember all the Bold Letter are Groups (not required to create) under which you have to create all the Ledgers with given Opening Balance
Note :
- All Bold Capital Letters are Pre-defined Groups (Not required to be create) to be select while creating Ledgers.
- Ledgers of Small Letter are required to be Create Newly with Opening Balance as given
- Include in Assessable Value Calculation – Not Applicable [Default – Don’t change]
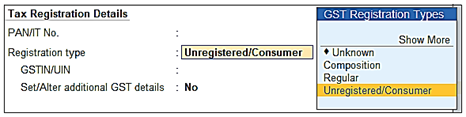
- Tax Registration type of all above Ledgers are Unregistered / Consumers (GST No. Not required)
[35- Accounting Setup-TallyPrime Book]
[36- Accounting Setup-TallyPrime Book]
[37- Accounting Setup-TallyPrime Book]
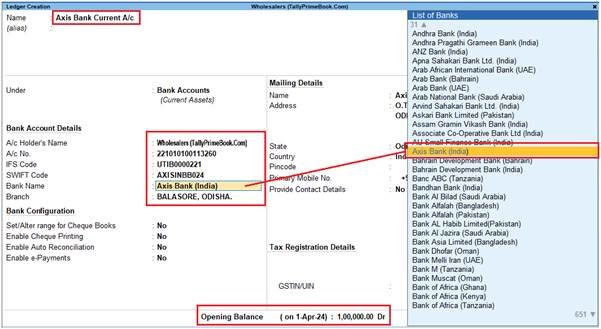
3.2.4. Creating Bank Account Ledgers in TallyPrime
Bank ledgers contain relevant information about a bank that you use to make or receive payments. You can provide information such as Bank name, Account no., IFS code, and address while creating bank ledgers.
To create a bank ledger
1. Gateway of Tally > Create > type or select Ledger and press Enter.
Alternatively, press Alt+G (Go To) > Create Master > type or select Ledger and press Enter.
2. Enter the Name of the bank for the bank ledger.
3. Select Bank Account from the List of Groups, in the Under field.
Note: The Books Beginning date is pre-filled in Effective Date for Reconciliation field.
4. Provide the following details in Bank Accounts details:
o A/C holder’s name – It prefills the company name; however, you can alter this name by pressing Backspace.
o A/c no. – Provide the account number of your bank.
o IFS code – Provide the IFS code for your bank.
Note: If the IFS code in incorrect, the system prompts the warning message “Invalid IFS Code. The IFS Code must contain 4 alphabets, followed by 0 and 6 numbers/alphabets. For example, UTIB0000221.”
o Bank name – Select the bank name from the List of Banks.
The Ledger Creation screen appears as shown below:
[38- Accounting Setup-TallyPrime Book]
Note: The List of Banks is displayed only when TSS and internet connectivity is available. Additionally, the Bank Configuration displays options that are applicable for the bank you select.
[Practical Assignment-3]
Creation of Bank Account
Create the following Bank Ledger with Opening Balances given:
| Opening Balance | |
| Bank Account (Group)
Axis Bank Current A/c SBI Current A/c |
1,00,000 50,000 |
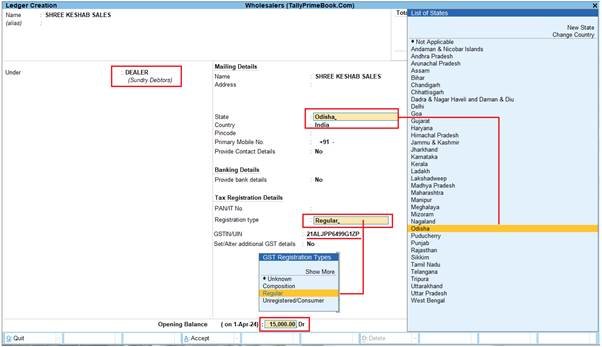
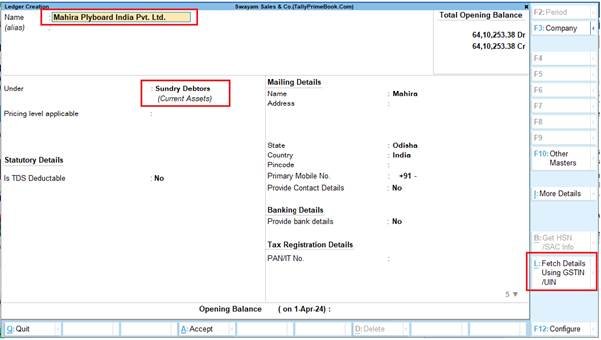
3.2.5. Creating Party Ledgers (Sundry Debtor / Sundry Creditor)
A business deals with customers, wholesalers, retailers, Suppliers and many such business parties on a day-to-day basis. You need to create party ledgers to record transactions that you make, which may involve Sales , Purchase, Receipts or Payments, or Sales or Purchase from these parties.
To create a Party Ledger:
1. Gateway of Tally > Create > type or select Ledger and press Enter.
Alternatively, press Alt+G (Go To) > Create Master > type or select Ledger and press Enter.
2. Enter the Name of the Party ledger
3. Select Sundry Creditors / Sundry Creditors from the List of Groups in the Under field.
4. In Mailing details, the State is your default local State. You can change name of State from the State List if your Suppliers belongs to Outside State.
![]()
[39– Accounting Setup-TallyPrime Book]
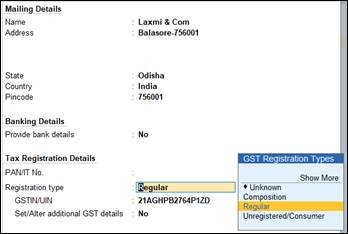
5. Enable the option Tax Registration Details? .
o Select the relevant Registration Type from the List of registration Types.
o Enter the 15-digit GSTIN or UIN issued by the tax authority.
o If the supplier is an e-commerce operator, then enable the option Behave as e-Commerce Operator?
The GST Details screen appears as shown below:

[40– Accounting Setup-TallyPrime Book]
o Press Ctrl+A to accept.
The Ledger Creation screen displays as shown below:
[41- Accounting Setup-TallyPrime Book]
Important Points:
- GST involves within State (Local) and Outside State (Outside).
- GST within State transactions are classified into CGST & SGST & Outside State transaction is IGST.
- TallyPrime will select CGST , SGST (with state transaction) or IGST (outside State transaction) on the basis of Party Ledger Address i.e. State & Party Registration type i.e. Composition or Consumer or Regular or Unregistered/Consumer. If Party is Registered either under Composition or Regular, then GSTIN / UIN No. has to be mentioned. TallyPrime will validate the GSTIN / UIN No. on the basis of State selection under Mailing details.
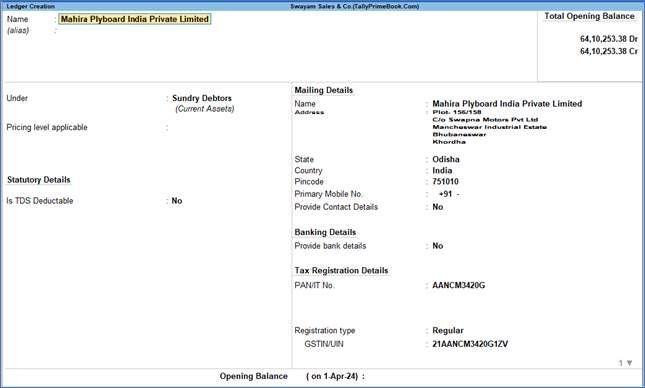
- So the most important part at the time creation of Party Ledger is its selection of State in Mailing Address and type of Registration under Tax Registration Details as per screen below:
[42- Accounting Setup-TallyPrime Book]
- TallyPrime will calculate GST automatically on the basis of GST Rate given in Items & Goods in case of Accounts with Inventory and in case of Accounts only GST Rate given in Sales or Purchase Ledger:
3.2.6. Directly Create Party Ledgers Using GSTIN/UIN (Rel.5)
You can now create or alter your party ledgers at the click of a button. With the help of the Fetch Details Using GSTIN/UIN button, you can instantly fetch the party details available on the GST portal and update it directly in the party ledger.
However, you also have the flexibility to create your party ledgers offline or manually, as per your business preferences.
The Fetch Details Using GSTIN/UIN feature will significantly save your time and effort, as you don’t have to manually type any of the details of the party, apart from the GSTIN/UIN at the beginning.
You won’t have to worry about the correctness or recency of the information, as it is being fetched in real time from the portal. You will be able to view and update all the available information about your party, starting from the name to the address details, such as state, area and pincode, and also the PAN.
1. Gateway of Tally > Create/Alter > Ledger.
[43- Accounting Setup-TallyPrime Book]
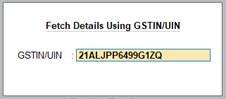
2. Press Alt+L (Fetch Details Using GSTIN/UIN).
3. Enter the GSTIN/UIN of the party.
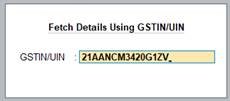
[44- Accounting Setup-TallyPrime Book]
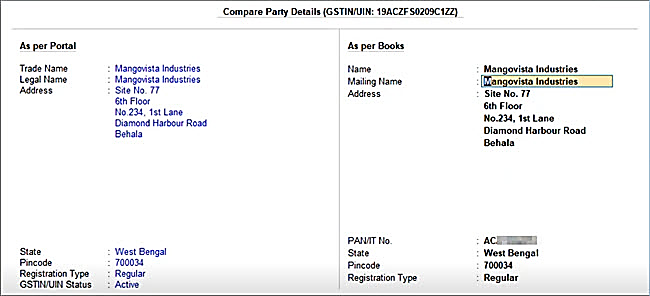
The Compare Party Details screen appears, where you can view the party details, such as address, PAN, and registration type & status, as available in real-time on the portal.
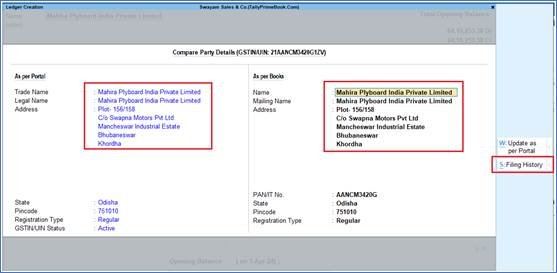
[45- Accounting Setup-TallyPrime Book]
You can make any changes in the above details, if needed. For example, if the GST registration of the party was cancelled, then you can set the Registration Type as Unregistered/Consumer.
4. Press Alt+S (Filing History), if you want to view additional details about the party.
[46- Accounting Setup-TallyPrime Book]
5. Press Ctrl+A to save the details.
In the Ledger Creation/Alteration screen, you can see the fetched details are filled in the respective fields.
You only have to select the relevant group (such as Sundry Creditors/Debtors) and enter the phone number.
[47- Accounting Setup-TallyPrime Book]
6. Press Ctrl+A to save the party ledger.
Similarly, you can update the details of an existing party by just entering the GSTIN/UIN and saving the fetched details.
You are all set to pass your transactions using this newly created or updated party.
3.2.7. Online GSTIN Validation in TallyPrime for single Party Ledger (Rel.5)
Whenever you do business with a new party, you can validate the GSTIN/UIN information provided by the party. It is recommended to validate GSTIN information while creating or right after creating a party ledger. It ensures that the information entered in the Party ledger is authentic, and you can then make corrections immediately if needed.
However, you may want to verify the information for a specific party at any point in time. In such cases, you can validate GSTIN online for a party from the Party ledger.
But before that, ensure that the pre-requisites for online GSTIN validation in TallyPrime are fulfilled.
Thereafter, follow the steps given below for GSTIN validation from the Party ledger.
1. Gateway of Tally > Alter > Ledger > type or select the Party, and press Enter.
The Ledger Alteration screen appears.
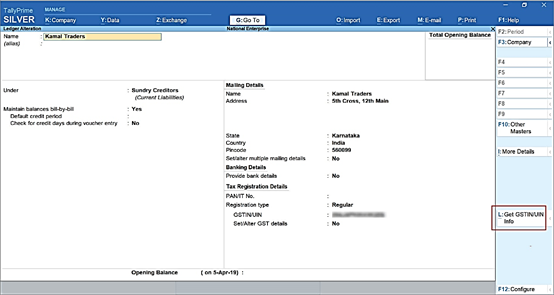
[48- Accounting Setup-TallyPrime Book]
2. Press Alt+L (Get GSTIN/UIN Info).
A confirmation screen appears.
3. Press Y (Yes) to accept.
The e-Invoice Login or e-Way Bill Login screen appears, based on the feature that is enabled. If both the features are enabled in the Company, then the e-Invoice Login screen appears.
4. Enter your Username and Password, and press Enter.
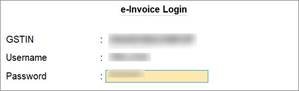
[49- Accounting Setup-TallyPrime Book]
If you have login credentials of multiple GST registrations, then you can use e-Invoice Login or e-Way Bill Login credentials of any of the GST registrations.
TallyPrime exchanges information with the portal.
The screen Get GSTIN/UIN Info for the GST number of the party appears as shown below.
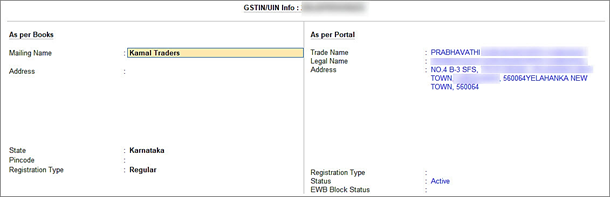
[50- Accounting Setup-TallyPrime Book]
| Note :
If the GST number entered in the party ledger is wrong or invalid, then the NIC portal will not retrieve the data for the GSTIN. On the As per Portal side, Could not retrieve data will be displayed. You will need to enter the correct GST number and you then can validate other details. |
The information fetched from the portal to TallyPrime is detailed under the column As per Portal. You can verify the information such as Mailing Name and Address entered in the party ledger and make corrections if needed.
Furthermore, the screen also provides information related to Registration Type and Status.
3.2.8. View the Filing History of a Party Ledger (Rel.5)
TallyPrime also provides you with the flexibility to view the filing details of the party, while creating or updating ledgers using GSTIN/UIN. You can view additional details of the party such as e-Invoice applicability, the jurisdiction, the nature of business, and any additional place of business.
Further, you can view the filing details of the last six months, which covers the Return Period as well the date, the mode and the status of return filing. The best part is that the filing details will be fetched based on the party’s registration type. For example, if the party is a Regular dealer, then you can see the filing details for GSTR-1 and GSTR-3B. On the other hand, if the party is a Composition dealer, then you can see the filing details for CMP-08.
In this way, the detailed information about the party will help you in taking key compliance and business decisions, and also foster better communication and understanding with other businesses in your network.
1. Gateway of Tally > Create/Alter > Ledger.
2. Press Alt+L (Fetch Details Using GSTIN/UIN).
3. Enter the GSTIN/UIN of the party.
[51- Accounting Setup-TallyPrime Book]
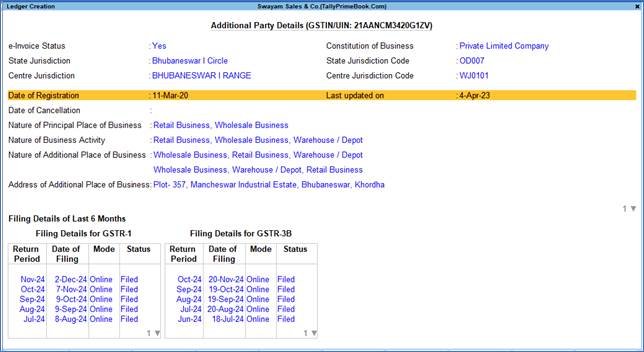
4. In the Compare Party Details screen, press Alt+S (Filing History).
[52- Accounting Setup-TallyPrime Book]
The Additional Party Details screen appears, where you can view the filing details of the party, such as e-Invoice applicability, the jurisdiction, the nature of business, and the filing details of the last six months.
In this way, you can refer to the detailed information about the party and take accurate business decisions.
[Practical Assignment-4]
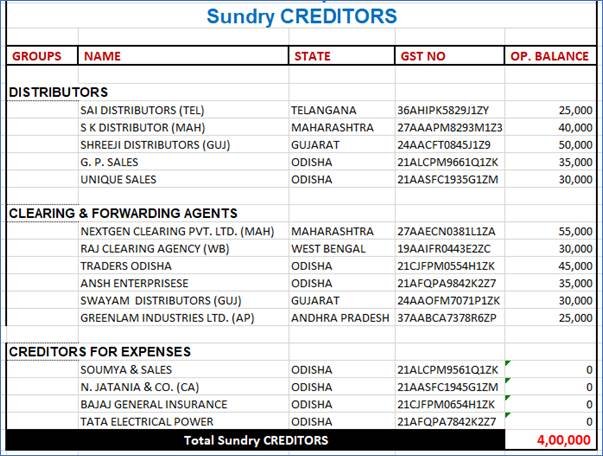
Creation of Debtors and Creditors
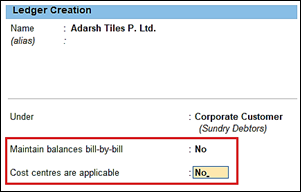
Create the following Sundry Debtor and Sundry Creditor Party Ledgers (without Bill-by-Bill, Credit Period & Cost Centre) with all information given:
Note :
Maintain Bill by Bill, Credit Period, Cost Centre options should be NO… [ under F11-Features]
[53- Accounting Setup-TallyPrime Book]

[54- Accounting Setup-TallyPrime Book]
[55- Accounting Setup-TallyPrime Book]
3.2.9. Creating GST Ledger (CGST / SGST / IGST) under Duty and Taxes Group.
Tax Ledgers should be created under Duties and Taxes group which contains all tax accounts like GST, and other trade taxes and total liability.
To account for the different taxes to be paid under GST (central tax, state tax, union territory tax, integrated tax, and cess), you have to create a tax ledger for each tax type.
The following GST Ledgers will be created :
i. SGST [ State Tax for both Purchase and Sale within State ]
ii. CGST [ Central Tax for both Purchase and Sale within State ]
iii. IGST [ Integrated Tax for both Purchase and Sale Outside State]
To create ‘SGST’ ledger
1. Gateway of Tally > Create > type or select Ledger and press Enter.
Alternatively, press Alt+G (Go To) > Create Master > type or select Ledger and press Enter.
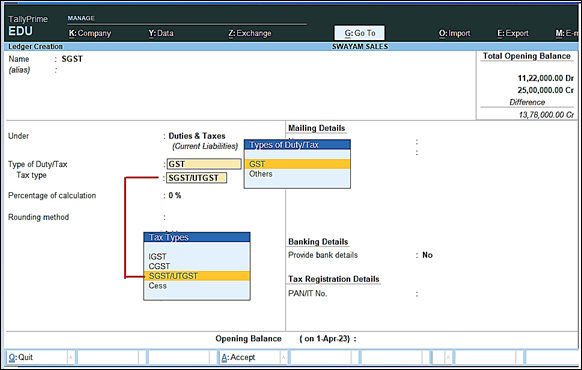
[56- Accounting Setup-TallyPrime Book]
2. In Under, select Duties & Taxes.
3. Select GST as the Type of duty/tax.
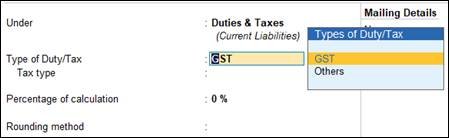
[57– Accounting Setup-TallyPrime Book]
4. Select State Tax as the Tax type.
Note : Percentage of Calculation should be 0% ( Don’t Change ) due to multiple Tax Rate
Similarly, you can create ledgers CGST & IGST by selecting the relevant Tax type under GST.
For CGST Ledger :
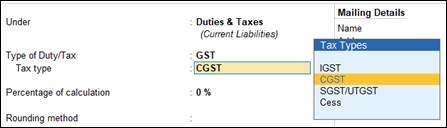
[58– Accounting Setup-TallyPrime Book]
For IGST Ledger :
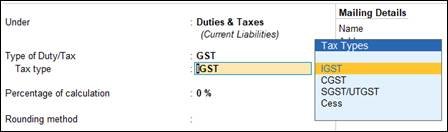
[59– Accounting Setup-TallyPrime Book]
[Practical Assignment- 5]
Creation of GST Ledger
Create the following GST Ledgers under Duties and Taxes (Pre-defined Group) :
| Duties & Taxes:
CGST SGST IGST |
3.2.10. Creating Sales and Purchase Ledgers for GST Compliance:
If many items you sell have the same tax rate, specify the tax rate and other GST details in your sales ledger. Similarly, if the items you purchase have the same tax rates, update your purchase ledger.
If you sell items with multiple tax rates, you can still maintain a single Sales Ledger for both within and outside State Sales, and record all GST details at the stock item or stock group level. You can create a single Purchase Ledger both for within as well as outside State Purchase, similarly.
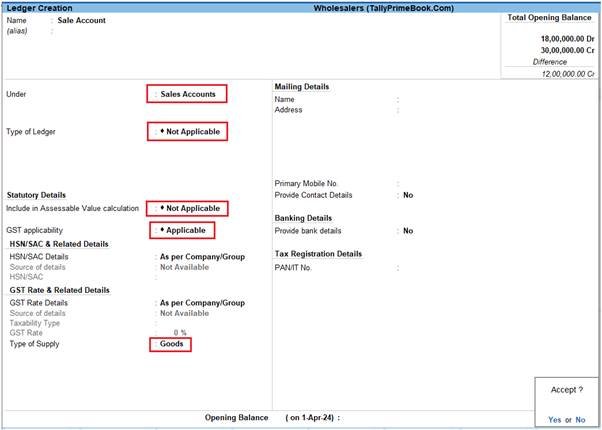
I. Creating a Sales Ledger: Sales-GST/IGST (both for Local & Outside State) or Sale A/c
To Create a Sales Ledger i.e. GST-Sales
1. Gateway of Tally > Create > type or select Ledger and press Enter.
Alternatively, press Alt+G (Go To) > Create Master > type or select Ledger and press Enter.
[60- Accounting Setup-TallyPrime Book]
2. Enter the Name of the Sales ledger i.e. Sale – GST/IGST (You can also Name – Sale A/c)
3. Select Sales Account from the List of Groups in the Under field.
4. Types of Ledger – Not Applicable.
5. Include in Assessable Value calculation (under Statutory Details) – Not Applicable
6. GST applicability – Applicable
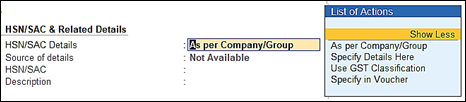
7. HSN/SAC & Related Details: Select As per Company/Group
You have three options to choose from.
[61- Accounting Setup-TallyPrime Book]
Specify Details Here: Once you select this option, you will be able to enter the details right here in Company GST Details.
Use GST Classification: This option allows you to select a previously created GST Classification, or create one on the spot. The details will be applied accordingly.
Specify in Voucher: If you are not aware of the details at the moment, and if you want to add the details directly in the transaction, then you can select this option.
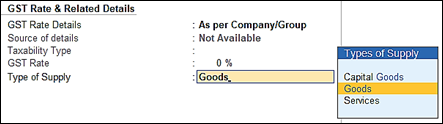
8. GST Rate Details: Select As per Company/Group
Like in the previous field (HSN/SAC Details), you have the same three options to choose from.
Don’t specify the details in the GST Details because GST Rate specified in all Items will automatically Calculate the CGST and SGST as well as IGST,.
9. Select the Type of supply. By default the type of supply is set to Goods.
[62- Accounting Setup-TallyPrime Book]
10. Press Ctrl + A to save.
[ Note : Only one Ledger i.e. Sale-GST/IGST (or Sale A/c) will be created for all type of GST Sales ]
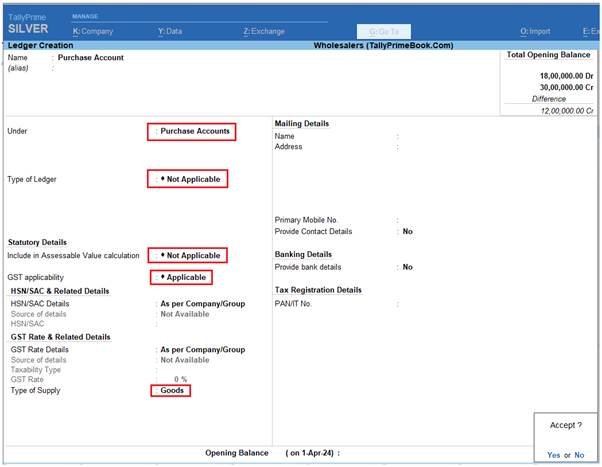
II. Creating a Purchase Ledger: Purchase-GST/IGST (both for Local & Outside State) or Purchase A/c
To Create a Purchase Ledger i.e. Purchase-GST/IGST
Follow the steps used for Creating the Sales Ledger i.e. Sales-GST/IGST as above.
To Create a Purchase Ledger i.e. Purchase-GST/IGST
1. Gateway of Tally > Create > type or select Ledger and press Enter.
Alternatively, press Alt+G (Go To) > Create Master > type or select Ledger and press Enter.
[63- Accounting Setup-TallyPrime Book]
2. Enter the Name of the Sales ledger i.e. Purchase – GST/IGST
3. Select Purchase Account from the List of Groups in the Under field.
4. Types of Ledger – Not Applicable.
5. Include in Assessable Value calculation (under Statutory Details) – Not Applicable
6. GST applicability – Applicable
7. HSN/SAC & Related Details: Select As per Company/Group
8. GST Rate Details: Select As per Company/Group
9. Select the Type of supply. By default the type of supply is set to Goods.
10. Press Ctrl + A to save.
[Practical Assignment- 6]
Creation of Sales & Purchase Ledger
Create the following Purchase & Sales Ledgers:
| Sales Account:
Sale – GST/IGST Purchase Account: Purchase – GST/IGST |
3.2.11. Creating Expenses and Income Ledgers without GST Compliance
You can select the income or expenses account group to create ledgers.
To create an Expense Ledger:
1. Gateway of Tally > Create > type or select Ledger and press Enter.
Alternatively, press Alt+G (Go To) > Create Master > type or select Ledger and press Enter.
2. Enter the name of the ledger in the Name field.
3. Select Indirect Expenses from the List of Groups in the Under field.
Note: Select Indirect Income from the List of Groups if you want to create an income ledger.
The expense Ledger Creation screen appears as shown below:
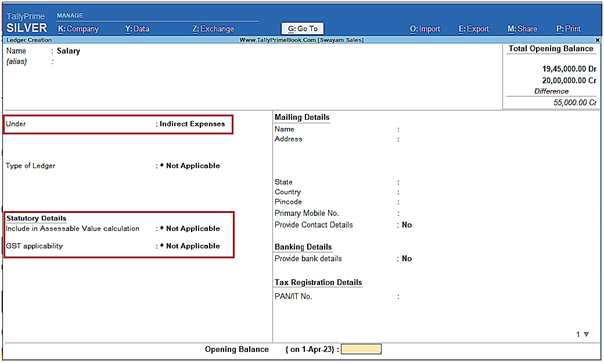
[64- Accounting Setup-TallyPrime Book]
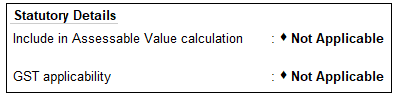
4. Regarding Statutory Details, GST should be Not Applicable , as well as the Option ‘Include in assessable value calculation for’ should be Not Applicable as white marked above.
5. Press Ctrl+A to accept.
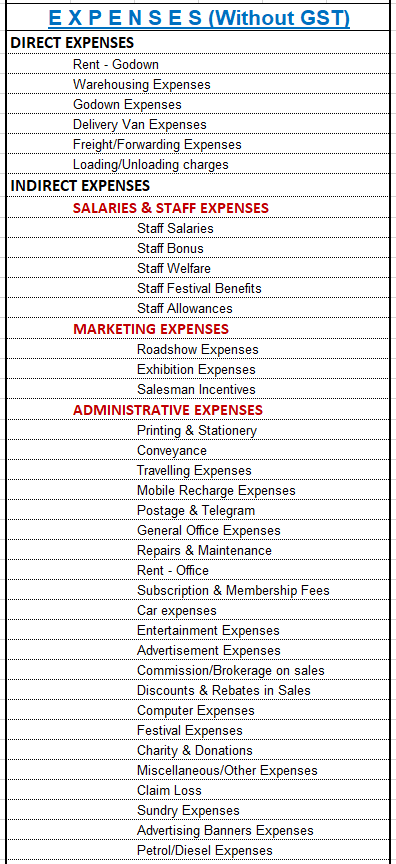
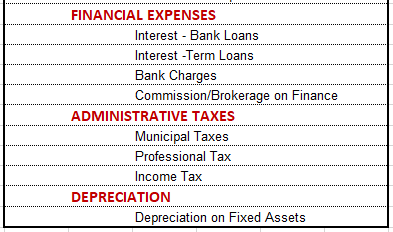
[Practical Assignment- 7]
Creation of Income & Expenses Ledger without GST Compliance
Create the following Incomes and Expenses Ledgers as per given Groups… (without Opening Bal. & Cost Center) –GST Not Applicable under Statutory Details :
[65- Accounting Setup-TallyPrime Book]
[66- Accounting Setup-TallyPrime Book]
[67- Accounting Setup-TallyPrime Book]
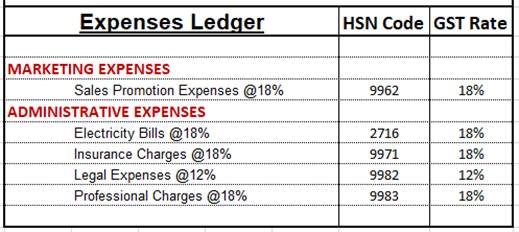
3.2.12. Expenses Ledger with GST Compliance
You have to create the Expenses Ledger with GST Applicable and with all GST Details like Nature of Transactions, Taxability, GST Rate etc. etc.
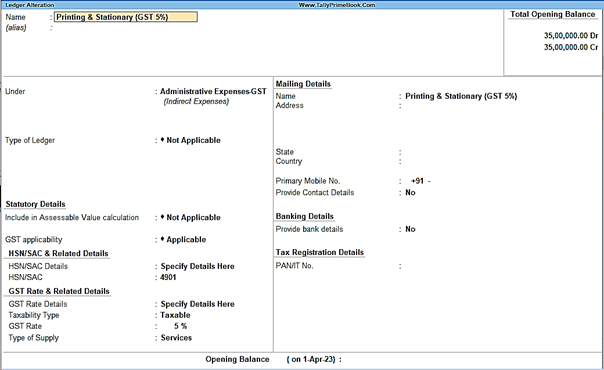
Say, for example, create a Expenses Ledger ‘Printing and Stationary’ which attracts GST 5% as below:
1. Press Alt+G (Go To) > Create Master > Ledger and press Enter.
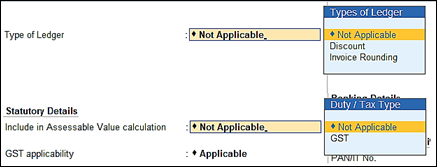
2. Enter the Name and group it under ‘Administrative Expenses-GST’ (Indirect Expenses).
3. Select the Type of Ledgeras Not Applicable and Include in Assessable Value Calculation as Not Applicable.
[68- Accounting Setup-TallyPrime Book]
4. Set GST Applicability to Applicable and enter the HSN/SAC & Related Details as required.
5. Under GST Rate & Related Details, enter the required details and set Nature of Transaction as applicable.

[69- Accounting Setup-TallyPrime Book]
6. Select the Type of Supply as required.
Services, if the ledger is used to record sale of service. By default, the type of supply is set to Services.
Goods, if the ledger is used to record sale of goods.

[70- Accounting Setup-TallyPrime Book]
[71- Accounting Setup-TallyPrime Book]
7. Accept the screen. As always, you can press Ctrl+Ato save the ledger.
[Practical Assignment- 8]
Creation of Expenses with GST Compliance
[72- Accounting Setup-TallyPrime Book]
3.2.13. Creating Service Ledger with GST Compliance
In case of Service oriented Business like…Chartered Accountant, Lawyer, Advertising Agency, Consultant, Architectures etc.. they provide Service to the customer and provide Bill / Invoice with GST Compliance. So in this case, TallyPrime provides Accounting Invoice with auto GST Calculations, provided all Service Ledgers has to be created with GST Rate ( as applicable).
For Example:
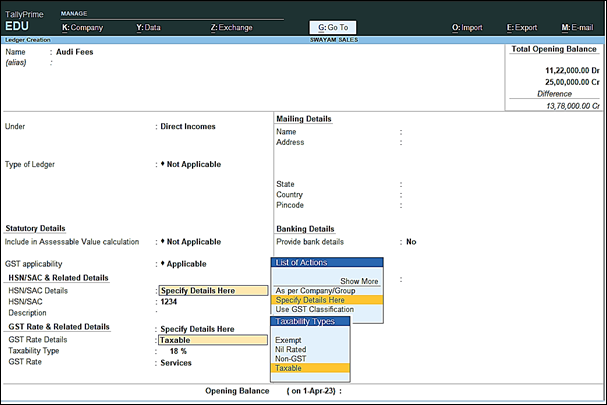
Create a Ledger – Audit Fee with GST 18%
Setup:
Create a Ledger, ‘Audit Fee’ under Direct Income with GST Applicable and the GST details will be applied seamlessly, with Type of Supply – Service as per screen below:
[73- Accounting Setup-TallyPrime Book]
1. Press Alt+G(Go To) > Create/Alter Master > Ledger (under Accounting Master).
Alternatively, go to Gateway of Tally > Create/Alter > Ledger.
2. Select the required service ledgerfrom the List of Ledgers, or create a new one, as needed.
3. Fill in the relevant details for HSN/SAC and GST.
a. HSN/SAC Details: You have three options to choose from.
i. Specify Details Here: Once you select this option, you will be able to enter the details right here in the service ledger.

[74- Accounting Setup-TallyPrime Book]
ii. Use GST Classification: This option allows you to select a previously created GST Classification, or create one on the spot. The details will be applied accordingly.
iii. Specify in Voucher: If you are not aware of the details at the moment, and if you want to add the details directly in the transaction, then you can select this option.
b. GST Rate Details: Like in the previous field (HSN/SAC Details), you have the same three options to choose from.
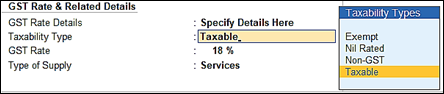
[75- Accounting Setup-TallyPrime Book]
[Select Sales Exempt , if the type of supply is exempted from tax under GST, or select Sales Nil Rated , if the tax rate applicable to the type of supply is 0% under GST.]
4. Type of supply – Services .

[76– Accounting Setup-TallyPrime Book]
5. Press Ctrl + A to save.
[Practical Assignment- 9]
Creation of Service Ledger with GST Compliance
Create the following Service Ledger under Services (GST) group which comes under Direct Income with GST Compliance :
| Services (GST) | GST Rate |
| Service Charges (12%) | 12% |
| Installation Charges (5%) | 5% |
| AMC Charges (18%) | 18% |
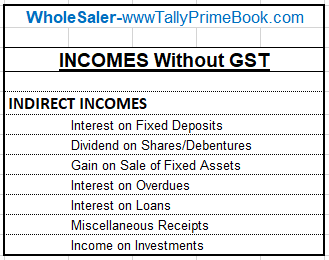
3.2.14. Incomes Ledger without GST Compliance
You can select the income account group to create ledgers.
To create an Income Ledger (Without GST):
1. Gateway of Tally > Create > type or select Ledger and press Enter.
2. Enter the name of the ledger in the Name field.
3. Select Indirect Income from the List of Groups .
The Income Ledger Creation screen appears as shown below:
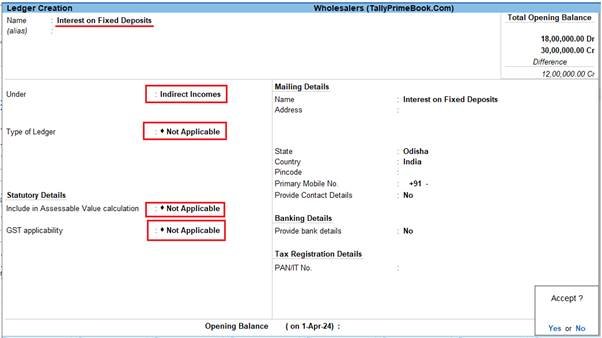
[77– Accounting Setup-TallyPrime Book]
4. Regarding Statutory Details, GST should be Not Applicable , as well as the Option ‘Include in assessable value calculation for’ should be Not Applicable as white marked above.
5. Press Ctrl+A to accept.
[Practical Assignment- 10]
Creation of Income Ledger without GST Compliance
[78- Accounting Setup-TallyPrime Book]
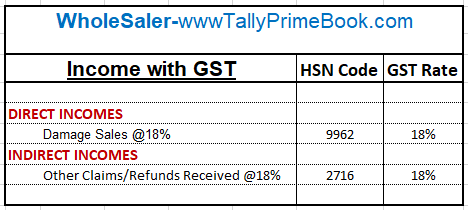
3.2.15. Income Ledger with GST Compliance
You have to create the Incomes Ledger with GST Applicable and with all GST Details like Nature of Transactions, Taxability, GST Rate etc. etc.
Say, for example, create an Incomes Ledger ‘Discount on Purchase@18%’ which attracts GST 18% under Direct Incomes as below:
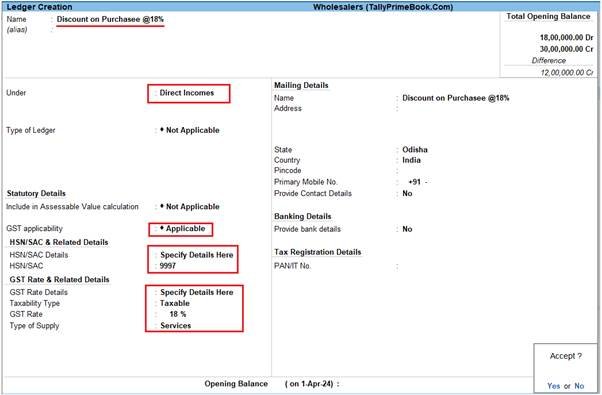
[79- Accounting Setup-TallyPrime Book]
[Practical Assignment- 11]
Creation of Income Ledger with GST Compliance
[80- Accounting Setup-TallyPrime Book]
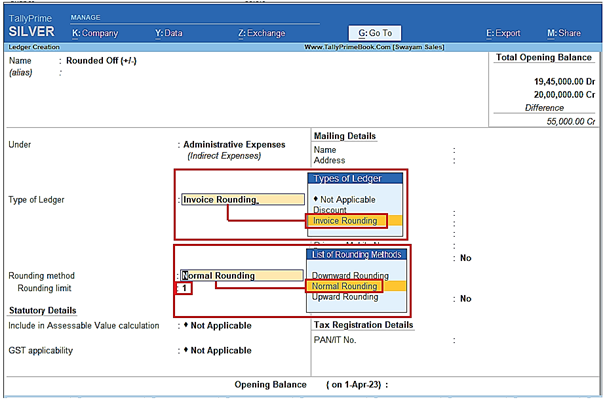
3.2.16. Creation of Ledger ‘Rounded off (+/-)’ for rounding the Invoice Value automatically.
You can create a Ledger ‘Rounded off (+/-)’ to round-off the invoice value automatically.
1. Gateway of Tally > Create > type or select Ledger and press Enter.
Alternatively, press Alt+G (Go To) > Create Master > type or select Ledger and press Enter.
| Note : If you already created the given Ledger Rounded Off (+/-), you can alter as below |
[81- Accounting Setup-TallyPrime Book]
2. Set Type of Ledger? as Invoice Rounding .
3. Select the Rounding method as Normal Rounding and enter the Rounding limit to 1 .
4. Under Statutory Information, all options should be set to Not Applicable .
3.2.17. Ledger of Additional Charges/ Discount etc. included in Assessable Value for GST Calculation
Some Purchase Voucher includes some Additional Charges like…Delivery Charges, Insurance Charges, Installation Charges, Rounded Off, Discount on Purchase etc.. etc..
The main situation is that whether all those additional charges are charged before GST or after GST. If those Expenses charged before GST, then all those Expenses should be created under Direct Expenses with GST Not Applicable, but it must be “Include in Assessable Value Calculation” for GST with Appropriation to Goods & Method of valuation should be Based on Value.. as given below screen :
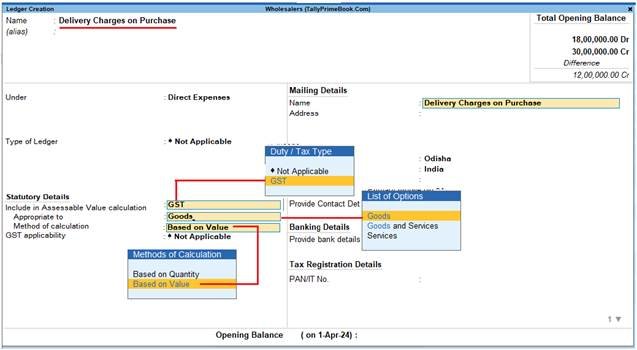
[82- Accounting Setup-TallyPrime Book]
[Practical Assignment- 12]
Creation of Ledgers included in Assessable Value for GST Calculation in Purchase Bill
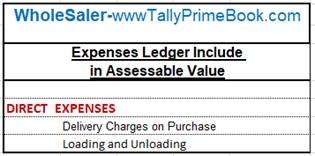
[83- Accounting Setup-TallyPrime Book]
3.2.18. Creation of Additional Charges Ledger without Inclusion in Assessable Value for GST Calculation in Purchase Bill
Ledger creation will be as below ( with Not applicable in all cases and should be under Direct Expenses Account Group)
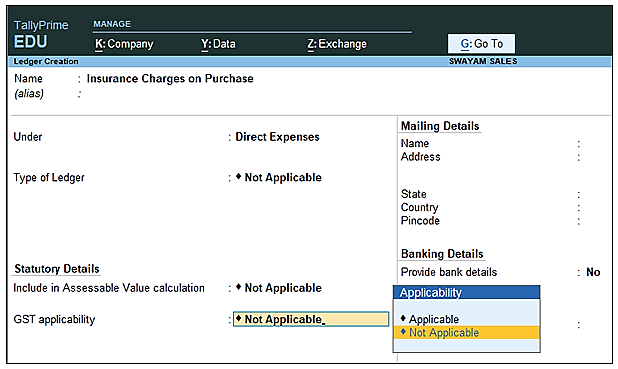
[84- Accounting Setup-TallyPrime Book]
Ledger Creation: ‘Insurance on Purchase’ & ‘Discount on Purchase’
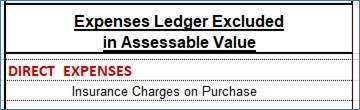
[Practical Assignment- 13]
Creation of Ledgers Excluded in Assessable Value for GST Calculation in Purchase Bill
[85- Accounting Setup-TallyPrime Book]
3.2.19. Ledger for RCM (Reverse Charge Mechanism)
Reverse Charge Mechanism (RCM) means that GST shall be paid and deposited with the Government by. recipient of Goods / Services and not by Supplier of Goods / Services. As per normal mechanism of levy of GST, the Receiver of Goods / Services pays GST to the Supplier and such supplier then deposits GST with the Government.
In case you avail services such as legal services, security, or services by an insurance agent to any person carrying on insurance business, configure the service ledger as applicable for reverse charge.
Example :
Create a Ledger “Transportation Charges on Purchase (RCM)” with RCM GST Rate 5% and HSN Code-9982
1. Press Alt+G (Go To) > Alter or Create Master > Ledger > type or select the name of the ledger ‘Transportation Charges on Purchase (RCM)’ and press Enter.
2. Configure for Reverse Charge applicability.
a. Specify the required GST Rate Details.
b. Applicable for Reverse Charge: Yes.
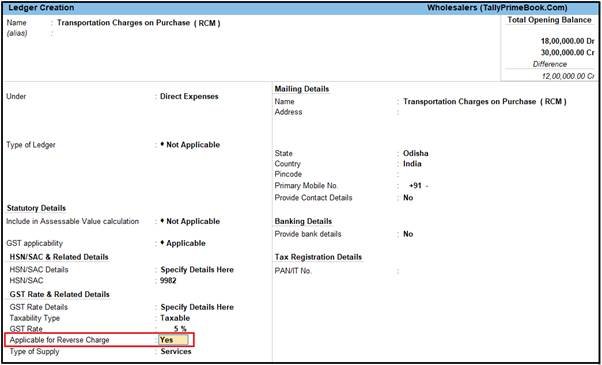
[86- Accounting Setup-TallyPrime Book]
[ If you do not see this option, then press F12 (Configure) and set Enable Reverse Charge calculation to Yes.]
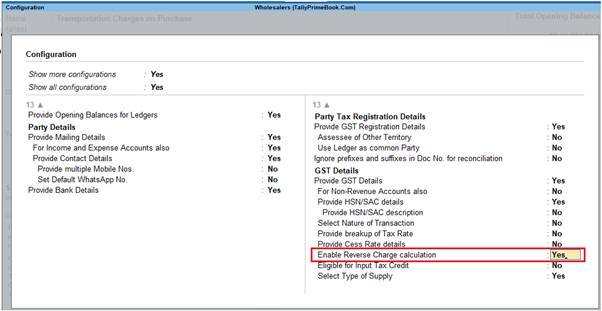
[87- Accounting Setup-TallyPrime Book]
3. Press Ctrl+A to save.