Create a New Company doing business of FMCG with following Information …
Swayam Agency (A Div. of TallyPrimeBook.Com) is one Distributor/Dealer in Balasore, Odisha, with GSTN No – 21AGHPB2764P1ZD deals with both Whole selling & Trading of different types of Products like … Electronics, Electrical Home Appliance, Mobiles, Personal & Essential Products etc. etc. with the following information’s and will maintain his Books of Accounts with the help of TallyPrime Accounting Software with effect from 01-04-2024.
Swayam Agency (www.TallyPrimeBook.Com)
Balasore, Odisha – 756001 (India)
GSTN – 21AGHPB2764P1ZD
Mob – 9437264738
Website : www.tallyprimebook.com
eMail ID : order@tallyprimebook.com
Financial Year begins from : 1-4-2024
Books beginning from : 1-4-2024
| Note :
Your can change your Local State with your GST No. DUE TO GST TRANSACTIONS. If your put your local state, all GST transaction with in your state will be CGST & SGST. So while creating Sundry Debtor or Sundry Creditor or any other Credit Party, their State and GST No. depends your within State transactions or Outside State Transaction. |
1.1. Company Creation:
You can create a Company profile by using the following procedure :
1. Press Alt+K > Create.

[1-Company Setup-TallyPrime Book]
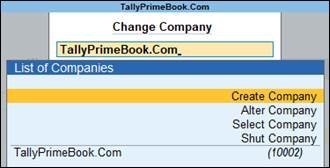
Alternatively, at the Gateway of Tally, press F3 > Company > Create Company
[2-Company Setup-TallyPrime Book]
The Company Creation screen appears.
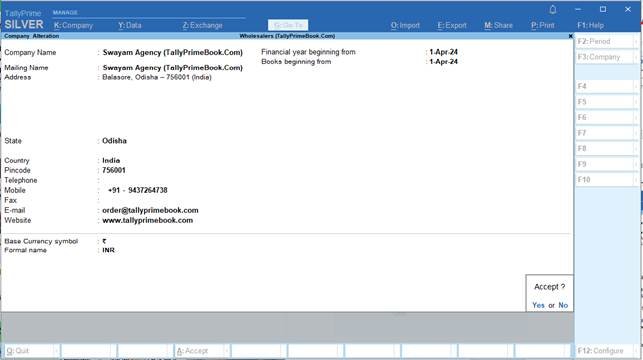
[3-Company Setup-TallyPrime Book]
Note :
In case you want to specify additional details for your Company, press F12 on the Company Creation screen.
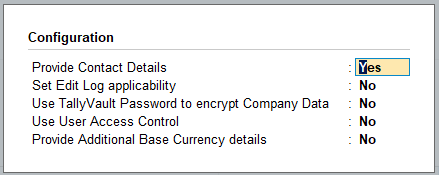
[4-Company Setup-TallyPrime Book]
F12 Configure options
- Provide Contact Details – To show the options to capture the company contact details.
- Set Edit Log Applicability : This is optional, available from TallyPrime Release 2.1 onwards. You can enable Set Edit Log applicability under F12 and enable Edit Log for the Company. This will help you to view Edit Log for the future activities that you will perform in masters and transactions.
- Use TallyVault Password to encrypt Company Data – To show the option to set TallyVault Password.
- Use User Access Control – To show the option to enable user-based access to the Company.
- Provide Additional Base Currency details – To show options to specify additional details of the Base Currency.
Finally, confirm company creation by pressing the ENTER key/ “Y” key or Ctrl+A to accept all declaration for the Company.
Saving the company takes you to the Company Features screen, which displays that the company is created successfully.
1. Enable the required features for your Company.
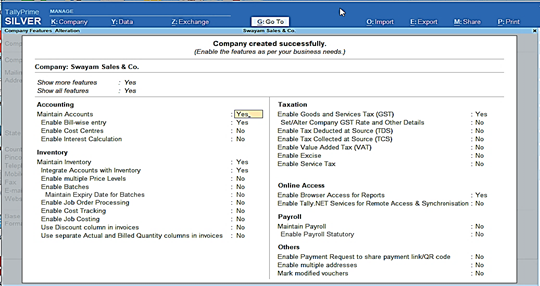
[5-Company Setup-TallyPrime Book]
You can enable or disable any of these features later.
2. Press Ctrl+A to save the selected features.
You can press Esc thrice to close the features screen, if you do not need to change any.
Books and Financial Year Details:

- Financial year begins from : TallyPrime pre-fills this field based on the date settings of your computer and the Country selected in the Company Creation
For example, if your computer date is set to 06-06-2024 and the region is set to India, the financial year is pre-filled as 01-04-2024.
- Books beginning from : By default, TallyPrime fills this field with the Financial year begins from You can update this, as needed.
For example, you started to maintain your Books of Accounts in TallyPrime from 1-June-2024. You can update the Books beginning from date to 1-June-2024, while the financial year will be 1-Apr-2024.
(Now you will be able to work with the Current Company)
The first Screen is called Gateway of Tally (Home Screen).
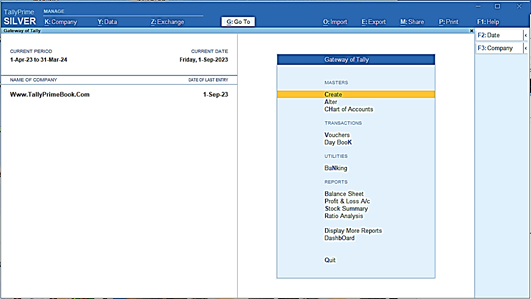
[6-Company Setup-TallyPrime Book]
Top Menu :
![]()
[7-Company Setup-TallyPrime Book]
Top Menu has options to manage your Companies, TallyPrime application, users in your Companies, and your data storage & sharing. This menu and child items in the menu are accessible from any screen in TallyPrime.
F1 : Help Menu ..
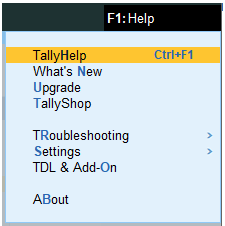
[8-Company Setup-TallyPrime Book]
Help menu has options to launch TallyHelp and to upgrade your application to a newer release of the product. Availability of a newer release is indicated with a red dot notification on the menu name Help. Other options under the Help menu include …
- What’s New,
- TallyShopfor buying add-ons,
- Troubleshootingto repair your application and data in case there are issues,
- Settingsto configure your application,
- TDL & Add-Onto manage your extensions/customisations, and an
- Aboutreport that shows the details of your TallyPrime installation and its environment.
G : Go To .. (Alt+G)

[9-Company Setup-TallyPrime Book]
- Go Tooption on the top menu helps you to quickly access any report or feature that you want to use.
- Any screen that you access using Go Towill open on top of the current screen, and closing the screen will take you back to the screen that was open earlier.
- You can use Alt+Gto access Go To.
Right-Button Bar :
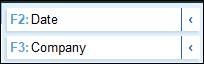
[10-Company Setup-TallyPrime Book]
Right Button Bar on the home screen of TallyPrime has two buttons F2: Date and F3: Company.
On pressing Alt key the options change to F2: Period and F3: Select Company.
Pressing Ctrl+F3 keys show the option Shut Company.
Alternatively, you can click the expand option, < next to each button to view the corresponding options.
Options on the right button bar change based on the screen that is open as per the actions relevant to the screen or the transaction you are working on.
However, the shortcuts associated with different options are consistent across masters, vouchers and reports. For example, F2 is always for date, Alt+F2 is for period, F10 in master screens is for Other Masters & voucher screens is for Other Vouchers, and Ctrl+B in reports is for Basis of Values.
In a similar manner, there are predefined list of buttons for different actions. Check different buttons when you are on different screens to know these options better.
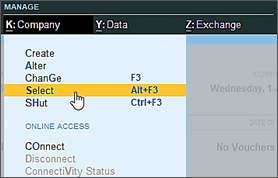
1.2. Opening (Loading) the Company in TallyPrime:
Once you have created a company, you can load/open the company in one of the following ways:
1. Press Alt+K > Select ( Alt+F3)
[11-Company Setup-TallyPrime Book]
Alternatively, at the Gateway of Tally, press Alt+F3 > Company > Select Company from the List of Companies.
If you have created more than one company, you can browse to the data path and select the required company to open.

[12-Company Setup-TallyPrime Book]
Load company on Start-up
If you wish to load one or more companies by default, whenever you open TallyPrime, you can configure the same.
1. Open the Startup Settings screen: Press F1 (Help) > Settings > Startup.
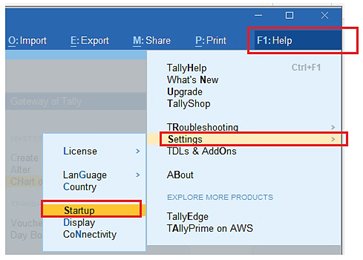
[13-Company Setup-TallyPrime Book]
2. Set the option Load companies on startup to Yes, and press Enter on Companies to load.
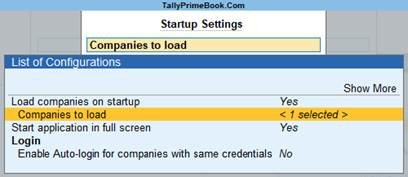
[14-Company Setup-TallyPrime Book]
3. In the List of Companies to Load on Startup screen, select one or more companies, based on your need.
4. Select End of List, after your have selected the companies to be loaded on startup.
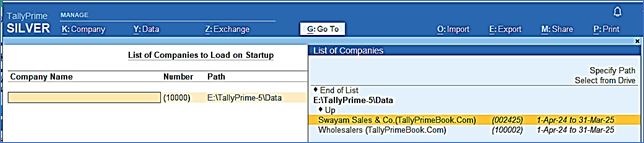
[15-Company Setup-TallyPrime Book]
The companies that you select here will be loaded by default next time you open TallyPrime.
1.3. Modification | Update | Alter Company Details | Delete Company
If your company address, phone number, or any other contact information was not provided earlier or has changed, you can update such details in TallyPrime. Any changes made to these details will be reflected accordingly in your reports and printed invoices.
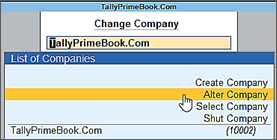
1. Press Alt+K > Alter
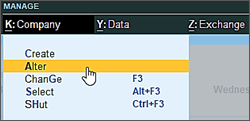
[16-Company Setup-TallyPrime Book]
Alternatively, at the Gateway of Tally, press F3 > Company > Alter Company
[17-Company Setup-TallyPrime Book]
If you do not need the company anymore, you can delete the company as well by pressing Alt+D in Company Alternation mode screen and Press Y (Yes).

[18-Company Setup-TallyPrime Book]