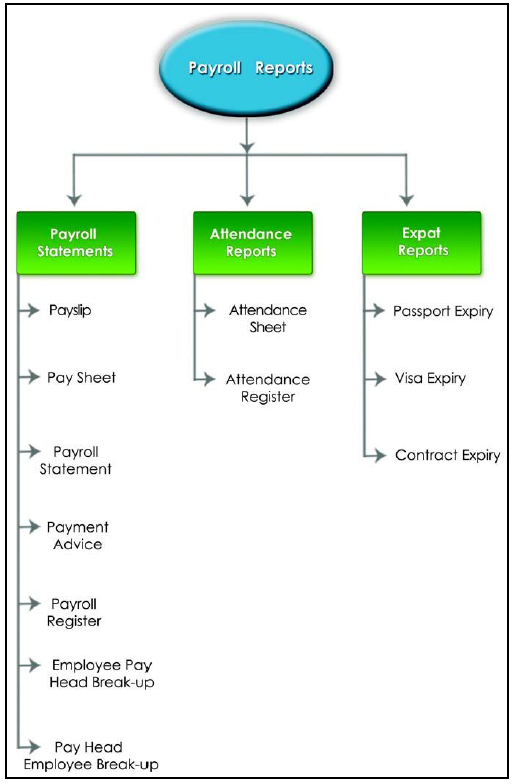
Payroll Reports help you ascertain the payroll expenses for a specified month or for year-to-date (YTD) transactions for a particular employee/ group along with the Attendance and Production details. You can also view the statutory forms required for Provident Fund and Employee State Insurance.
In TallyPrime 4, you can generate the following Payroll related reports.
Chart showing Payroll Reports in TallyPrime 4
[122-Payroll Management using TallyPrime]
We shall discuss each report in detail in the sections as explained below:
1. Single Pay Slip
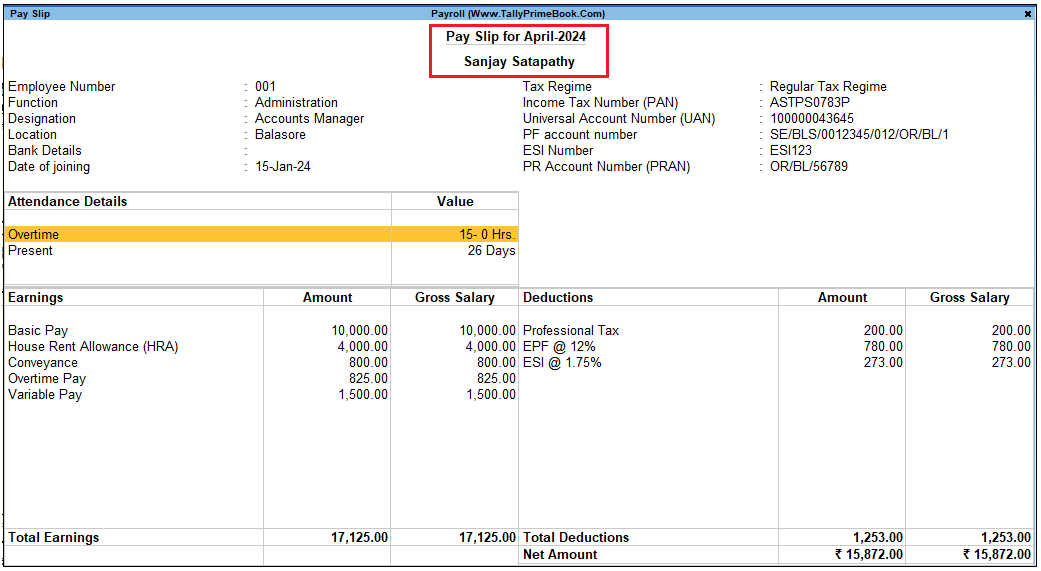
A Pay Slip in TallyPrime is a document issued to an employee that lists each component of earnings and deductions, and the net amount paid to an employee for a given pay period. It provides details on how the net amount has been arrived at. It also displays the tax regime of the employee that gives indication of the tax slab used for income tax calculation.
The Pay Slip option in TallyPrime facilitates the users to view the Pay Slip for individual Employees, Configure the Content and Appearance based on the requirement and then Print or Email the Pay Slip. Alternately, the user can also print or Email Pay Slips for all or selected Employees from the Pay Slip Menu.
You can view, print or e-mail the pay slips as:
- Single Pay Slips for single Employees
- Multi Pay Slips for all or selected Employees
A. Display Single Pay Slip
1. Gateway of Tally > Display More Reports > Payroll Reports> Pay Slip.
Single Pay Slip
2. Select the Employee whose Pay Slip you want to view.
3. Change the Period from 1-4-2024 to 30-4-2024 by Pressing Alt+F2
The Pay Slip for the selected employee (Sanjay Satapathy) for the month of April 2024 is displayed as shown:
[123-Payroll Management using TallyPrime]
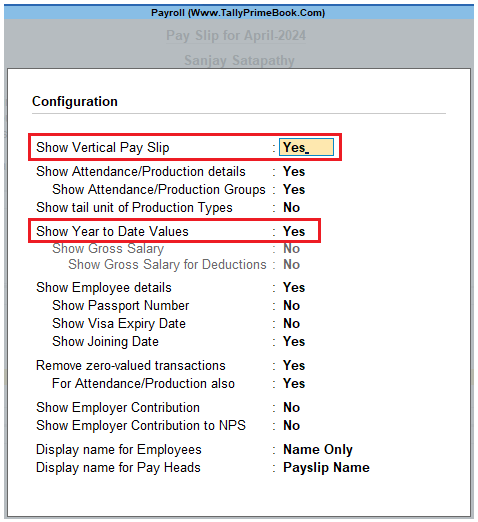
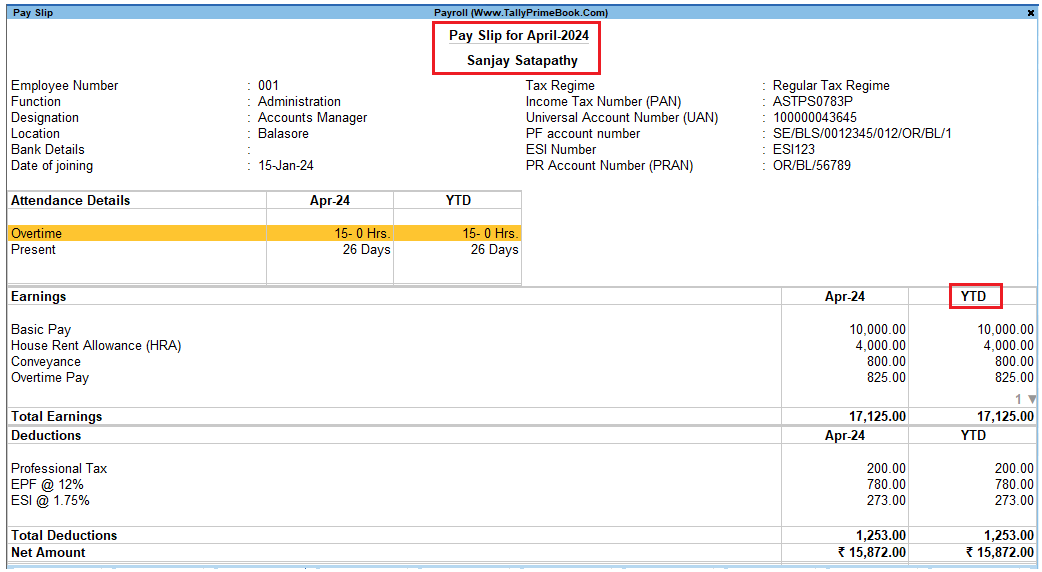
In TallyPrime 4 Payroll, the Pay Slip can be configured to Vertically Display the details of attendance, in terms of attendance or production, with Year to Date Values (YTD).
- Press F12: Configure and set the following options to Yes
[124-Payroll Management using TallyPrime]
The Pay Slip with the above configurations is displayed as shown:
[125-Payroll Management using TallyPrime]
- You can view additional information in the Pay Slip, by pressing Alt+F1.
The detailed Pay Slip is displayed as shown:

[126-Payroll Management using TallyPrime]
The voucher number, date and the number of attendance or payroll records are displayed as shown in the above image. This is very useful when multiple attendance/payroll vouchers are entered for the same payroll period. You can drill down to the voucher level for reference or to effect an alteration by pressing Enter on the required record.
B. Printing Single Pay Slip
- Press Ctrl+P (Print) from the Pay Slip display screen and press P (Print) to print the active Pay Slip. TallyPrime will print the Pay Slip in the format that is configured for display. The Printing Pay Slip screen appears as follows:
[127-Payroll Management using TallyPrime]
- Set the options as required and press Enter to print the pay slip.
The printed Pay Slip of Mr. Sanjay Satapathy is displayed as shown:

[128-Payroll Management using TallyPrime]
2. Multi Pay Slips
1. Gateway of Tally > Display More Reports > Payroll Reports > Pay Slip.
- Alternatively, press Alt+G (Go To) > type or select Multi Pay Slip > and press Enter.
2. Select the required Employee Category and Employee Group.
3. Press Enter.
4. Change the Period by Pressing Alt+F2
[129-Payroll Management using TallyPrime]
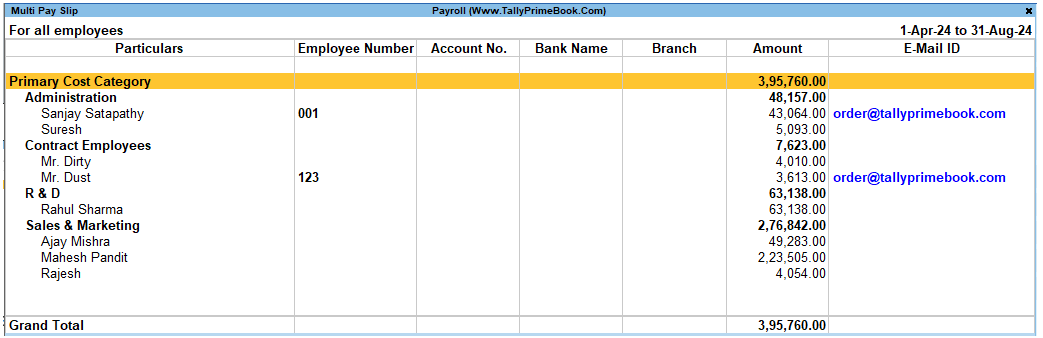
The Multi Pay Slip screen displays the Particulars, Employee Number, Account No., Bank Name & Branch, Amount and E-Mail ID for the Employees.
Press Enter on the Employee Names to view the Single Pay Slip for the selected Employee.
Button options in Multi Pay Slip Screen
- F2 (Period): press F2 to change the selected Period.
- F4 (Employee): press F4 to view Employee Filters screen, this report to select Payroll Category and Employee/Employee Groups.
- F5 (Employee-wise): press F5 to view the report without the details of the Payroll Category and Employee Groups.
- Ctrl+H (Change View): You can display the details of a report in different views with additional details or for a specific period. You can also view other reports related to the current report.
To view the Pay Sheet for Multi Pay Slip, press Ctrl+H (Change View) > type or select Pay Sheet > press Enter. Press Esc to view the default report.
- Ctrl+J (Exception Reports): You can view the exceptions related to the data displayed in the current report by pressing Ctrl+J (Exception Reports), without closing the report.
To view the Employees Without E-mail IDs, press Ctrl+J (Exception Reports) > type or select Employees Without E-mail IDs > and press Enter. Press Esc to view the default report.
- F12 (Configure): press F12 to change default view for the Multi Pay Slip report.
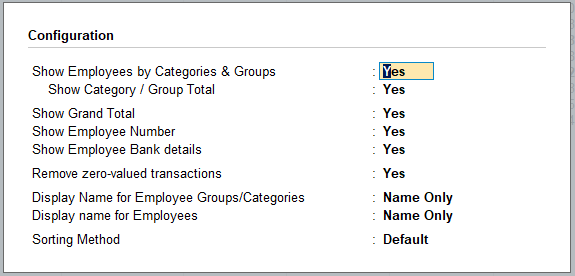
[130-Payroll Management using TallyPrime]
-
- Show Employee by Categories & Groups: Set this option to Yes to include rows related to Category and Groups. Set this to No to list only employee information.
- Show Category/Group Total: Set this option to Yes to display the totals for Category and Group.
- Show Grand Total: Set this option to Yes to display the Grand total at the bottom of the report.
- Show Employee Number: Set this option to Yes to display the employee number along with the Name.
- Show Employee Bank Details: Set this option to Yes to display the Name of Bank and Branch for each Employee.
- Remove zero-valued entries: Set this option to Yes to remove the Employees with Zero pay value from the Multi Pay Slip.
- Display Name for Employee Groups/Categories: From the Display Name Style list, select how you want names to appear..
- Display name for Employees: from the Display Employee
Name Style list, select an option to specify how employee need to appear.
- Sorting Method: Select the appropriate sorting method from the list.
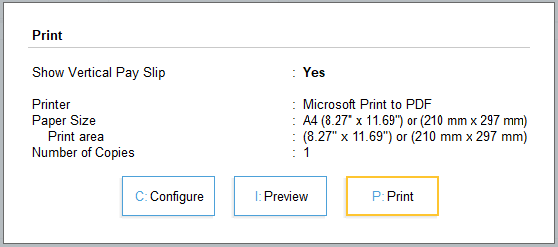
Print Multiple Pay Slips
1. Press Ctrl+P from the above report.
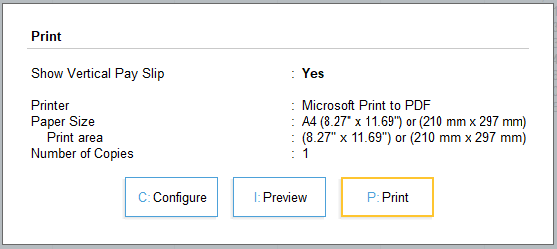
[131-Payroll Management using TallyPrime]
While printing all the pay slips from Multi Account Printing, you can print more than one pay slip in a single page. The option to print more than one pages in a sheet is available under Printer Properties.
2. Press C (Configure) to set the print configurations as required and press Esc and press P (Print)to print the Pay Slips for all Employees.
For more information on the Print Configuration options, refer to printing Single Pay Slips.
3. Pay Sheet
Pay Sheet is a matrix report which displays cascading records of category, groups, and employees as rows, and Pay Heads as columns. The default report contains details of all earnings and deduction for a given month or period with a number of options to re-configure the appearance of rows and columns.
If you reconfigure the format appropriately, the pay sheet report in TallyPrime can serve as a Salary and Wage register. You can also filter the report data based on a given category or group of employees.
1. Gateway of Tally > Display More Reports > Payroll Reports > Pay Sheet.
- Alternatively, press Alt+G (Go To) > type or select Salary Pay Sheet > and press Enter.
2. In the Name of Employee Categories select the required Employee Categories from the List of Employees Categories. The Pay Sheet appears.
3. In the Name of Employee/ Group select the required Employee Group from the List of Employees / Groups. The Pay Sheet appears.
4. Select All Items in the required Employee Category and Employee Group.
5. Press Enter to display the Pay Sheet.
6. Change the Period by Pressing Alt+F2
The Pay Sheet is displayed as shown:
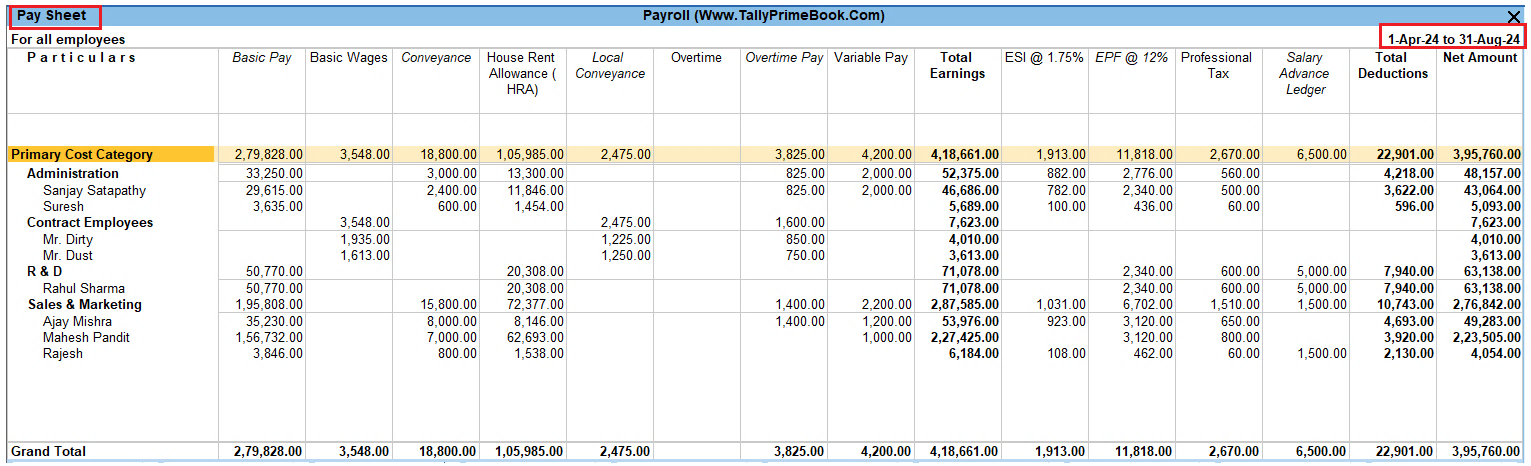
[132-Payroll Management using TallyPrime]
Configuration options in Pay Sheet report
Use the F12 (Configure) button in the Pay Sheet to access a configuration sub-form that you can use to customize the display or printing content and the appearance of the Pay Sheet report in TallyPrime.

[133-Payroll Management using TallyPrime]
- Show Gross Salary: Set this toYes to display Pay Head-wise Gross Salary details. This displays all Pay Heads, as the column headings. Setting this to No will display Pay Head name.
- Show column subtotal: Set this options to Yes to include the sub-totals of Earnings/Deductions columns.
- Show Attendance details: Set this option to Yes to include details of the employee’s attendance.
- Show tail unit of production Types: the below option need to update the descriptions.
- Show Employees by Categories & Groups: Set the Show Employees By Categories & Groups option to Yesto include the rows of categories and groups. Setting this to No lists only employee information.
- Show Category / Group Total: Set the Show Category/Group Total option to Yesto display totals for categories and groups.
- Show Category / Group in Column: Set the Show Category / Group in Columns option to Yesto display Category and Groups in Columns. You can set this option to Yes only when the option Show Employees By categories & Groups is disabled.
- Show Serial Number: Set the option to Yesto display the serial number in the report.
- Format of Report: Set the Format option to either Detailed or Condensed.
- Expand all levels in Detailed format: Set the option to Yesto expand all levels and display all relevant details of the employee. Set the same to No, to generate a summary report for a Category or Group.
- Show Employee Number: Set the Show Employee Numberoption to Yes to display the employee number along with the employee name.
- Show Employee Bank details: Set the Show Employee Bank Detailsoption to Yes to display the Bank Name and Account Number of the employees along with the employees’ names.
- Show Employee TAX Regime: Set the option to Yesto display the tax regime of the employee in the pay sheet.
- Show Income Tax Number (PAN): Set the Show Income Tax Number (PAN)option to Yes to display the employee’s IT PAN number.
- Show Aadhaar Number: Set the Show Aadhaar Numberoption to Yes to display employee’s aadhaar number.
- Show Universal Account Number(UAN): Set the Show Universal Account Number (UAN) option to Yesto display employee’s PF universal account number.
- Show PF Account Number: Set the Show PF Account Number option to Yesto display the employee’s PF Account number.
- Show Employee ESI Number: Set the Show Employee ESI Number option to Yesto the display employee’s ESI number.
- Show Employee Designation: Set the Show Employee Designation option to Yesto display the employee’s designation.
- Show Employee Function: Set the Show Employee Function option to Yesto display the employee’s job function specified under General Information.
- Show Date of Joining & Resignation: Set the Show Date of Joining & Resignation option to Yesto display the employee’s dates of Joining and leaving the organization.
- Remove zero-valued transactions: Set the Remove Zero Entries Employees option to Yesto remove employee records that have Zero Earnings/ Deductions.
- Display name for Employee Groups: Select the appropriate names from the Display Employee Group Name Stylelist.
- Display name for Employees: Select the appropriate names from the Display Employee Name Stylelist.
- Display name for Pay Heads: Select an option to indicate if you want the report to include only Earnings, Deductions, or All Pay Heads
- Sorting Method: Set this option to select the appropriate sorting methodfrom the list.
Button options in Pay Sheet report
- Alt+F5(Condensed): Use this toggle button (Alt+F5) to quickly shift between the detailed and summary views.
- F2(Period): Use the Period (F2) button to change the time frame of the report. You can generate the report for a day, week, fortnight, month, quarter, half-year, or the entire year.
- Ctrl+B(Basis of Values): You can configure the values in your report for that instance, based on different business needs.
In Pay Sheet, you can display the required pay head type. Press Ctrl+B (Basis of Values) > Pay Head Type > select Earnings. Press Esc to view the default values.
Similarly, you can select enable Show Net amount column.
- Ctrl+H(Change View): You can display the details of a report in different views with additional details or for a specific period. You can also view other reports related to the current report.
To view the Multi Pay Slips for Pay Sheet, press Ctrl+H (Change View) > type or select Multi Pay Slips > press Enter. Press Esc to view the default report.
- Ctrl+J(Exception Reports): You can view the exceptions related to the data displayed in the current report by pressing Ctrl+J (Exception Reports), without closing the report.
To view the TDS Variance for Pay Sheet, press Ctrl+E (Exception Reports) > type or select TDS Variance > and press Enter. Press Esc to view the default report.
- Alt+C (New Column): Use this button (Alt+C) to add a column to include any other Pay Head that is not included in the default Pay Slip format. The new column appears on the right-hand side of the report.
- Alt+A(Alter Column): Use this button (Alt+A) if you want to replace an existing column in the report with a new Pay Head column. Position the mouse cursor in the column that you want to replace.
- (Alt+D) Delete Column: Use this button (Alt+D) if you want to delete an existing column in the report. Position the cursor on the column that you want to delete.
- (Ctrl+P) Print: You can print the Pay Sheet by pressing Ctrl+Pfrom the report display screen. While printing the Pay Sheet report, choose an option to increase the line height (for each employee line) to allocate space for the employee’s signature or to affix a stamp, and use the printed report for manual salary disbursement..
- Ctrl+M(E-Mail): You can E-Mail the Pay Sheet by pressing Ctrl+M from the report display screen.
- Ctrl+E(Export): You can export the Pay Sheet by pressing Ctrl+E from the report display screen.
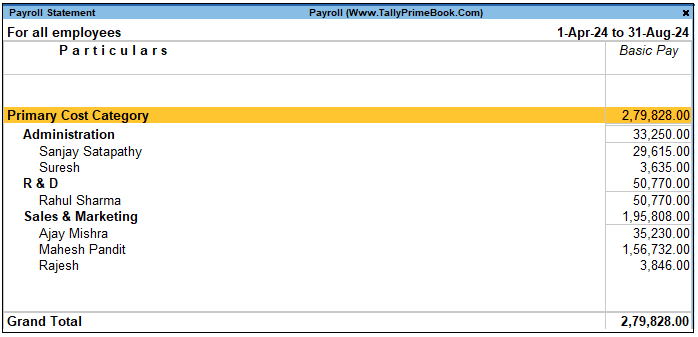
4. Payroll Statement
A Payroll Statement is a columnar report which displays Group/Department-wise employees’ break-up of selected earnings or deductions, for a specified month or period.
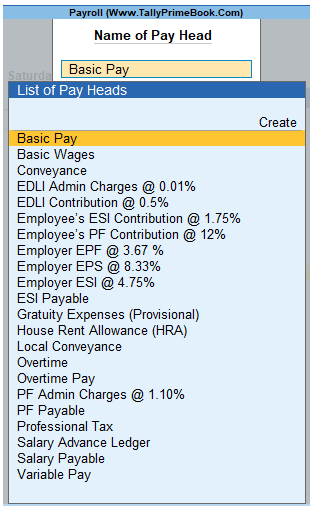
- Gateway of Tally > Display More Reports > PayrollReports > Payroll Statement > select the appropriate Pay Head from the List of Pay Heads.
Alternatively, Alt+G (Go To) > type or select Payroll Statement > and press Enter.
- Select the required Pay Head and press Enter
The Payroll Statement for Basic Pay Earnings Head for the month of April 2024 is displayed as shown:

[134-Payroll Management using TallyPrime]
Configuration Options in Payroll Statement Report
You can further configure the Payroll Statement to display the Employee groups and categories, category/group subtotals, grand totals, user-defined Pay Slip names, employee names, employee bank details, sort it by Employee number, by pressing F12: Configure
- Enter the details in F12: Configuration screen as shown
The F12: Configuration screen is displayed as shown:

[135-Payroll Management using TallyPrime]
- Show Employees By Categories & Groups: Set this option to,
o Yes to include the rows showing Category and Groups.
o No to include only employee information.
- Show Category/Group Total: Set this option to Yes to display Category and Group wise Totals.
- Show Category/Group in Column: Set this option to Yes to display Category and Groups in Columns. This option can be set to Yes only when the option Show Employees By categories & Groups is disabled.
- Show Grand Total: Set this option to Yes to display the Grand total at the bottom of the report.
- Format of Report: Detailed or Condensed format can be selected for display. Condensed format will display only the Payroll Category wise report.
- Expand all levels in Detailed Format: Set this option to Yes to expand all levels and display Employee details. Set this option to No to display summary report for Category/Group.
- Show Employee Number: Set this option to Yes to display employee number along side the Name.
- Show Employee Bank Details: Set this option to Yes to display the Bank Name and Account Number of the employees along with the employees’ names.
- Show Employee TAX Regime: Set this option to Yes to display the tax regime of the employee in the payroll statement.
- Show Income Tax Number (PAN): Set this option to Yes to display employee IT PAN number.
- Show Aadhaar Number: Set this option to Yes to display employee’s aadhaar number.
- Show Universal Account Number (UAN): Set this option to Yes to display employee’s PF universal account number.
- Show PF Account Number: Set this option to Yes to display employee PF Account number.
- Show Employee ESI Number: Set this option to Yes to display employee ESI number.
- Show Employee Designation: Set this option to Yes to display the Employee Designation.
- Show Employee Function: Set this option to Yes to display the Employee Function specified under General Information.
- Show Date of Joining & Resignation: Set this option to Yes to display employees Date of Joining & Resignation details.
- Remove Zero Entries Employees: Set this option to Yes to remove an Employee with Zero Earnings/ Deductions.
- Display name for Employee Groups: Select the appropriate names from the Display Employee Group Name Style list.
- Display name for Employees: The appropriate appearance of names can be selected from the Display Employee Name Style list.
- Display name for Pay Heads: Select an option to indicate if you want the report to include only Earnings, Deductions, or All Pay Heads
- Sorting Method: Select the appropriate sorting method from the list.
5. Payment Advice
The Payment Advice report in TallyPrime is used to generate Payment Advice / Bank Transfer letters to transfer Salary Amount from a specific bank account to the respective bank accounts of the employees based on the Salary Payment voucher. For more details refer to Salary Payment section.
1. Gateway of Tally > Displays More Reports > Payroll Reports > Payment Advice.
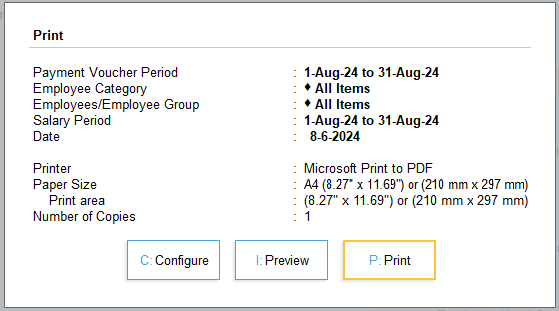
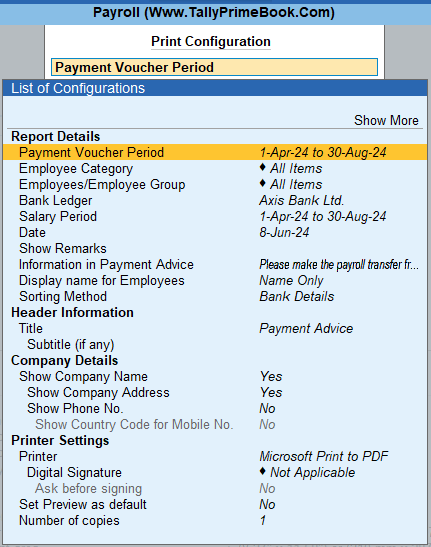
2. Press P (Print) to print and press C (Configure) to specify the following details in the Print Configuration screen:
[136-Payroll Management using TallyPrime]
The Printing Configuration for Payment Advice is displayed as shown:
[137-Payroll Management using TallyPrime]
- Payment Voucher Period: Set From and To date in the Date Range to Print field as per the Payroll Voucher period.
- Employees/Employee Group: Select Appropriate Employee and Employee/Group.
- Bank Ledger: Select Appropriate Bank Ledger to which Salary Amount is Posted.
- Salary Period: Set From and To date in the Date Range to Print field.
- Date: Specify the Date.
- Show Employee Number: Set Employee Number to Yes to print the Employee’s Number in the Payment Advice for each Employee.
- Bank Name: Set Bank Name to Yes to print the Bank Name in the Payment Advice for each Employee.
- Branch:Set Branch to Yes to print the Branch Name in the Payment Advice for each Employee.
- IFS Code: Set IFS Code to yesto print the IFS Code of the Particular Branch of the Bank in the Payment Advice.
- Date of Birth: To print the Date of Birth of each Employee, set Date of Birth to Yes.
- E-mail ID: To print the E-Mail IDs of the employees, set Email ID to Yes.
- Show Remarks: A common remark can be defined for all the employees, to be printed in the Payment Advice. Enter it in the Remarks field.
- Sorting Method: Select the desired Sorting Method (from Bank Details, Employee Number or Default).
3. Enter the required Date of Printing for Payment Advice, it is defaulted with the actual date of printing.
4. Acceptto print the Payment Advice.
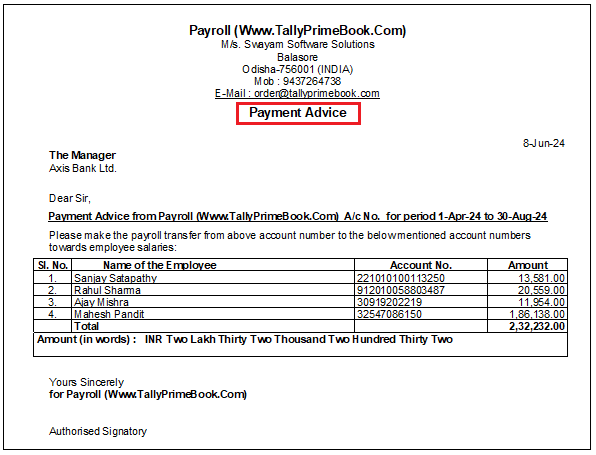
[138-Payroll Management using TallyPrime]
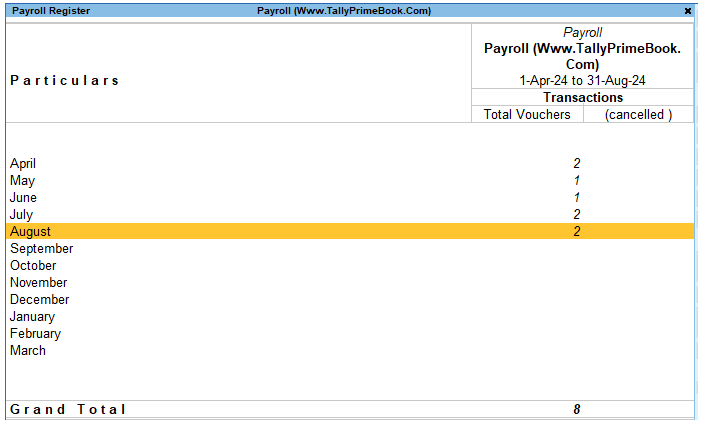
6. Payroll Register
Payroll Register is a month-wise transaction summary report displaying Payroll vouchers, similar to Display Statistics in the accounting module. Though the register primarily displays Payroll vouchers, you can however add new columns for any other voucher type i.e., Attendance, Journal, Purchases, Sales and so on.
- Gateway of Tally> Display More Reports > Payroll Reports > Payroll Register.
The Payroll Register is displayed as shown:
[139-Payroll Management using TallyPrime]
Configuration Options in Payroll Register
Press F12 (Configure): to change the default view for the above report.
- Show Optional Vouchers: Need to add the descriptions.
- Periodicity: Select the Periodicity to use.

[140-Payroll Management using TallyPrime]
You can drill down to the List of All Payroll Vouchers report for a particular month and then to a specific voucher, if required by pressing Enter.
7. Employee Pay Head Breakup
An Employee Pay Head Breakup report is a columnar report which displays the Group/Department- wise employees’ breakup of a selected earnings or deductions pay head for a specified month/period. This report also displays the opening balance, debit and credit transactions and the closing balance for a specified period.
This report is also helpful in tracking loan outstanding and instalments deducted till date or for any specified period.
- Gateway of Tally> Display More Reports > Payroll Reports > Employee Pay Head Breakup.
1. Select the required Pay Head from the List of Pay Heads and press Enter
[141-Payroll Management using TallyPrime]
The Employee Breakup of Pay Head for Basic pay screen is displayed as shown:

[142-Payroll Management using TallyPrime]
2. Press F2 (Period) to select required period.
3. Press F4 (Pay Head) to view list of Pay Heads.
4. To view the Payroll Statement, press Ctrl+H (Change View) > type or select Payroll Statement > press Enter. Press Esc to view the default report.
[143-Payroll Management using TallyPrime]
- Press F12(Configure) for additional options in the above report.
- You can drill down to Employee Summaryreport, from the Employee Pay Head Breakup report.
- From Employee Summary report you can drill down to the Employee Monthly Summaryreport.
- From Employee Monthly Summaryreport, you can further drill down to Employee Vouchers screen.
- The Employee Breakup of Pay Head report can be viewed with additional Pay Heads, by pressing Alt+C and adding the required Pay Head .
8. Pay Head Employee Breakup
This report displays a group wise summary of the transactions and Closing balance for the selected Employee. Drill down to specific ledger of the group, to the month wise summary and up to voucher, is available in this report.
1. Gateway of Tally> Display More Reports > Payroll Reports > Employee Pay Head Breakup.
2. Select the Employeefrom the list, to view the Pay Head Breakup for that employee.

[144-Payroll Management using TallyPrime]
To view the Pay Head breakup,
- Select the required Employee (say, Sanjay Satapathy) from the List of Employees and press Enter
- Press Alt+F1 for a detailed view
The ledger-wise Breakup of Employee screen is displayed as shown:

[145-Payroll Management using TallyPrime]
| Note: Press F12 (Configure) for additional options in the above report. |
3. You can drill down to Breakup of Employee for each Group, from this report.
4. Drill down further to view the Ledger Monthly Summary report and the Employee Vouchers.
5. The Pay Head Employee Breakup report can be viewed with additional employees, by pressing Alt+C and adding the required Employee and for multiple periods, by pressing Alt+N.