TallyPrime is an advanced accounting software that offers a wide range of features to streamline your business operations. One of the key functionalities of TallyPrime is the ability to handle the purchase of goods and services efficiently.
With TallyPrime , you can easily record and track your purchases, manage your suppliers, and generate accurate reports for better decision-making. In this page, we will walk you through the process of purchasing goods and services in TallyPrime.
For each purchase transaction, you will need to keep a record of the items you bought, payments made, goods returned, and so on. TallyPrime provides you the facility to perform all such actions and much more, effortlessly. Moreover, you can view reports at any time to know about all the purchases made in your business and compare them against the sales performance.
TallyPrime is a powerful accounting software that simplifies the process of managing purchases of Goods and Services for businesses in following Steps.
Step 1: Creating a Purchase Voucher
The first step in the purchase process is to create a purchase voucher. To do this, go to the ‘Gateway of Tally’ and select ‘Accounting Vouchers’ from the menu. Then, choose ‘F9: Purchase’ to create a new purchase voucher.
Step 2: Entering Supplier Details
Once you have created the purchase voucher, you need to enter the details of the supplier. This includes the supplier’s name, address, and contact information. You can also specify the supplier’s GSTIN if applicable.
Step 3: Selecting the Purchase Ledger
After entering the supplier details, you need to select the purchase ledger. The purchase ledger is a predefined account in TallyPrime that is used to record all purchase transactions. Choose the appropriate purchase ledger based on the type of goods or services being purchased.
Step 4: Entering Item Details
Next, you need to enter the details of the items being purchased. This includes the item name, quantity, rate, and tax details. TallyPrime allows you to easily select items from a predefined list or create new items on the fly.
Step 5: Recording Additional Expenses
If there are any additional expenses associated with the purchase, such as freight charges or customs duty, you can record them in the purchase voucher. TallyPrime provides a dedicated section for entering these expenses.
Step 6: Calculating Taxes
After entering all the item details and additional expenses, TallyPrime automatically calculates the taxes applicable on the purchase. The software considers the tax rates and rules set up in the system to calculate the taxes accurately.
Step 7: Finalizing and Saving the Voucher
Once you have entered all the necessary details, you can finalize the purchase voucher by reviewing the information and making any necessary adjustments. After ensuring the accuracy of the voucher, save it in TallyPrime.
Step 8: Printing or Emailing the Purchase Invoice
Finally, you can print or email the purchase invoice to the supplier. TallyPrime allows you to customize the invoice format and send it directly from the software.
By following these steps, businesses can efficiently manage their purchase process in TallyPrime. The software automates many of the manual tasks involved in purchasing goods and services, saving time and reducing errors.
Record Purchase Bill :
Purchases are recorded under 3 categories…
(i) Cash Purchase, :
Record a cash bill or invoice when you make an instant payment to the supplier, using cash.
For Registered Purchase Assign Cash Ledger as Regular with GST No. and provide Tax Ledger in Purchase Voucher and for Consumer Purchase assign Cash Ledger as Consumer.
(ii) Bank Purchase (Cheque or Credit/Debit Card, UPI, Net Banking) :
Record a cash bill or invoice when you make an instant payment to the supplier, using any mode related to Bank like a cheque or credit/debit card or UPI or Net Banking Transfer.
For Registered Purchase Assign Bank Ledger as Regular with GST No. and provide Tax Ledger in Purchase Voucher and for Consumer Purchase assign Bank Ledger as Consumer and don’t provide Tax in Purchase Voucher.
(iii) Credit Purchase :
If it is a purchase on credit, record a credit purchase by using the supplier ledger.
There are also situations when you want your supplier to deliver goods to a specific location that is different from your billing address.
Similarly, you can record the transaction in various voucher modes as required like Item Invoice or Accounting Invoice, and so on.
TallyPrime handles all your requirement to record the purchase of goods and services with party details, dispatch details, and more.
Record additional charges, discounts, and free items:
Your purchase transaction may include additional expenses, such as transportation charges, insurance, and taxes. If your supplier has given discounts on your purchases, you will need to record the discounts in your invoices as well. Similarly, if you have received free items or samples from your supplier, all of these can be recorded and tracked in TallyPrime.
Reports on Purchase of Goods and Services :
In TallyPrime, you can track all your purchase of goods and services using different reports, such as Purchase Register, Day Book, and so on.
You can view your purchases across different periods, filter the data for specific details, configure the reports to view more purchase-related details, and more.
Purchase Voucher (F9)
Whether you make a purchase on cash or credit, the procedure in TallyPrime remains similar. The only difference is that you will select cash or bank for cash purchases and the supplier ledger for credit purchases.
When a company buys goods on credit or cash, Purchase voucher is used to record all the Purchase transactions of the company.
Once you activate GST in your company, you can record the purchase of goods and services (inward supply) that attract GST using a purchase voucher.
- Go to Gateway of Tally > Vouchers > Press F9 (Purchase)
Alternatively, Press Alt+G (Go To) > Create Voucher > Press F9 (Purchase)
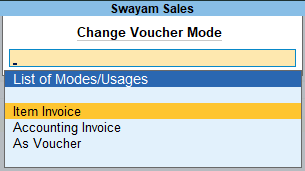
Change Voucher Mode :
You can record purchases of items using the Item Invoice mode and record purchases without items using the Accounting Invoice mode. TallyPrime also provides the flexibility to use these invoice modes interchangeably for recording purchases. You can also print the invoices with the necessary details, if needed.
Press Ctrl+H (Change Mode) to select the required voucher mode (Item Invoice / /Accounting Invoice/ As Voucher).

[1-1-Purchase Process in TallyPrime]
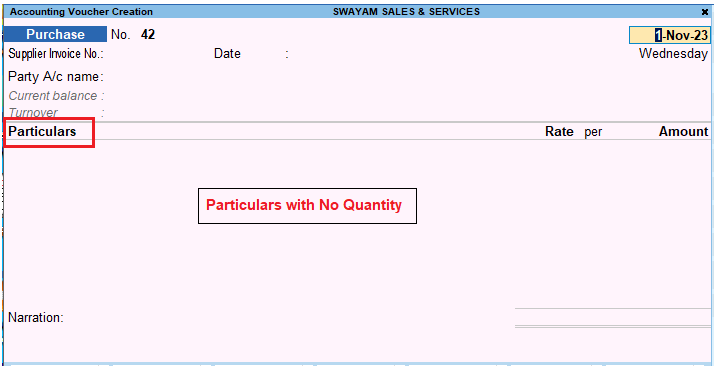
Account Invoice/As Voucher:
You will be directly selecting/debiting the Ledger account in case you are passing an Account Invoice. This is useful especially when a Service Bill is entered and does not include Inventory.

[1-2-Purchase Process in TallyPrime]
Item Invoice:
You will be first selecting the Inventory and then allocating the same to the relevant Ledger account. This is useful to record all the Inventory movements in books of account.

[1-3-Purchase Process in TallyPrime]

