INTRODUCTION
TallyPrime 6 launches a transformed Banking experience with an exciting new capability: Connected Banking.
TallyPrime Release 6 makes banking delightful with an enhanced Bank Reconciliation and Connected Banking.
The enhanced Bank Reconciliation offers numerous facilities for matching book transactions with bank transactions, which keep your books in sync with your bank.
Connected Banking helps you reduce time and effort consumed in various banking activities.
Key Features :
- Use Connected Banking in TallyPrime
- Set up for Bank Reconciliation
- Import Bank Statements
- View Reports for Banking Utilities
- Auto-reconciliation
- Manual Reconciliation
- Create Automated Vouchers
- Reset Bank Statement Data
1. Use Connected Banking in TallyPrime
Available from TallyPrime Release 6, Connected Banking makes your banking tasks simpler. With Connected Banking, you can get Bank Statements and Bank Balance right from TallyPrime.
To get started with Connected Banking, you need the following:
- Active license
- Valid TSS
- Tally.NET ID or a valid e-mail address
- Valid 10-digit mobile number for linking with your Tally.NET ID and receiving OTP
1.1. Link Mobile Number to Tally.NET ID
- Press Alt+Z(Exchange) > All Banking Options > Login & Logout.
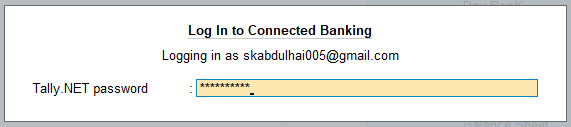
- In the Log In to Connected Bankingscreen, enter your NET ID.

If you are working with multiple users under a license site, then refer to Approve User Access to Connected Banking for non-admin users.
- Enter your NET password.
- Enter the mobile number that you want to link to your Tally.NET ID.
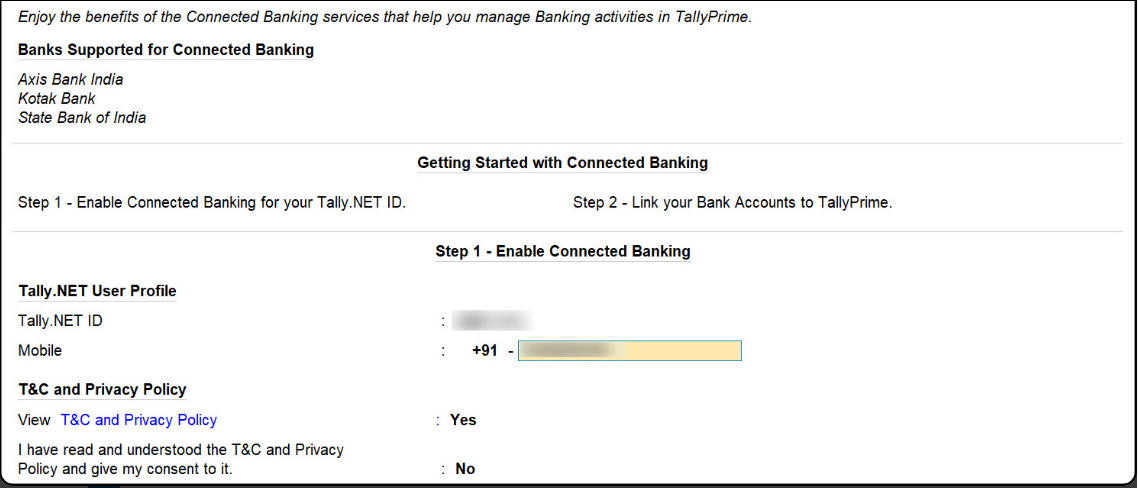
- View T&Cand Privacy Policy: Yes.
You will get redirected to the web page where you can read the T&C and Privacy Policy and then accept it. - Enter the OTP received on your mobile number.

If you do not receive the OTP, press Alt+R (Resend OTP).
The mobile number gets linked to your Tally.NET ID.
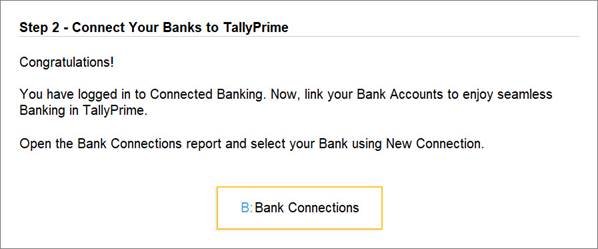
As a result, you get logged in and can use the Connected Banking services.
You can proceed to connect your bank accounts to TallyPrime.
1.2. Connect Bank Accounts with TallyPrime
When you connect to a specific Bank, a Connection ID gets generated. This is the reference ID for the connection initiated with the Bank.
Once the connection is successful, you get a list of account numbers with the matching Bank ledgers.
- Press Alt+Z (Exchange) > All Banking Options> Bank Connections.
If you have not logged in to Connected Banking already, then you will need to log in. - Press F6(New Connection).
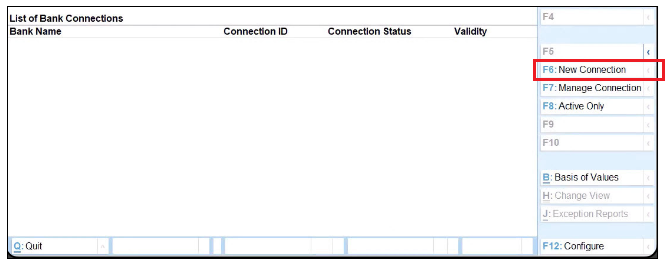
- Select the relevant bank.
A connection ID gets generated.
If there are connections pending for approval for the bank, then you will get a message.
In that case, you can press Y to proceed.
- If you are an Axis Bank customer, refer to Connection with Axis Bank.
- If you are a Kotak Mahindra Bank customer, refer to Connection with Kotak Mahindra Bank.
- In the Connect to Bankscreen, press C (Connect).
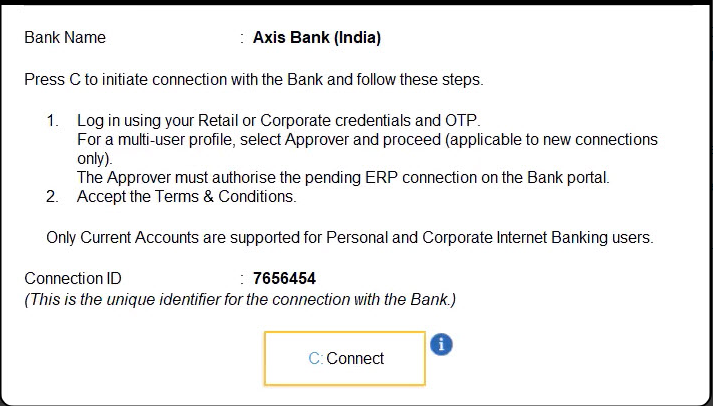 Consequently, you get redirected to the respective bank portal.
Once you establish the connection with the bank on the portal, you can refresh the status.
- Press R(Refresh Status).
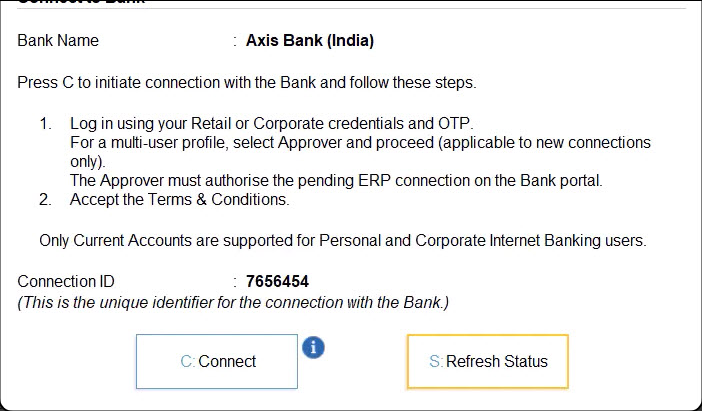
The status of the connection gets displayed in the Bank Connections report as Connected.
Once you establish the connection with the bank, the bank accounts get linked. If there are ledgers matching the bank accounts, then the ledgers also get displayed.
- To view the linked bank accounts, press Shift+Enteron the relevant Bank row.

After the one-time setup, you can log in to Connected Banking at any point in time.
Thereafter, using Connected Banking in TallyPrime, you can:
- Get Bank Balance.
- Get Statement.
If you are not logged in, then you will need to log in with Tally.NET ID, password, and OTP.
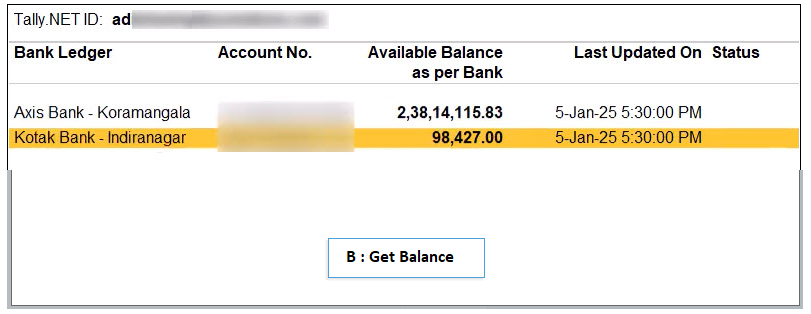
2. Get Bank Balance
With Connected Banking, you get to know your Bank Balance in a matter of seconds and that too, right from TallyPrime. This helps you decide the account using which you can send payments to your suppliers. You only need to ensure that you are logged in to Connected Banking.
- Press Alt+Z(Exchange) > Get Balance.
Alternatively, press Alt+Z (Exchange) > All Banking Options > Get Balance.
- Select one or more bank accounts to get the balance.
- Press B(Get Balance)
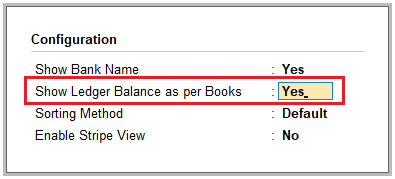
You can further configure this report to view Bank Name and Ledger Balance as per Books for comparison with the balance as per bank.
- Press F12(Configure).
- Show Bank Name: Yes.
- Show Ledger Balance as per Book: Yes.
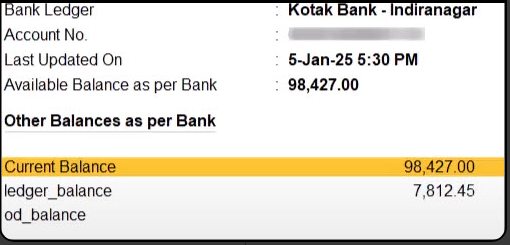
Furthermore, while you get to know the balance of your bank accounts, you can view other balances sent from the bank.
- Select the bank ledger, and press Enter.
The Account Balance Info screen appears.
3. Get Bank Statement
With Connected Banking, you can seamlessly get bank statements. You can then use the bank statements to reconcile the transactions in books.
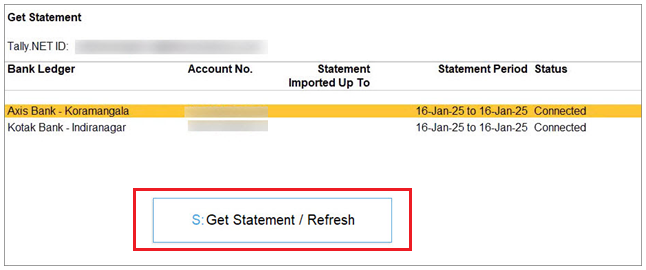
- Press Alt+Z(Exchange) > All Banking Options > Get Statement.
- Set the periodfor which you want to get the statement.
- Select the bank ledger and press Alt+S(Set Statement Period).
| Note :
At a time, you can select only one bank account to get bank statement. |
- Enter the Fromand To dates and press Enter.
- Press S(Get Statement).
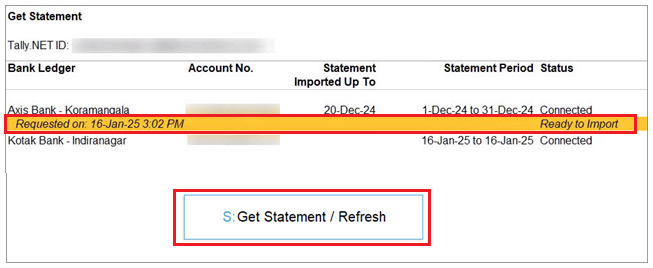
- Import the statement.
- Select the request that is ready to import.
- Press Sto import the statement.
 The statement becomes a part of your Company data.
You can view the transactions from the imported statements in the Imported Bank Data and Bank Reconciliation reports.
If you are not using Connected Banking services, then you can import bank statements to perform auto reconciliation.
3.1. Delete Statement Request
You might want to delete a statement request when it was requested for the wrong period.
- Bring the cursor to the request.
- Press Alt+R(Delete Request).
- Press Yto confirm.

The request gets deleted.
3.2. Reset Bank Statement Data
If you import a bank statement, reconcile your transactions, and then reset the bank statement, all previously auto-reconciled transactions will appear as manually reconciled.
You can reset the bank statement data when:
- You have imported the statement for a wrong period.
- You have already reconciled your transactions. Therefore, you do not want the imported bank statements in your Company data anymore.
- Press F1(Help) > Troubleshooting.
- Select Reset Bank Statement Dataand press Enter.
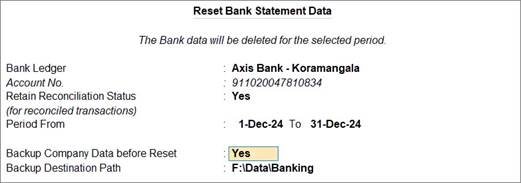
- In the Reset Bank Statement Datascreen, select the Bank Ledger.
- Retain Reconciliation Status: Yes.
The reconciliation status of the fully reconciled transactions gets retained. However, if there are any partially reconciled transactions, then their status becomes Unreconciled.
If the option is set to No, then the statement data will get deleted and transactions reconciled or even partially reconciled via linking will become Unreconciled.
- Enter the From and To dates.
The Bank Statement data will get cleared for the specified status.
- Takea backup of the Company data, if needed.
-
- Backup Company Data before Reset: Yes.
- Backup Destination Path: Select or specify the folder path and press Enter.
- Press Yto confirm.

The bank statement data gets cleared.
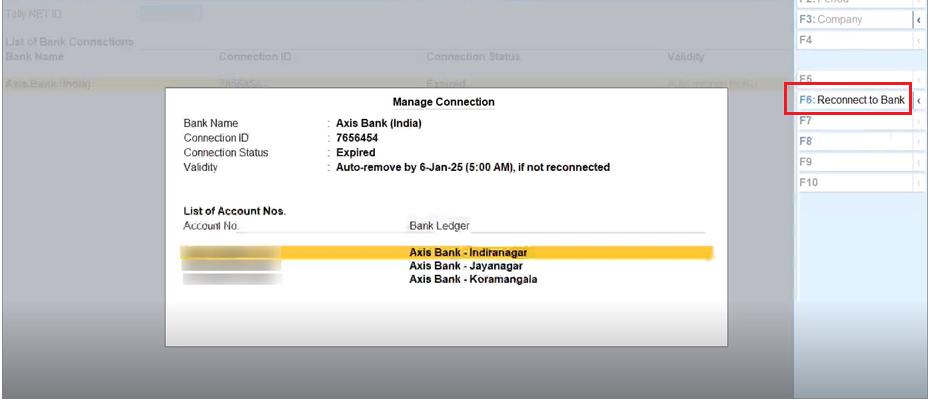
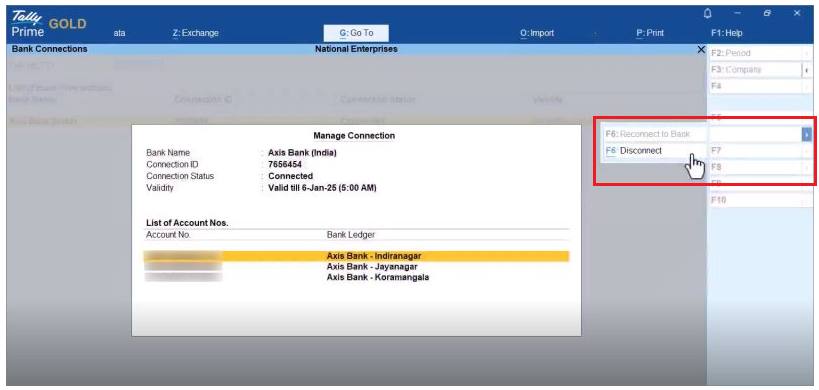
4. Reconnect/Disconnect Bank
The facility to manage bank connections allows you to reconnect or disconnect from your bank, whenever needed.
- Select the bank connection, and press Enteror F7 (Manage Connection).
4.1. Reconnect Bank Accounts
You can reconnect to the bank using an existing Connection ID in the following scenarios:
- The connection is still in progress.
- The connection has expired when:
- The connection has crossed its validity.
- The mobile number has been changed.
- In the Manage Connection screen, press F6(Reconnect to Bank).
 In the Reconnect to Bank screen, press C (Connect).
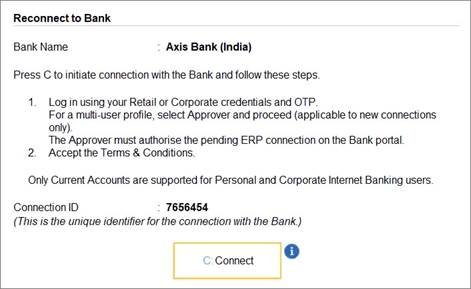
Consequently, you get redirected to the bank portal.
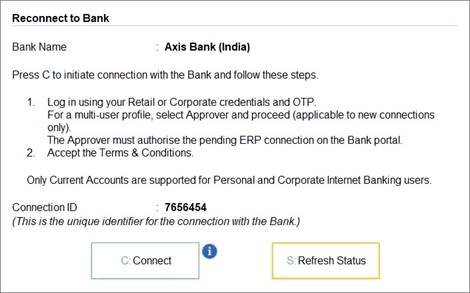
- Once you establish the connection with the bank on the portal, you can refresh the status.
- Press R(Refresh Status).
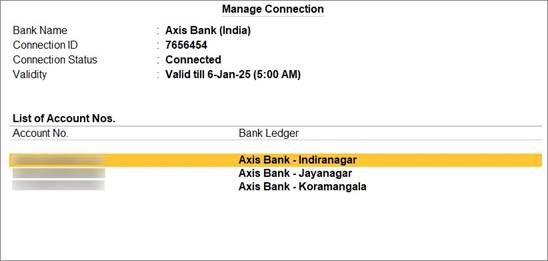
The Bank Accounts get connected.
4.2. Disconnect Bank Accounts
Some of your bank accounts might be dormant. So, you might not want to use the bank accounts through Connected Banking. When you do not want to use bank accounts of a specific bank, you can disconnect from the bank.
- In the Manage Connectionscreen, press Alt+F6 (Disconnect).
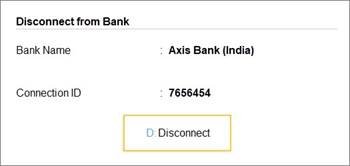
- In the Disconnect from Bankscreen, press D (Disconnect).
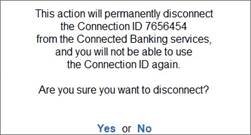
- Press Yto disconnect from the bank.
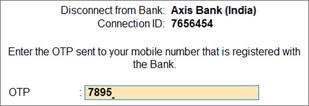
| Note :
In the case of Axis Bank, you will need to enter the OTP received on the mobile number registered with the Bank.
|
 However, in the case of Kotak Mahindra Bank, the OTP is not required.
5. Log In/Log Out from Connected Banking
You can log in using your Tally.NET ID and password at any point in time.
5.1. Log in to Connected Banking
- Press Alt+Z(Exchange) > All Banking Options > Login & Logout.
- Enter your NET IDin the Log In to Connected Banking screen.

- Enter your NET password.

- Enter the OTP received on your mobile number.
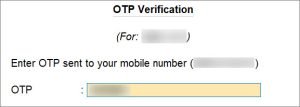
If you do not receive the OTP, press Alt+R (Resend OTP).
Once you enter the OTP, you get logged in to the Connected Banking services.
5.1.1. Log in when the session is expired or inactive
A Connected Banking session expires after 24 hours. In such a case, you can enter your Tally.NET password and OTP to log in.
Moreover, your Connected Banking session might become inactive in three cases:
- Noactivity is performed for more than 15 minutes.
- The Company is shut and opened in another instance of TallyPrime.
- TallyPrime is closed.
In case of an inactive connection, you need to enter just your Tally.NET password to log in.
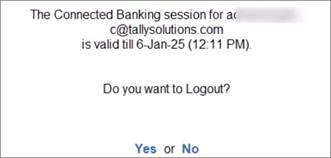
5.2. Log Out from Connected Banking
When you are not using any Connected Banking facility, you can log out.
- Press Alt+Z(Exchange) > All Banking Options > Login & Logout.
- Press Yto log out.
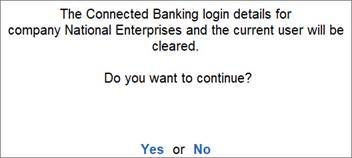
5.3. Reset Connected Banking Login
When you are not able to log out of Connected Banking, you can reset the Connected Banking login.
- Press F1(Troubleshooting) > Reset Connected Banking Login and press Enter.
- Press Yto confirm.
5.4. Change Password for Connected Banking
You will need to change your password if it does not adhere to the new password policy. Your new Password should either be a 6-10 digit PIN or contain at least 8 characters with one uppercase letter, one lowercase letter, a number, and a special character.
- Enter the Old password.
- Enter the New password.
- Confirm the New password.
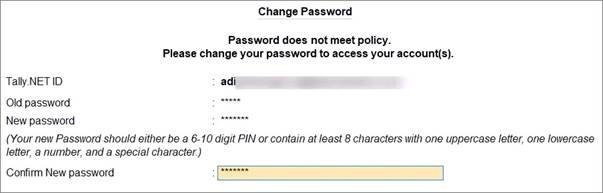
- Press Enter.
The password gets changed.
6. Set up for Bank Reconciliation
For existing users performing Bank Reconciliation
If you have been performing bank reconciliation before TallyPrime Release 6.0 and wish to continue using this feature in TallyPrime Release 6.0 or later you can do so by reconciling transactions through linking. To proceed, you need to Import bank statement starting from the period where book transactions are still pending for reconciliation.
If any book transactions were already reconciled in a release prior to TallyPrime Release 6.0, you do not need to reconcile them again. If you have imported the corresponding bank transactions in TallyPrime Release 6.0, you can simply mark these transactions as ‘Reconciled’ using the ‘Set Status’ option.
For First-time users performing Bank Reconciliation
If you are doing reconciliation for the first time in TallyPrime, you will need to configure your bank ledger to Set Reconciliation Beginning date. By default, this date is set to the start of your financial year, but you can change it to reflect the date you wish to begin bank reconciliation. Any transactions left unreconciled prior to this date will remain unreconciled until you include them in your Opening BRS report. You can Set/Alter Opening BRS to include the unreconciled transactions. Once included, you can see these transactions in the Bank Reconciliation report ready to be reconciled.
6.1. Set Bank Reconciliation Beginning Date
In the Ledger Creation/Alteration screen, you can specify a date from which you want to start reconciling your transactions.

- Set/Alter Bank configuration:Yes.
- Reconciliation Beginning date: Enter the date.
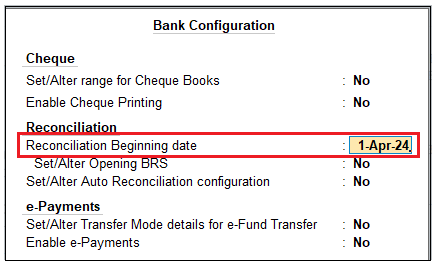
Reconciliation will be applicable from the date specified here.
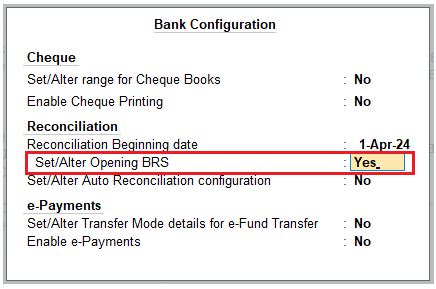
6.2. Set/Alter Opening BRS
In the Ledger Creation/Alteration screen, you can view transactions that are a part of your opening BRS. Moreover, while altering a ledger, you can add a transaction to the opening BRS, or even alter a transaction that is a part of the opening BRS.
- Set/Alter Bank configuration:Yes.
- Set/Alter Opening BRS: Yes.
This option is available only during ledger alteration.
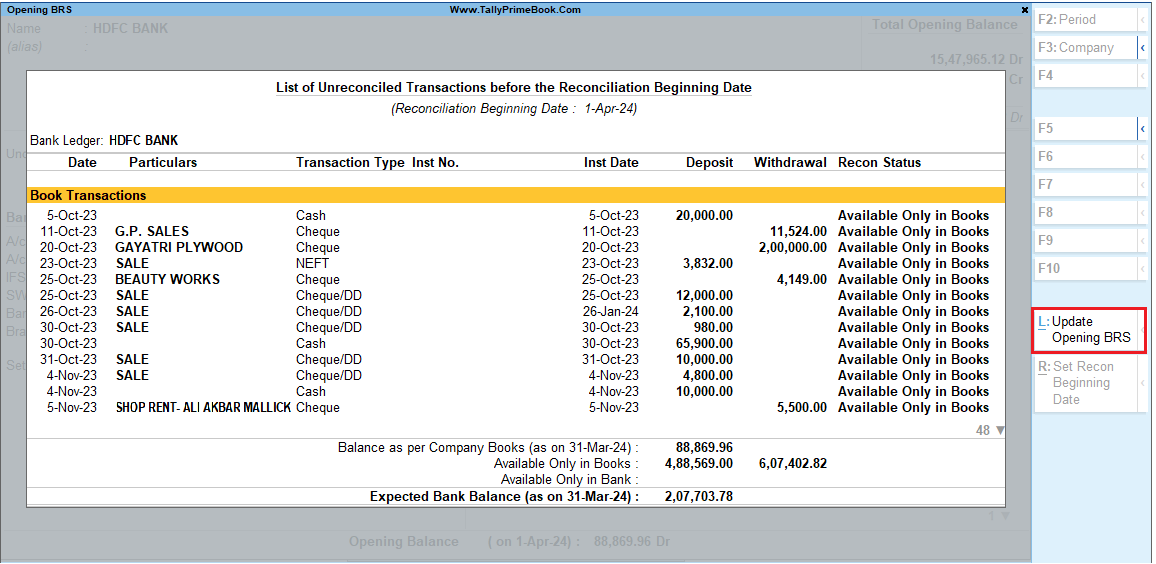
- Press Alt+L(Update Opening BRS).

- Enter the details of the transaction.
- Date: Enter the date of transaction.
This date should be before the Reconciliation Beginning date. - Particulars: Enter the ledger name.
- Nature of Transaction: Select Deposit or Withdrawal, as applicable.
- Transaction Type: Select from the list of transaction types.
- Remarks: Enter the remark, if needed.
- Deposit/Withdrawal: Enter the Amount.
- Instrument No.: Enter the Instrument No., as applicable.
- Instrument Date: By default, this is prefilled, based on the entered Date.
- Press Ctrl+A to save the configuration.
If you split a company, the unreconciled transactions automatically appear in the Opening BRS of the second child company created after the split date. The unreconciled transactions in the split data of the second child company will update the Opening BRS of the last 6 months from the Reconciliation Beginning Date, which is the same as the split date. It includes both book and bank unreconciled transactions.
7. Import Bank Statements
You can import your bank statements into TallyPrime in two ways:
- Importing a downloaded statement from your bank into TallyPrime.
- Import a statement into TallyPrime using Connected Banking services.
You cannot import a bank statement if:
- The statement is already open
- The statement is not in the correct format, or
- You do not have Write permission.
- Gateway of Tally> press Alt+O (Import) > Bank Statement.
The Import Bank Statement screen appears.
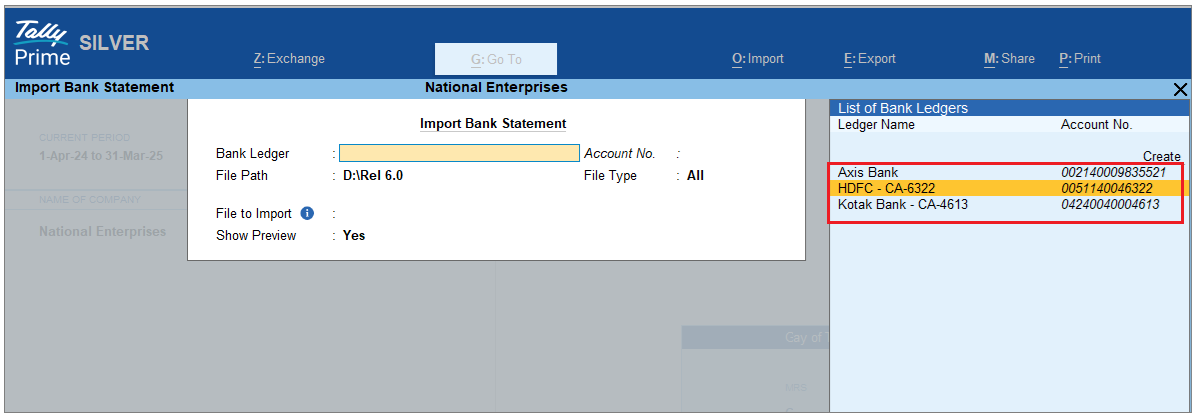
- In the Import Bank Statementscreen, select Bank Ledger, specify File Path, select File Type as Supported, select the File to Import and set Show Preview as Yes.
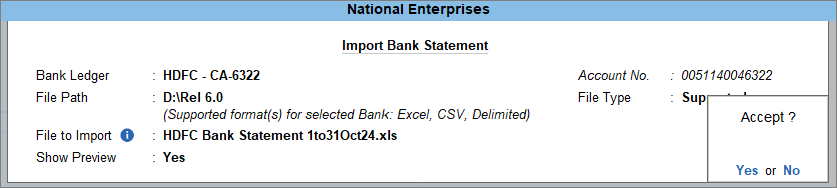
- Press Ctrl+Ato import the Bank Statement.
The Bank Statement Preview screen appears.
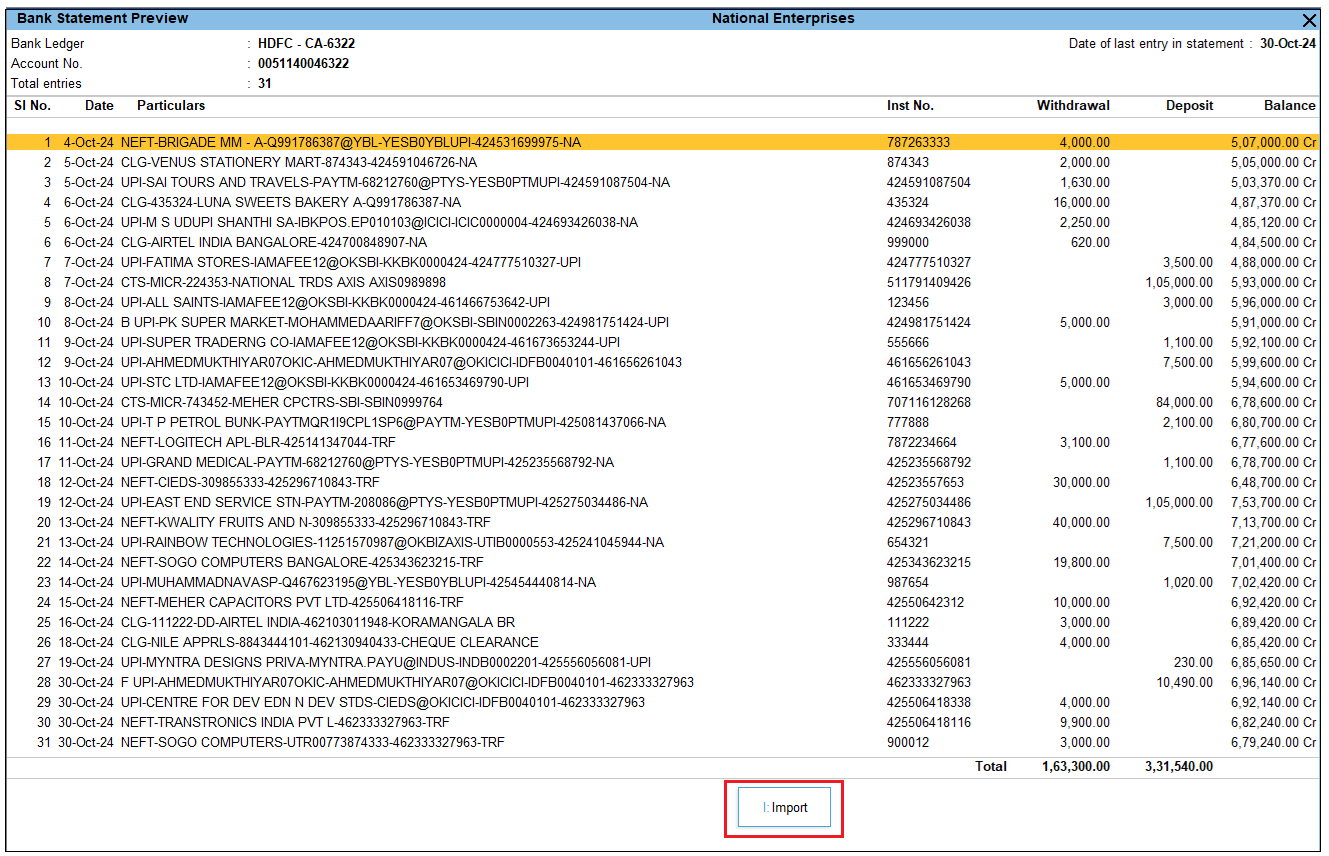
- In the Bank Statement Previewscreen, press I (Import) to import the bank statement.
You can see the total number of entries imported and exact matches in the Summary of Imported Statement.
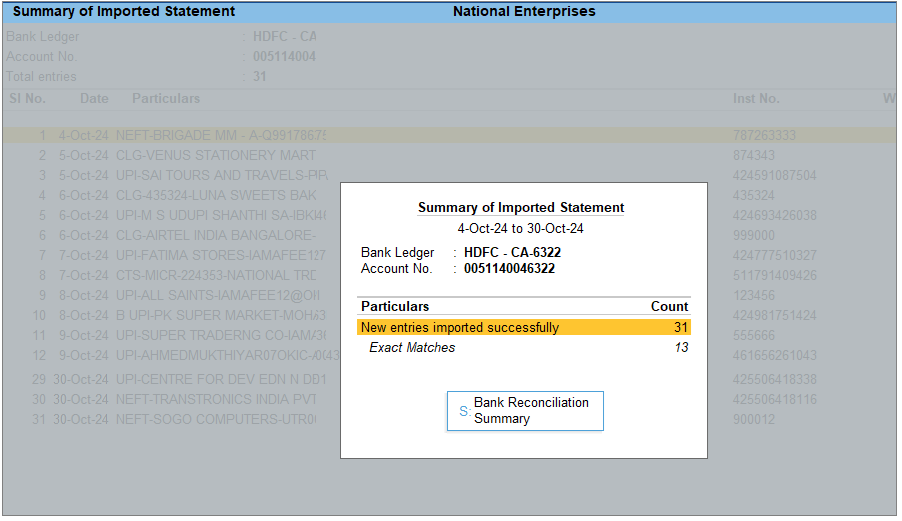
- Press S(Bank Reconciliation Summary) to go to the Bank Reconciliation Summary report.
Once you have imported the bank statement, you can reconcile the book and bank transactions.
7.1. Imported Bank Data Report
In this report, you can see the complete bank transactions along with the count and amount of deposits and withdrawals for the selected bank. From this report, you can reconcile the transactions by finding matched and potential match suggestions. You can also set the status for individual transactions.
- Open the Imported Bank Data report.
- Press Alt+G(Go To) > type or select Imported Bank Data.
Alternatively, Gateway of Tally > Banking > Imported Bank Data.
- Select the bank from the List of Banks.
The Imported Bank Data screen appears.
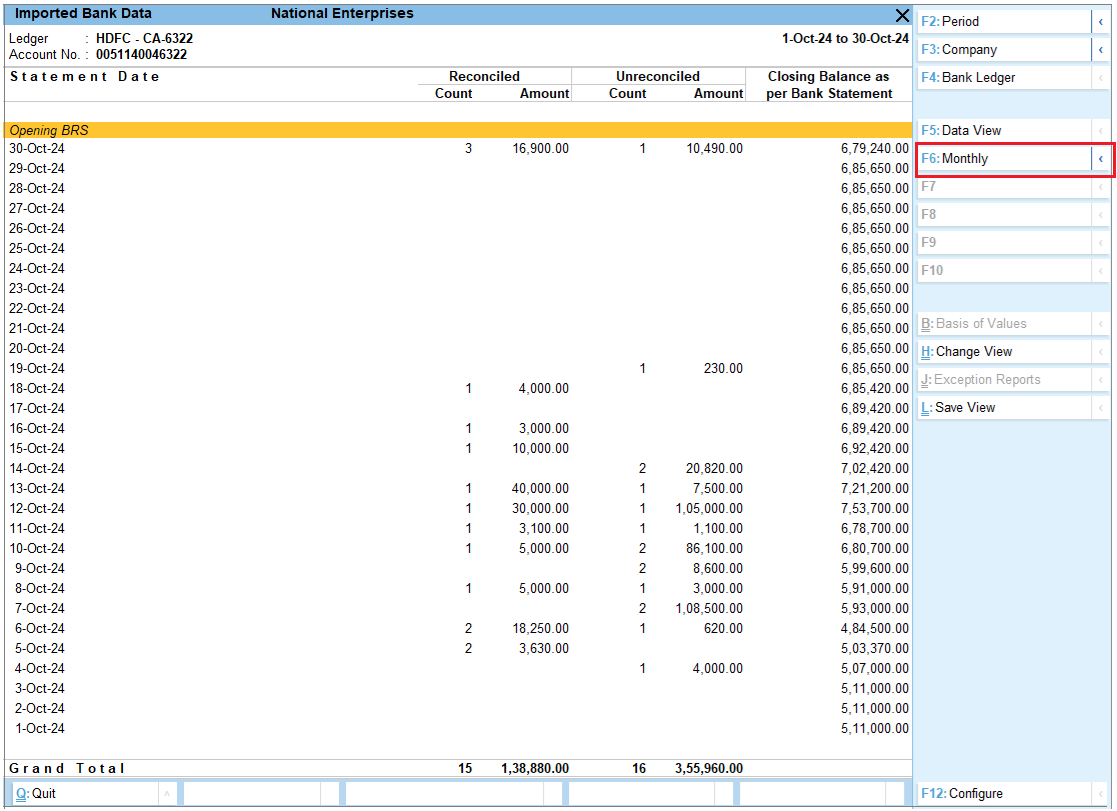
The default view of the report is to show the daily count and amount of deposits and withdrawals. It also shows the Closing Balance as per the Bank Statement.
- You can view this report as a monthly summary of imported bank data. To view transaction amounts that occurred in the corresponding months, press F6(Monthly). If you press Alt+F6 (Quarterly) then you can view the transactions as quarterly summary.
- If you want to view the count and amount of the transactions as Reconciled and Unreconciled, then press F5(Recon View) to change the view. Drill down from this report to view the transactions along with the Recon Status. You can also create vouchers directly from this report and reconcile your transactions. Additionally, you can unlink your incorrectly reconciled transactions from this report.
You can further configure the report from F12 (Configure).
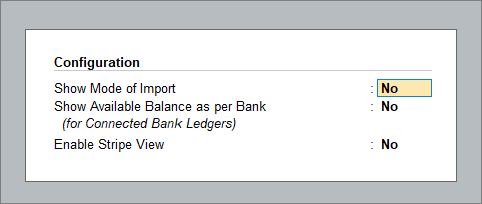
- Show Mode of Import: Set this option to Yesto view the mode of import of the bank statement.
- Show Available Balance as per Bank (for Connected Bank Ledgers): Set this option to Yesto view the Bank balance along with your book balance. Note that this is only available for Connected Bank ledgers.
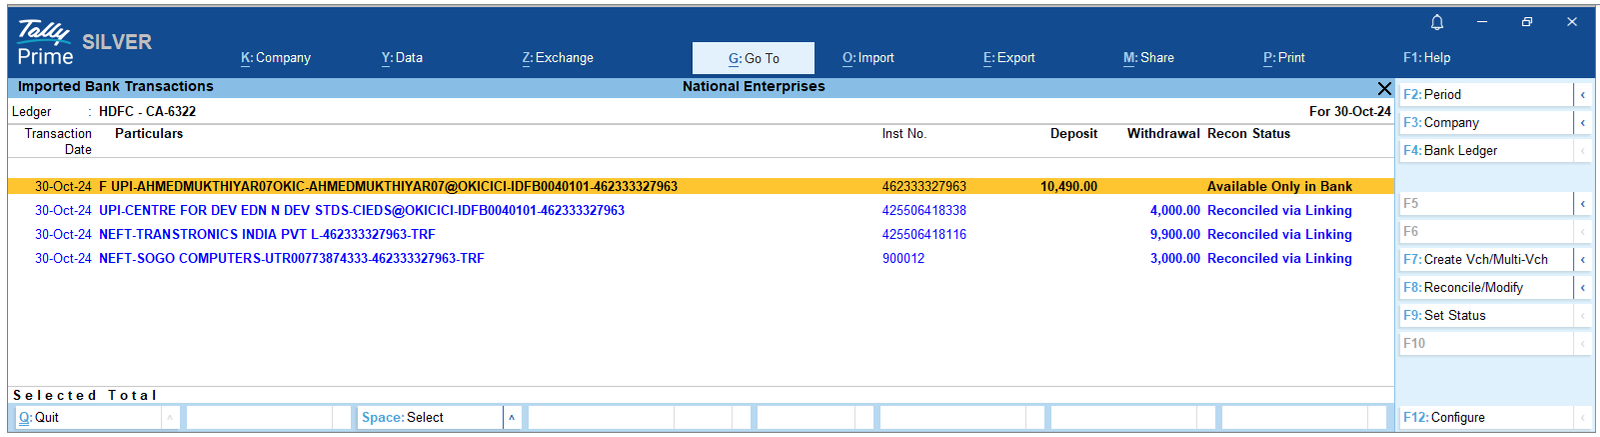
From the Imported Bank Transactions Screen, you can see the following…
Create Vch/Multi-Vch:
If a transaction is available only in the bank, then you can create a voucher or multiple vouchers, as needed. Press F7 (Create Vch/Multi-Vch) to create a single or multiple voucher.
Create Voucher (Consolidate):
You can also create a consolidated voucher for multiple bank transactions. Press Alt+F7 (Create Voucher (Consolidate)) to create consolidated voucher.
Reconcile/Modify:
From this report, you can also reconcile a transaction or modify a reconciled transaction. Press F8 (Reconcile/Modify) to reconcile or modify a transaction.
Unlink:
If a transaction is already reconciled and you want to unlink such transaction due to the wrong transaction selected for reconciliation, then press Alt+F8 (Unlink) to unlink the transaction.
Set Status:
To set a status manually for any transaction, press F9 (Set status).
Potential Matches:
You can view the potential match suggestions to reconcile the transactions. Press Alt+S (Potential Matches) to view the suggestions.
Optional Vouchers (Bank Data):
If you want to see the optional vouchers linked to bank data, press Ctrl+J (Exception Reports) > Optional Vouchers (Bank Data).
If you want to include or exclude transactions with a certain reconciliation status in the report, then press Ctrl+B and set the options as Yes or No, as needed.
8. View Reports for Banking Utilities
The Banking Activities report under Banking provides a summary of your banking transactions. If you are dealing with multiple banks, then this report gives you an overview of all the banks. You can also drill down into individual transactions from this report. From the Banking Activities report, you can further drill down to view the e-Payments report and Bank Reconciliation Summary report leading you to the Bank Reconciliation report where you can reconcile your unreconciled transactions.
In this section
- Banking Activities report
- e-Payments report
- Bank Reconciliation Summary report
- Bank Reconciliation report
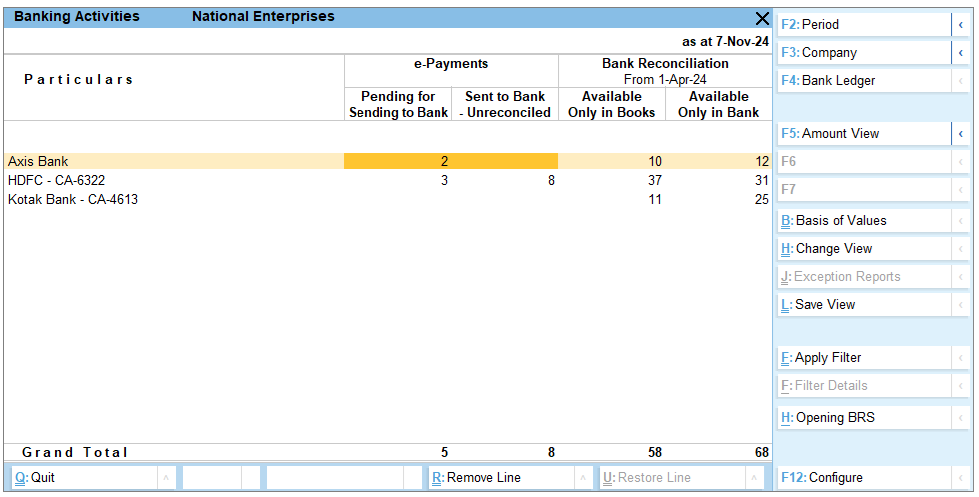
8.1. Banking Activities Report
This report gives a summary of your bank reconciliation, showing how many transactions need to be reconciled and the total unreconciled count/amount. If e-payments are enabled for your bank, it also includes details of those payments, helping you easily track pending actions.
Open the Banking Activities report.
- Press Alt+G(Go To) > type or select Banking Activities.
Alternatively, Gateway of Tally > Banking > Banking Activities.
The Banking Activities screen appears.
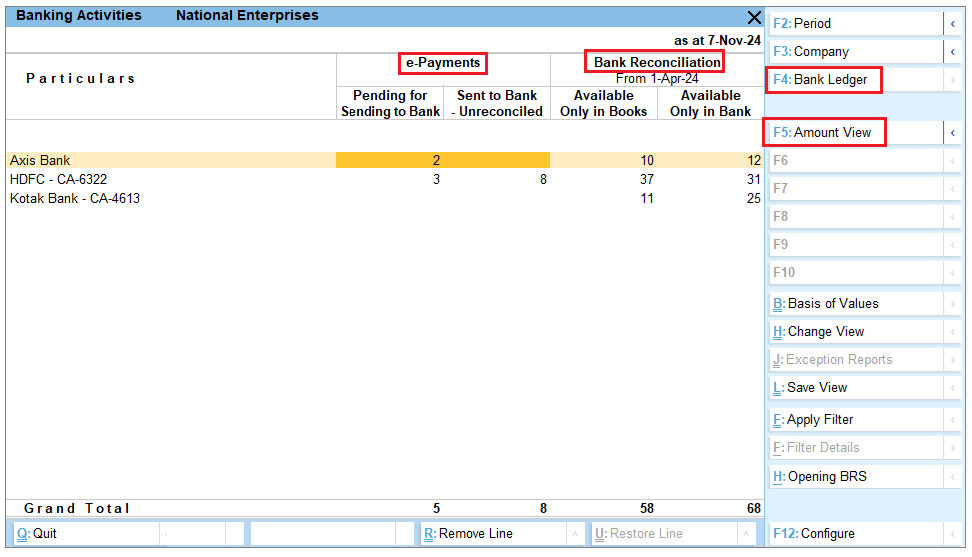
From the Banking Activities report, you can see the following:
Bank Ledger:
Press F4 (Bank Ledger) to select the respective bank.
e-Payments:
In this column, you can see the number of transactions that are Pending for Sending to Bank and Sent to Bank-Unreconciled. You can press F5 (Amount View) if you want to see the amount of the transactions instead of the number of transactions.
Bank Reconciliation:
In this column, you can see the number of transactions that are Available Only in Books and Available Only in Bank. You can press F5 (Amount View) if you want to see the amount of the transactions instead of the number of transactions. If you want to change the view to see the deposit and withdrawal summary, press Ctrl+H (Change View) > Deposits & Withdrawals – Unreconciled.
Detailed View:
Press Alt+F5 (Detailed) to view the details like the Account No. and Date of Last Entry in Statement, under the Bank Ledger name.
8.2. e-Payments Report
If you drill down from the e-Payments column in the Banking Activities report, you will see the e-Payments report displaying the details of transactions under Pending for Sending to Bank and Sent to Bank-Unreconciled.
- Open the e-Payments report.
- Press Alt+G(Go To) > type or select Banking Activities.
Alternatively, Gateway of Tally > Banking > Banking Activities.
- In the Banking Activitiesscreen, press Enter on the count of transactions displayed under the e-Payments column.
The e-Payment report screen appears.
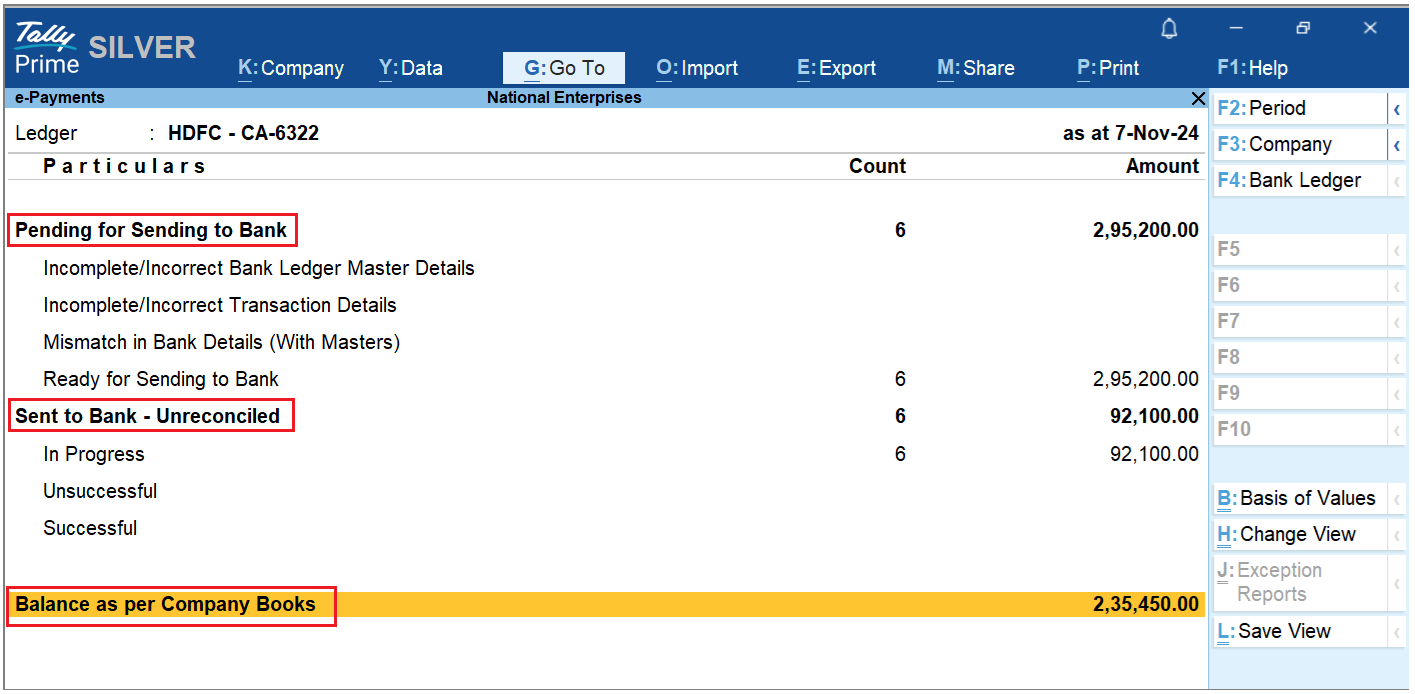
From the e-Payment report, you can see the following:
Pending for Sending to Bank:
You can see the number of transactions along with the amount that is pending for sending to the bank. You can also see the breakdown of the transactions under the following headings.
- Incomplete/Incorrect Bank Ledger Master Details:
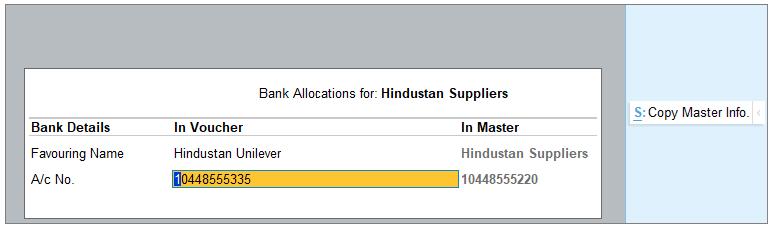
This header reflects the number of transactions along with the amount when the Bank Ledger Master has incorrect or incomplete details. Once you drill down, you can see the transactions along with the error. If you drill down further, you can see the Bank Allocation screen, and you can update the details missing or incorrect. Once the transaction details are corrected, it will move to Ready for Sending to Bank.
- Incomplete/Incorrect Transaction Details:
This shows the number of transactions that are not sent to the bank due to incomplete or incorrect details. Once you drill down, you can see the transactions along with the error. If you drill down further, you can see the Bank Details screen, and you can update the details missing or incorrect in the Bank Allocation sub-screen. Once the transaction details are corrected, it will move to Ready for Sending to Bank.
- Mismatch in Bank Details (With Masters):
You will see the count of transactions under this heading when the bank details of the beneficiary are altered while recording or after recording the payment entries. Resolve the mismatch and the transactions will move to Ready for Sending to Bank.
- Ready for Sending to Bank:
This shows the number of transactions that can be sent to the bank for e-payments.
Sent to Bank – Unreconciled:
You can see the number of transactions along with the amount that is sent to bank but are unreconciled. You can also see the breakdown of the transactions under the following headings.
- In Progress:
This shows the number of transactions along with the amount that was sent to the bank but is not yet reconciled.
- Unsuccessful:
This shows the number of transactions along with the amount that was sent to the bank but was not successfully reconciled.
- Successful:
This shows the number of transactions along with the amount that was sent to the bank and was successfully reconciled.
Balance as per Company Books:
It shows the book balance of the company. Drill down from the company book balance to open the Bank ledger voucher report.
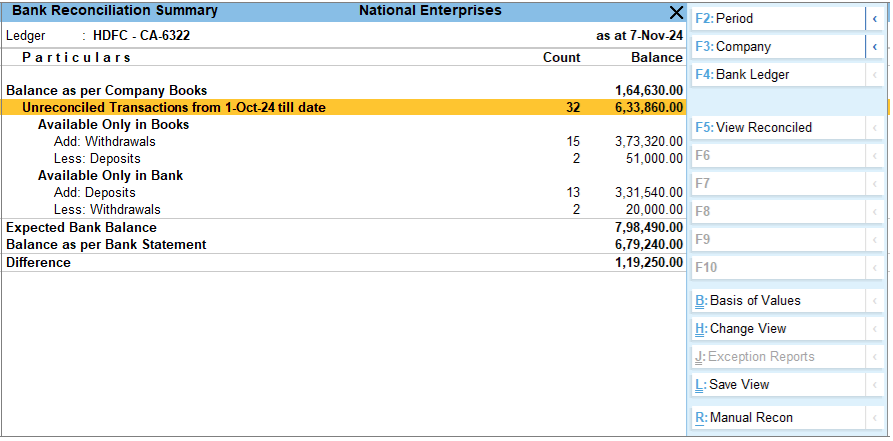
8.3. Bank Reconciliation Summary Report
If you drill down from the Bank Reconciliation column in the Banking Activities report, you will see the Bank Reconciliation Summary report. It displays the book balance of the company, Unreconciled Transactions, transactions Available Only in Books and Available Only in Bank and the Expected Bank Balance.
- Open the Bank Reconciliation Summary report.
- Press Alt+G(Go To) > type or select Banking Activities.
Alternatively, Gateway of Tally > Banking > Banking Activities.
- In the Banking Activitiesscreen, press Enter on the count of transactions displayed under the Bank Reconciliation column.
The Bank Reconciliation Summary report screen appears.
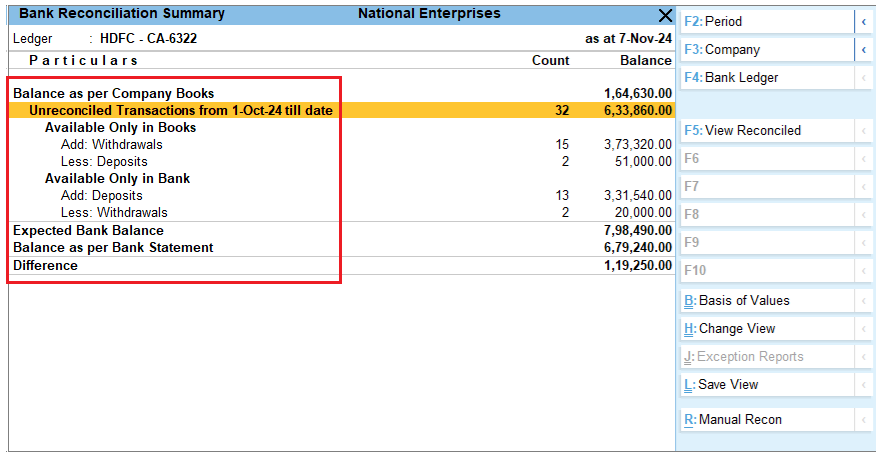
From the Bank Reconciliation Summary report, you can see the following:
Balance as per Company Books:
It shows the book balance of the company as of the report date.
Unreconciled Transactions from 1-Oct-24 till date:
This shows the count of all unreconciled transactions of books and bank, and the net of unreconciled amounts as on the report date.
Available Only in Books:
Under this header, you can see the number of unreconciled transactions along with the amount that was withdrawn or deposited. You need to add the withdrawal amount and deduct the deposits from the book balance to arrive at the bank balance. To view the details as Deposit and Withdrawal, press Ctrl+H (Change View) > Deposits & Withdrawals – Unreconciled.
Available Only in Bank;
Under this header, you can see the number of unreconciled transactions along with the amount that was withdrawn or deposited. You need to deduct the withdrawal amount and add the deposits from the book balance to arrive at the bank balance. To view the details as Deposit and Withdrawal, press Ctrl+H (Change View) > Deposits & Withdrawals – Unreconciled.
Reconciled in Subsequent Period:
If the recon summary is viewed for any other period other than ‘as at date’, and if there are any unreconciled transactions that are reconciled after the ‘to date’ of the report, such transactions will be shown under this header row.
Expected Bank Balance:
This reflects the balance that should be in your bank.
Balance as per Bank Statement:
This displays the balance per the imported bank statement. If the last imported bank transaction is prior to the report beginning date, then this header will be suffixed with ‘Balance as per Bank Statement as of <Date>’. This row starts appearing when you import the bank statement for the first time.
Difference:
This row displays the difference between the Expected Bank Balance and Balance as per Bank Statement.
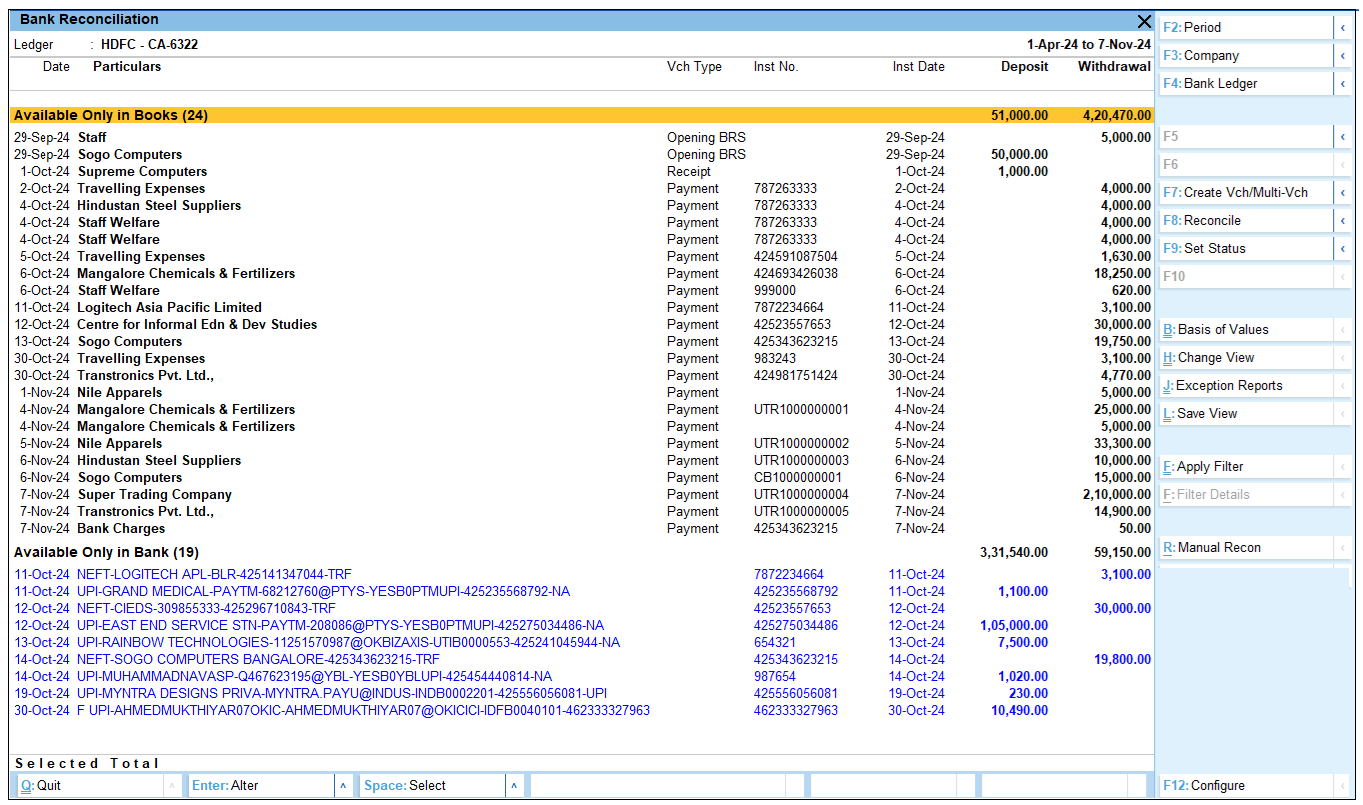
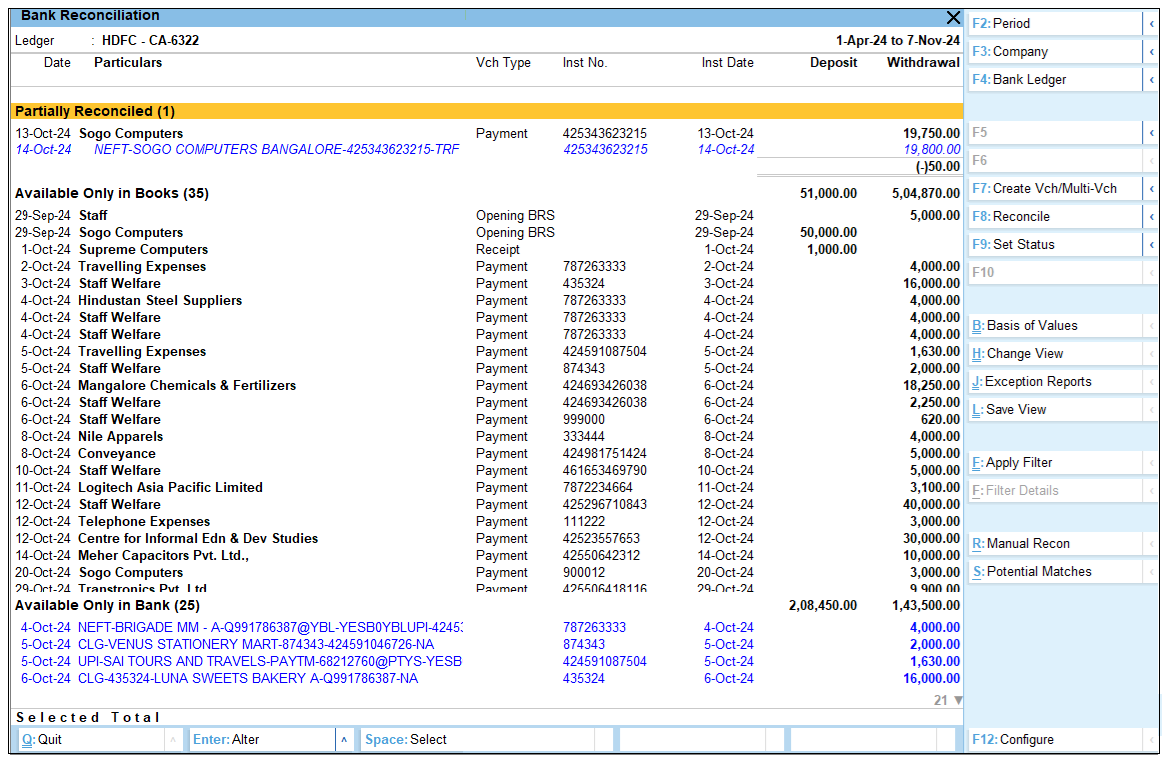
8.4. Bank Reconciliation Report
If you drill down from the Unreconciled Transactions in the Bank Reconciliation Summary, you will see the Bank Reconciliation report. This report displays all the unreconciled transactions Available Only in Books and Available Only in Bank. This report will also include the Exact Matches and Partially Reconciled transactions as they also form part of unreconciled transactions. You can create vouchers, reconcile your transactions, set the status for your transactions, perform manual recon and see potential match suggestions from this report.
Open Bank Reconciliation report.
- Press Alt+G(Go To) > type or select Banking Activities.
Alternatively, Gateway of Tally > Banking > Banking Activities.
- In the Banking Activitiesscreen, press Enter on the count of transactions displayed under the Bank Reconciliation column.
The Bank Reconciliation Summary report screen appears.
- In the Bank Reconciliation Summaryscreen, press Enter on the Unreconciled Transactions.
The Bank Reconciliation screen appears.
9. Auto Reconciliation of Bank Transactions
If you want to reconcile your bank transactions automatically without spending much time then you can enable the option of auto-reconciliation in your bank ledger. Additionally, you can configure it to find the exact match for reconciliation.
With the Enhanced Bank Reconciliation feature in TallyPrime, once you import the bank statement for the period you can see the exact match in your Bank reconciliation report.
You can further view the potential match suggestions, select a transaction from either bank or book and find a match to reconcile.
Additionally, you can modify a reconciled or partially reconciled transaction and also select a transaction and match to reconcile between bank and book transactions. You also have the option to unlink any linked transaction and reopen the transactions for reconciliation.
In this section
- Reconcile transactions with exact match
- Select transactions and reconcile
- Reconcile transactions with potential match
- Reconcile transactions by finding a match
- Reconcile transactions with partial match
- Unlink transactions
9.1. Reconcile transactions with exact match
While configuring the bank ledger for auto-reconciliation, you can see the default setting to identify exact matches when you import a bank statement. Once you import the bank statement, you can see the exact matches in the Bank Reconciliation report. If you have enabled the option Automatically Reconcile Exact Matches found, then the exact matches will automatically get reconciled once you import the bank statement.
- Reconcile transactions with exact match.
- Open the Bank Reconciliation
You can see the list of transactions under Exact Match section.

- Select a single or multiple transactions and press F8(Reconcile) to reconcile.
The transactions linked between the bank and the book get reconciled.
9.2. Select Transactions and Reconcile
After you have reconciled all your exact matches, from the remaining transactions available only in books and available only in bank section, you can select transactions from each section and reconcile them. You can select and match in the following ways where the amounts match between book and bank:
- Select one book transaction and one bank transaction.
- Select multiple book transactions and one bank transaction.
- Select one book transaction and multiple bank transactions.
You can also apply filter and give the amount or instrument number to identify the matching transaction and reconcile them.
- Select transactions and reconcile.
- Open the Bank Reconciliation (See Para-8.4)
- Select one transaction from Available Only in Books and one transaction from Available Only in Bank.
- Press F8(Reconcile) to reconcile the transactions.
To search the transactions both from book and bank easily, you can apply filter.
- Select transactions by applying filter.
- Open the Bank Reconciliation (See Para-8.4)
- Press Ctrl+F(Apply Filter).
The Basic Filter screen appears.

- In the Basic Filterscreen, mention the amount or instrument number in the Look for
It will filter the transaction from both the bank and the book.
- Select the transaction and press F8 (Reconcile) to reconcile the transaction.
The transactions between the bank and the book get reconciled.
9.3. Reconcile Transactions with Potential Match
You can also reconcile your bank and book transactions with the potential match suggestions. The suggestions are displayed under different sections. The default view is Potential Matches for Books (As per Rules) where you can see the book transactions under the different matching rules. You can choose to change your view to Books (As per Transactions), Bank (As per Rules), or Bank (As per Transactions).
You can also configure the potential match as required. If there are no potential matches available under a particular rule, you can change view and select other rules to view the potential matches.
- Reconcile transactions with potential match
- Open the Bank Reconciliation
- Press Alt+S (Potential Matches) to view the potential match suggestions.
You can see the potential matches under different sections.

- Select the single or multiple matching sets at once and press F8 (Reconcile) to reconcile.
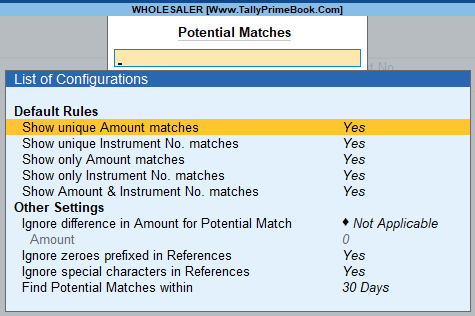
You can also configure your potential match,
- In the Potential Match screen, press Alt+S (Potential Match Configuration).
You can see the List of Configurations.
9.4. Reconcile Transactions by Finding a Match
If you have more transactions to reconcile, you can select transactions from either Available Only in Books or Available Only in Bank section and find a match.
- Reconcile transaction by finding a match.
- Open the Bank Reconciliation
- Select a transaction either from Available Only in Books or Available Only in Bank and press F8(Reconcile).
The Bank Reconciliation – Find Matches screen appears.
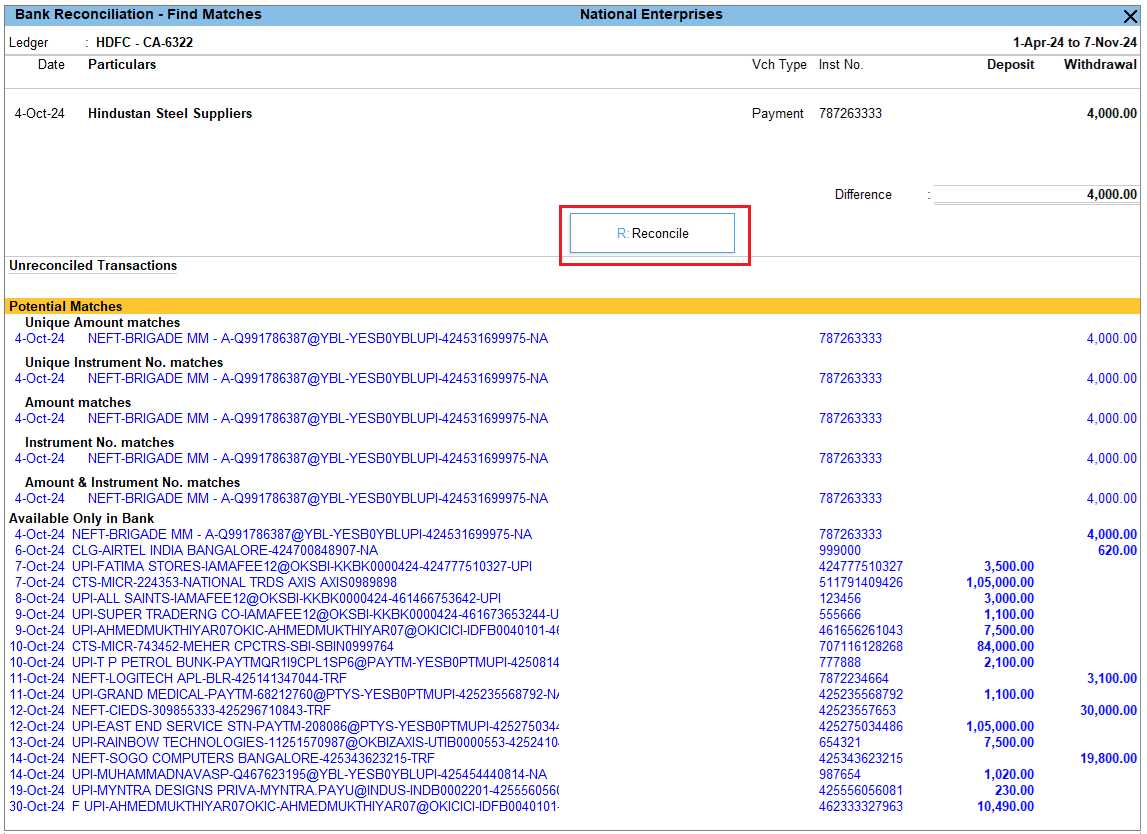
- Inthe Bank Reconciliation – Find Matches screen, the selected transaction appears in the top section, and the bottom sections display the corresponding transactions along with Potential matches.
- Select the transaction from potential match and/or from Available only in Books or Bank,and press F9 (Add).
- The transaction gets added to your selected transaction.
- Press R(Reconcile) to reconcile the transactions.
The transactions between the bank and the book get reconciled.
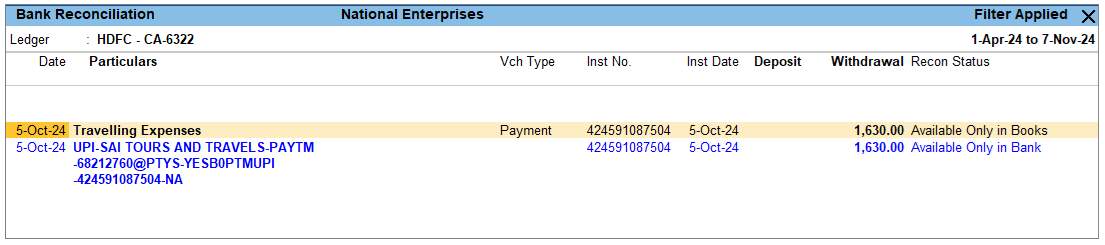
9.5. Reconcile Transactions with Partial Match
You may have transactions that are not a complete match. This may happen if there are bank charges added by the bank or if there is a typo while recording the transaction in your book. In such cases, if you select the transactions and try to reconcile, it will appear as Partly reconciled. So you can alter your transaction or find another transaction to add so that you can match both the bank and book amount and reconcile. You can also see the difference between the transactions selected before you reconcile them.
- Reconcile transactions with partial match.
- Open the Bank Reconciliation
- Select the transactionsthat are not matching and press F8 (Reconcile).
You can see the transactions appearing under Partially Reconciled section.
- If you want to alter your transaction, press Enteron your book transaction.
The Accounting Voucher Alteration screen appears.
- Alter the transactions and press Ctrl+Ato save the voucher.
Once you alter and save the voucher, if both the bank and book amount match it will automatically get reconciled.
9.6. Unlink Transactions
If you have mistakenly reconciled a book transaction with the wrong bank transaction during auto-reconciliation or otherwise, you can unlink them to correct the error and make the transaction available for proper reconciliation.
- Unlink the transactions.
- Open the Bank Reconciliation Summary
- Press F5(View Reconciled).
- The Reconciled transactions – Monthly Summaryscreen appears.
- Select a month and then select the transactions under Reconciled Through Linkingand press Alt+F8 (Unlink) to unlink.
- You can also select the transaction and press F8(Modify Match).
- In the Bank Reconciliation – Reconciled – Modify Matchesscreen, select the corresponding transactions and press F10 (Remove) to unlink.
- Select the relevant transactions from the Unreconciled Transactions section and press F9 (Add) to add the relevant transactions and reconcile.
You can also unlink the exact matches in the Bank Reconciliation report. Once the transactions are unlinked, you can view them in Bank Reconciliation report and reconcile them correctly.
10. Manual Reconciliation of Bank Transactions
Bank reconciliation can be done manually if your organisation follows that process or if you cannot download the required bank statement format for auto-reconciliation. In manual reconciliation, you will need to update the bank clearing date for each transaction. With the Connected Banking feature in TallyPrime, you can now select a transaction and set the status as reconciled, on hold or processed manually.
To perform the bank reconciliation manually, you need to select the manual mode and enter the bank date on which the amount is reflected in your bank. You can also see the Balance as per Company Books, amount Available Only in Books and Available Only in Bank, Expected Bank Balance, Balance as per Bank Statement and Difference if any at the end of the report.
- Open the Bank ReconciliationSummary or Bank Reconciliation
- Press Alt+R(Manual Recon).
The Bank Reconciliation (Manual) screen appears. You can only see the transactions that are available in books.
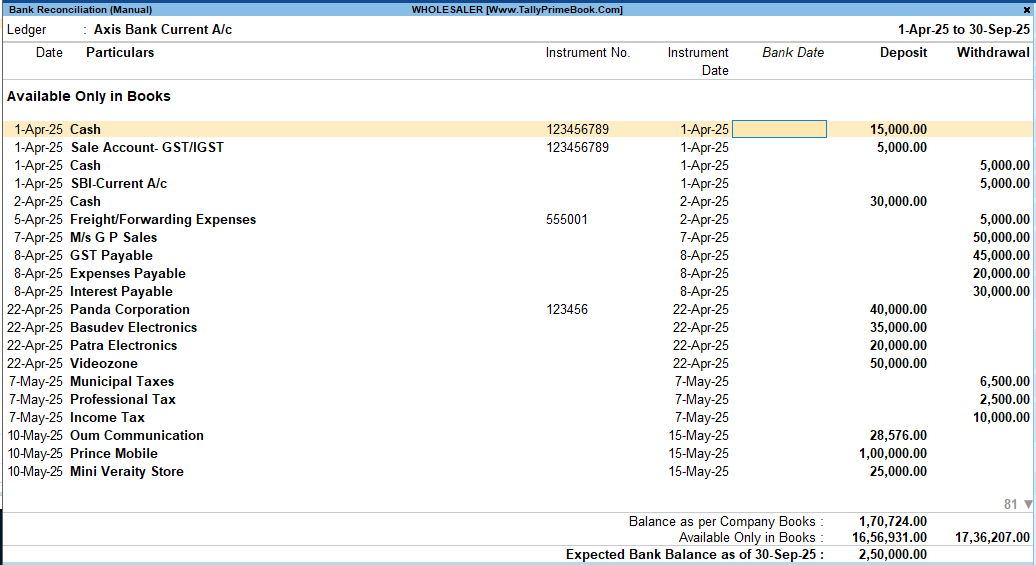
- In the Bank Reconciliation (Manual)screen, enter the Bank Date column with Instrument Date, New Date or Voucher Date.
You can also enter the date manually. - Once the bank dates are updated, press Ctrl+Ato accept the screen.
The transactions between the bank and the book get reconciled.
10.1. Set Status for Transactions
You can manually set the status of each transaction as reconciled or unlink any manually reconciled transactions.
- Set status for transactions.
- Open the Bank Reconciliation
- Select a transaction and press F9(Set Status).
- In the Set Statusscreen, select Reconciled as the Transaction Status.
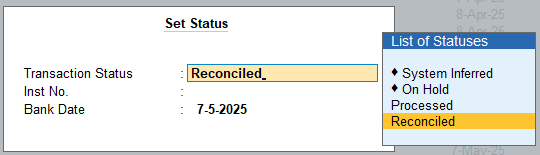
The Inst No. and Bank Date is auto-updated based on the entry recorded in the books. If the instrument number is not updated in the book transaction, then the instrument number entered in Set Status will get updated in the book transaction.
- You can update the Bank date, with the date when the transaction is reflected in the bank statement.
Once reconciled, you can see the transaction under Reconciled Manually in the Bank Reconcilitaion – Reconciled report.
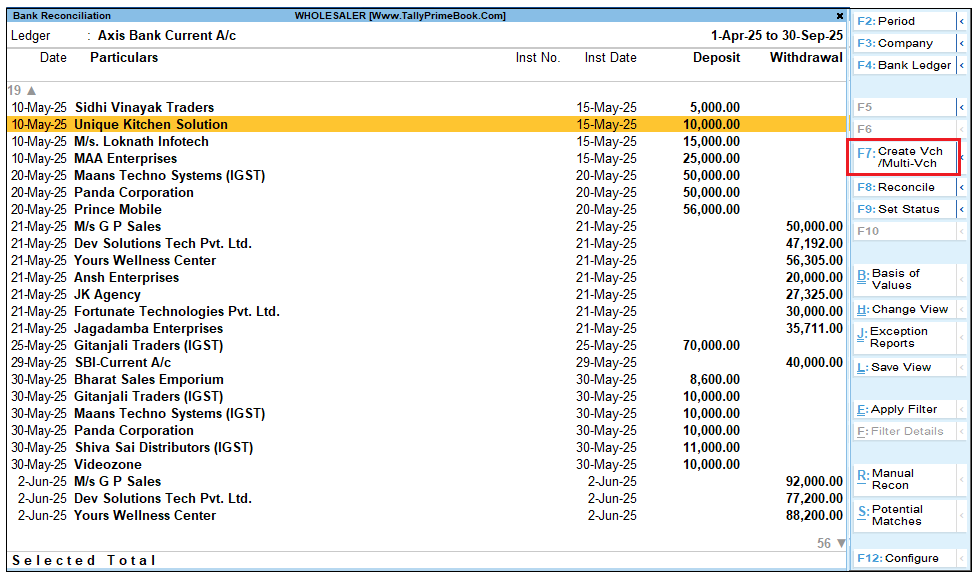
11. Create Automated Vouchers
When you import a bank statement, there may be entries that are not recorded in the books. You can create those transactions directly from Bank Reconciliation report. Select a single transaction from the bank and create a single voucher,
After importing the bank statement, you may come across transactions like bank charges or bank interest, even an amount received from a customer which is not recorded in your books. You can select the bank transaction and directly create a single voucher. Once the voucher is created, the transactions get reconciled automatically.
- Create single voucher.
- Open the Bank Reconciliation
- Select the transaction and press F7(Create Vch/Multi-Vch).
The Accounting Voucher Creation screen appears.
- Record the transaction and press Ctrl+Ato save the voucher.
Once the voucher is saved the transaction will get reconciled in the Bank Reconciliation report.