
Even if you do not need extra voucher types, you would normally alter the predefined voucher types to customize them according to your needs, e.g., to control their numbers.
Gateway of Tally > Chart of Accounts > type or select Voucher Type.
Alternatively, press Alt+G (Go To) > type or select Chart of Accounts > Voucher Type.
The screen appears as shown below:

[25-Sales Process in TallyPrime-3 & Higher]
Select one of the Pre-defined Voucher List to be Alter , say For Example – Sales
| Note:
1. You can also create a New Voucher on the basis of Pre-defined Voucher types. But the screen features and settings are same. 2. This Alternation of Voucher is same for all Pre-defined Vouchers |
The pre-defined Sales Voucher screen will be shown below :

[26-Sales Process in TallyPrime-3 & Higher]
The Voucher Type creation screen is divided into three sections depending on various settings.
- General
- Printing
- Voucher Class
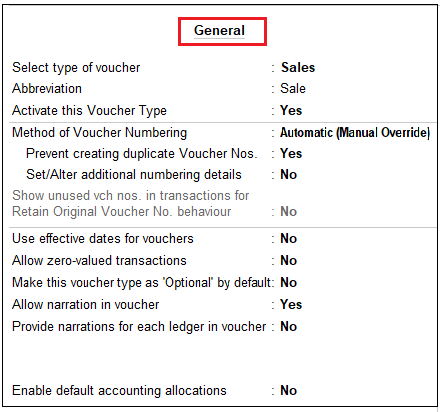
1. ‘General’ Setting in Voucher Type
[26-A-Sales Process in TallyPrime-3 & Higher]
Type of Voucher
The type of voucher should be any one of the predefined voucher types (already listed). The new voucher type would inherit the properties of this predefined voucher type. It would function exactly like the predefined voucher.
Abbr (Abbreviation)
Even if the Abbreviation is not specified, TallyPrime automatically sets a default name for the Voucher. In this example, Sale is the abbreviation. Though there is no restriction on the length of the abbreviation, it should preferably consist of five characters or less.
(A) Method of Voucher Numbering
This is, perhaps, one reason for your opting for a new voucher type. There are Five methods available: The Methods of Numbering list appears as shown below:

[27-Sales Process in TallyPrime-3 & Higher]
Automatic
This method is flexible. If Automatic method is selected, then TallyPrime numbers the vouchers automatically.
Automatic (Manual Override)
Select Automatic (Manual Override) if you want to auto-number the vouchers and manually override the auto-numbering, if required. For example, if the voucher number is 10, you can manually override the voucher number as required, say 21. The next voucher number will be 22.
Set Prevent Duplicated to Yes to avoid duplicate voucher numbers during entry. You can enable this option only if there are no transactions of this voucher type.
Manual
This method allows you to number the vouchers manually. It does not check for the sequence of the numbers and permits you to specify anything that you wish in the voucher number field. However, you may choose to prevent entry of duplicate numbers. If you would like to do so, then set Prevent Duplicates to Yes.
- Prevention of Duplicates is possible if you enable the option at the time of creation. You may enable it later (by alteration) only if there are no transactions of this voucher type.
- If you face difficulty due to existing transactions, just create another voucher type for preventing duplicates of subsequent voucher numbers.
Multi-user Auto
Select this option to enable the allotment of subsequent voucher number in a multi-user environment when multiple users are working on the same company data and recording vouchers.
None
This will disable numbering of such vouchers. If you select this method, no further information is required.
(B) Configure in Method of Voucher Numbering for GST:
If the Method of Voucher Numbering is set to Automatic, then two additional fields are displayed…

[28-Sales Process in TallyPrime-3 & Higher]
(i) Numbering behaviour on insertion/deletion:
You will see this option if you have selected Automatic or Multi-user Auto as the Method of Voucher Numbering. Generally, when you insert or delete a transaction, your existing voucher numbers might get affected. However, you now have the option to either retain the original voucher numbers or renumber the vouchers, as per your requirement.
(ii) Set / Alter additional numbering details :
Setting this field to Yes, Voucher Type Creation (Secondary) screen is displayed.

[29-Sales Process in TallyPrime-3 & Higher]
The figure shown in the below voucher for Credit Card Purchase which will be available under the Purchase Voucher.

[30-Sales Process in TallyPrime-3 & Higher]
Number Scheme for different types of Vouchers :
You can generate different number series for different types of Voucher for identifying the voucher as monthly or by yearly. Example :
| Voucher type | Method | Start Number | Prefix | Suffix |
| Contra
Payment Receipt Journal Purchase Sales |
Yearly
Yearly Yearly Yearly Yearly Yearly |
1
1 1 1 1 1 |
CTR/
PMT/ REC/ JRN/ PUR/ SAL/ |
/23-24
/23-24 /23-24 /23-24 /23-24 /23-24 |
(iii) Show unused vch nos. in transactions for Retain Original Voucher No. behaviour:
When you delete transactions or mark them as optional, then the corresponding voucher numbers might remain unused. This option will help you view such unused voucher numbers during voucher entry and reuse the numbers, as required.
This option will appear when you have set the numbering behaviour as Retain Original Voucher No..
Press Ctrl+A to save the details.
2. A further discussion on these options is necessary.
 |
[31-Sales Process in TallyPrime-3 & Higher]
Use EFFECTIVE dates for Vouchers?
Select Yes if you want to enter effective dates for vouchers. You would opt for this option when you have recorded a transaction on a particular date, but the voucher comes into effect only on a future date. If the effective date is entered, the overdue/ageing will be considered from the effective date and not from the voucher date.
Allow zero-valued transactions
Set the option Allow zero-valued transactions to Yes if required. enabling this option will allow this voucher type to accept transaction without any value.
Make ‘Optional’ as Default
Setting this option to Yes, will set your Voucher to Optional Voucher by default. Refer to Optional Vouchers for further details.
Note: For Memorandum and Reversing Journal voucher the option Make Optional as Default will not be shown.
Allow Narration in voucher ?
Select Yes to give a common narration for the entire voucher. TallyPrime vouchers can have multiple entries. Hence, you may wish to give a common narration for all the entries of the voucher. Select No, if you do not want a common narration.
Provide Narrations for each ledger in voucher – Yes
Select Yes, if you want to give a separate narration for each entry of a voucher. This would be applicable for a multiple entry voucher where you want separate details for each entry. Select No if you do not want a separate narration for each entry.

[32-Sales Process in TallyPrime-3 & Higher]
Note: To get the Narration for each entry raise the sales in As Voucher and for Payment or Receipt vouchers, set Use Single Entry mode for Pymt/Rcpt/Contra to No in F12:Configurations.
For Delivery Note, Receipt Note, Sales Order, Purchase order, Physical Stock, Stock Journal, Rejection In and Rejection Out, the option Provide narrations for each ledger in voucher is not available.
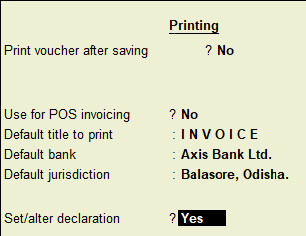
3. ‘Printing’ Setting in Voucher Type
[33-Sales Process in TallyPrime-3 & Higher]
Print after saving voucher?
Select ‘Yes’ to print every voucher after entering it, else select ‘No’. This is suitable for an online environment where you use TallyPrime printed vouchers as the formal voucher. Remember, that the transaction is already recorded and posted and should you wish to make corrections to the printed voucher, you must alter the TallyPrime voucher online and print it again.
Note: If we select Receipt as Type of Voucher the option Print Formal Receipt after saving will be displayed. Depending on the Type of Voucher you have selected to create or alter, different printing features appear in this field.
Use for POS (Point Of Sale) Invoicing
If you would like to use the sales invoice as POS invoice then set this option to Yes.
Default Print Title to Print in Invoice
If you would like to give the default print title for POS Invoice then specify the same. So when ever you print the POS Invoice this title will be printed.
Default Bank Account Details to Print in Invoice
Select the Bank Ledger from a list of created Bank Accounts Ledger which will display Bank Account details that given at the time of creation inside the Invoice .
Default Jurisdiction to Print in Invoice
Place of Jurisdiction in case of any legal matter has to be mention which will be print below the invoice.
Set / Alter Declaration to Print in Invoice
It this option is set to Yes, a Space will be shown to write any Declaration or Terms & Conditions to be printed inside the Invoice . (This is default declaration by the Tally)

[34-Sales Process in TallyPrime-3 & Higher]
4. ‘Name of Class’ Setting in Voucher Type

[35-Sales Process in TallyPrime-3 & Higher]
[ Click… Voucher Classes for Sale Voucher in TallyPrime-Rel.3 & Higher ]