
This topic covers printing your sales invoice. There are multiple configurations with additional details you can do before printing your invoice which has been described in details with Examples here …
(1) Change of Invoice Title
(2) Print Sales Invoice with Company LOGO
(3) Printing Bank Details in Sales Invoice
(4) Change Declaration / Terms & Conditions in Sales Invoices
(5) Setting Print Size of your Sales Invoice
(6) Add Description for Items & Ledgers to Print in Invoice
(7) Print Proforma Invoice
(8) Print Invoice on Saving a Voucher
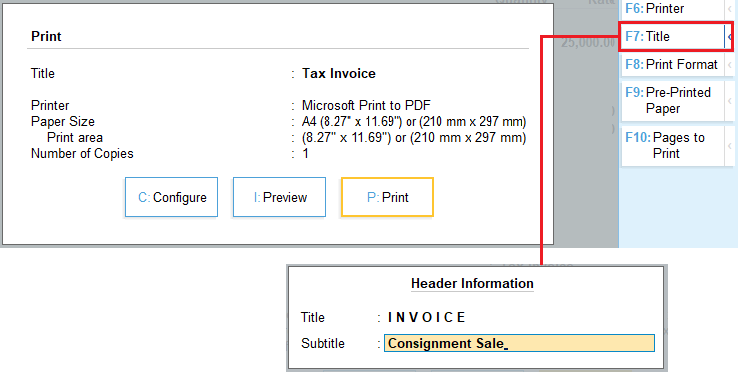
(1) Change of Invoice Title in Sales Invoice
TallyPrime provides you with the option to change the title and subtitle of your invoice. You can decide on the Invoice title based on your business requirement. Once you change the title on the configuration page, it remains the same for the rest of the invoices, until changed.
- Change the title and subtitle of the invoices once and it continues for the rest of the invoices.
- In the sales voucher, press Ctrl+P.
Alternatively, press Alt+P(Print) > Current. - PressF7 (Title) to enter the required title and subtitle.
- In the sales voucher, press Ctrl+P.
[143-Sales Process in TallyPrime-3 & Higher]
- Press Enterto accept the screen.
- Print the voucher with the changed title and subtitle.
- In the print screen, press I(Preview) to check the invoice before printing, if needed.
- Press P (Print) to print.
[144-Sales Process in TallyPrime-3 & Higher]
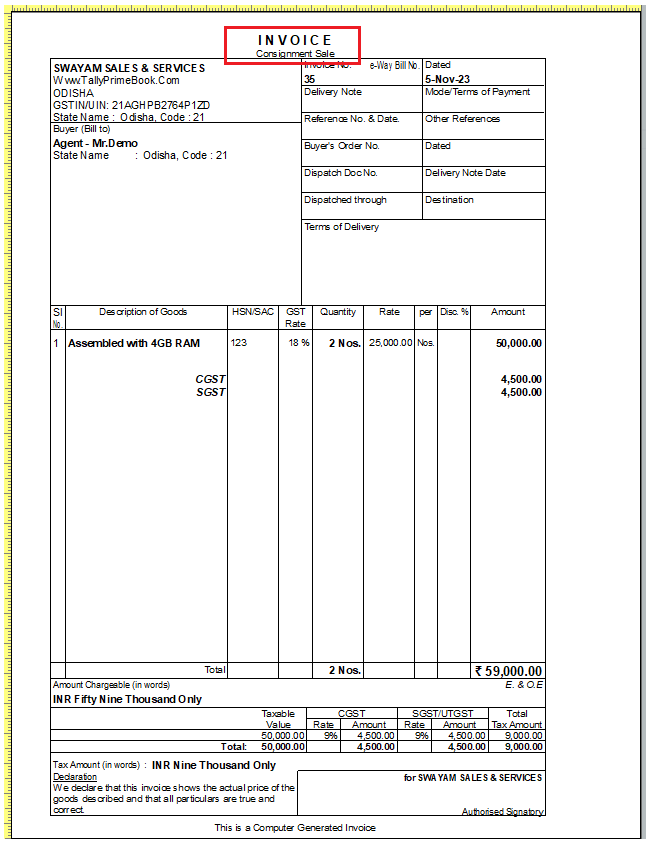
The title you have specified appears on the top of the printed invoice. If you have used a subtitle, it appears below the title. This remains the same until you change it again.
(2) Print Sales Invoice with Company LOGO
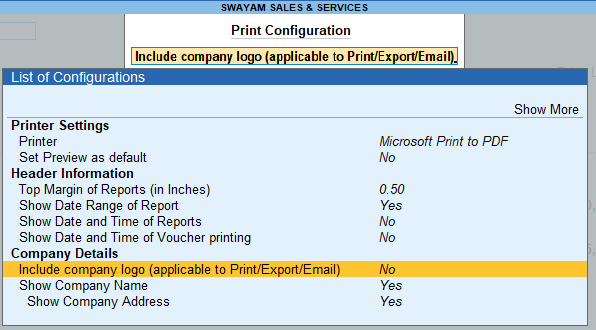
You can print the company logo and the company name on your invoices which helps customers remember your business easily.
- Enable the use of the company logo in TallyPrime.
- In the sales voucher, Press Alt+P or Select P:Print from the Tool bar and Select N (Configure).

[145-Sales Process in TallyPrime-3 & Higher]
- Press Enterto the Option inside Company Details : Include Company Logo (applicable to Print/Export/Email) set it to Yes.
[146-Sales Process in TallyPrime-3 & Higher]
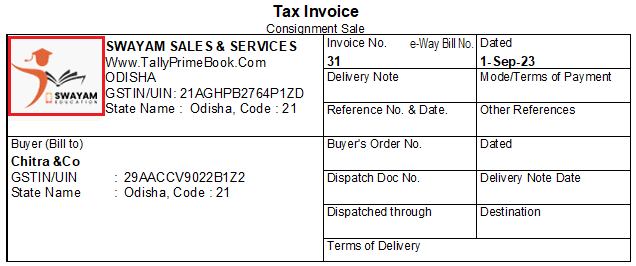
- Select the Image Pathand Image File Name.
For example, D:companylogo.jpg.

[147-Sales Process in TallyPrime-3 & Higher]
- Print the voucher with the company logo.
- In the Printscreen, press I (Preview) to check the invoice before printing, if needed.
- Press P(Print) to print.
[148-Sales Process in TallyPrime-3 & Higher]
The company logo appears on the top left side along with the company name on the printed invoice.
(3) Printing Bank Details in Sales Invoice
In the sales invoice, you can print your bank details for the customers to make payments directly to your bank account. If you need to provide the bank details in some invoices, then you can select the bank name while printing the invoice. However, you can specify the bank details as default in the sales voucher type if you need to print the bank details in all the invoices.
You can also mention your mobile number along with the account details if you are willing to receive money through UPI.
- Select the bank name to print in the invoice.
- In the sales voucher, press Ctrl+P.
Alternatively, press Alt+P(Print) > Current > press C (Configure). - Type or select Show Bank Details> press Enter to set it to Yes.
If it is already enabled, then you can select the bank ledger. - Type or select Show Bank Name> press Enter to select the bank ledger.
The bank ledger is created with the account number and other relevant details.

[149-Sales Process in TallyPrime-3 & Higher]
- Press Ctrl+Ato save the changes.
- Press P(Print) on the Print

[150-Sales Process in TallyPrime-3 & Higher]
If you need to change the bank details, you can select either a different bank from the bank list or you can change the account number in the same bank.
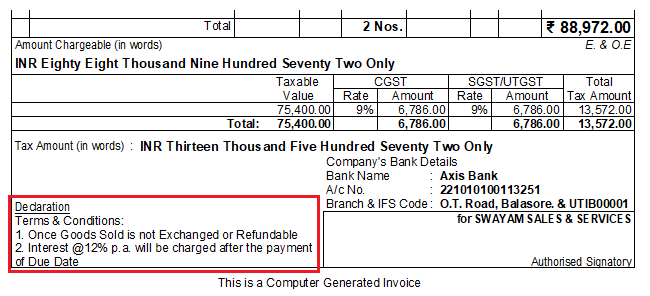
(4) Change Declaration / Terms & Conditions in Sales Invoices
If your business policy has any declarations related to the sales of goods and services, and you want to print them in your invoice, you can do so in TallyPrime. In TallyPrime there is a default declaration which appears in all the invoices. You can alter the declaration and print it accordingly. The altered declaration appears in all future invoices until you change it.
- Enable the sales voucher type to print the declaration.
- Gateway of Tally> Alter > Voucher Type > type or select Sales > and press Enter.
- Go to Set/alter declarationunder Printing > set it as Yes.
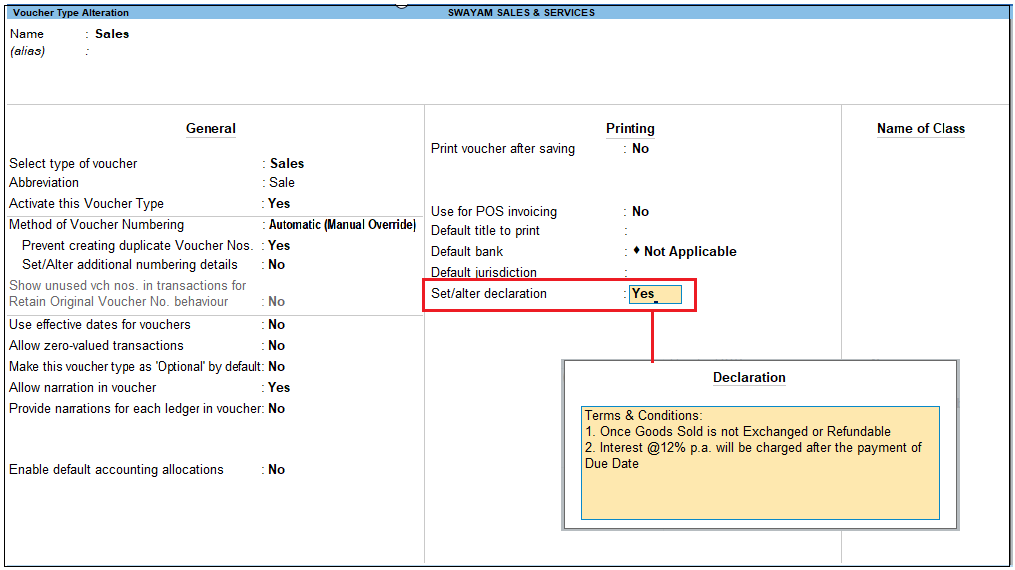
[151-Sales Process in TallyPrime-3 & Higher]
- Change the declaration, as needed.
Use Ctrl+Enterto break lines for multi-line entry.
- Print the declaration in the sales invoice.
-
- In the sales voucher, press Ctrl+P.
Alternatively, press Alt+P (Print) > Current > press C (Configure). - Type or select Show Declaration and press Enter to set it to Yes.
- In the sales voucher, press Ctrl+P.

[152-Sales Process in TallyPrime-3 & Higher]
-
- Press Ctrl+A to save the changes.
- Press P (Print) to print.
[153-Sales Process in TallyPrime-3 & Higher]
In the printed invoice, the declaration appears as provided and this declaration appears in all the invoices hereafter.
(5) ‘Setting Print Size of your Sales Invoice’ to Use Less Paper for Printing
By default, TallyPrime prints invoices on A4-size papers. In certain cases, your transaction may involve multiple line items and it may take more than a single page to print. You can set the print size for your invoice and use less papers for printing. Printing invoices as per the print and paper sizes depends on your printer. The default height is set to 10 for an A4 paper. If your invoice requires only half the size, change the height to 5 inches and replace the printing paper with A5.
You can also enable the option for Optimise printing to save paper.
- Set the Invoice Print Size.
- In the sales voucher, press Ctrl+P.
Alternatively, press Alt+P(Print) > Current. - Press C (Configure) > press Enteron Show More > type or select Printer Settings and press Enter
- Height of normal invoice (in Inches): By default, the standard height is set to 10 inches for an A4 paper. If your invoice requires only half the size, change the height to 5 inches. If your printer’s tray contains A4 size papers, replace them with papers appropriate for printing. For example, to print an invoice of a height of 5 inches, use A5 size papers.

[154-Sales Process in TallyPrime-3 & Higher]
- Enable Optimise printing to save paper.
- In the Print Configuration screen, type or select Optimise printing to save paperand press Enter to set it to
This option prints the maximum information in the print area and saves paper.

[154A-Sales Process in TallyPrime-3 & Higher]
- Press Ctrl+Ato save the changes.
- Press P (Print) to print the invoice.
[155-Sales Process in TallyPrime-3 & Higher]
As you print the invoice after enabling the option Optimise printing to save paper, the list of stock items appears on a single page. Similarly, if you set this option to No, the same information gets printed on two pages. Using appropriate print and paper sizes for printing your invoices helps you save paper.
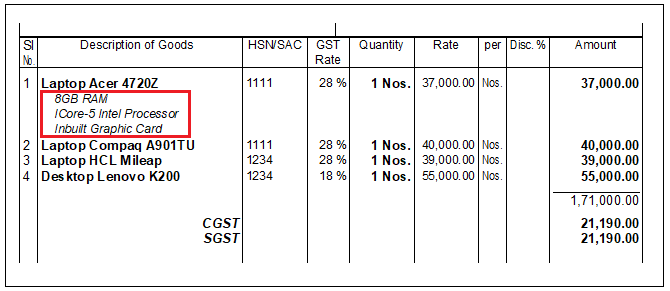
(6) Add Description for Items & Ledgers to Print in Invoice
You may deal with multiple variants of an item, say appliances of different motor capacities or services in different packages. You can add descriptions for these items or service details in the printed invoices for the buyer’s reference.
(i) Additional Description for Stock Items to Print
You can add descriptions for stock items and print the same. If you are selling food items, you can mention the main ingredients or if you are selling a mobile phone then you can mention the storage capacity or any other feature
- Enable the option to add description for stock items.
- In the sales voucher, Press F12 (Configure) > set Provide Additional Descriptions for Stock Items to Yes.

[156-Sales Process in TallyPrime-3 & Higher]
Henceforth, you can add descriptions for each item you select in every sales invoice until you disable the option.
-
- After selecting the item, enter the additional description in the sub-screen Description(s) for Item.
You can add more than one line of description by pressing Enter.
- After selecting the item, enter the additional description in the sub-screen Description(s) for Item.

[157-Sales Process in TallyPrime-3 & Higher]
-
- As always, press Ctrl+A to save.
- Print the description in the invoice.
-
- In the sales voucher, press Ctrl+P.
Alternatively, press Alt+P (Print) > Current > press C (Configure). - Type or select Show Additional Descriptions for Stock Items and press Enter to set it to Yes.
- In the sales voucher, press Ctrl+P.

[158-Sales Process in TallyPrime-3 & Higher]
-
- Press Ctrl+A to save the changes.
- Press P (Print) to print.
The description appears below each stock item entered during the voucher entry in the printed invoice.
[159-Sales Process in TallyPrime-3 & Higher]
(ii) Additional description for ledgers to print
Similar to adding descriptions to stock items, you can also add descriptions for ledgers and print the same. If you are selling services, you can mention details related to that service.
- Enable the option to add descriptions for ledgers.
- In the sales voucher, press F12 (Configure) > set Provide Additional Descriptions for Ledgers to Yes.
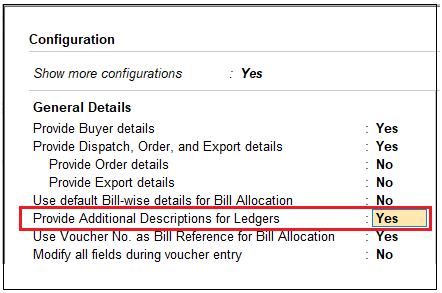
[160-Sales Process in TallyPrime-3 & Higher]
Henceforth, you can add descriptions for each ledger you select in every sales invoice until you disable the option.
-
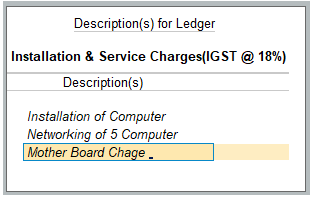
- After selecting the ledger, enter the additional description for the ledgers in the sub-screen Description(s) for Ledger.
You can add more than one line of description by pressing Enter.
- After selecting the ledger, enter the additional description for the ledgers in the sub-screen Description(s) for Ledger.
[161-Sales Process in TallyPrime-3 & Higher]
-
- As always, press Ctrl+A to save.
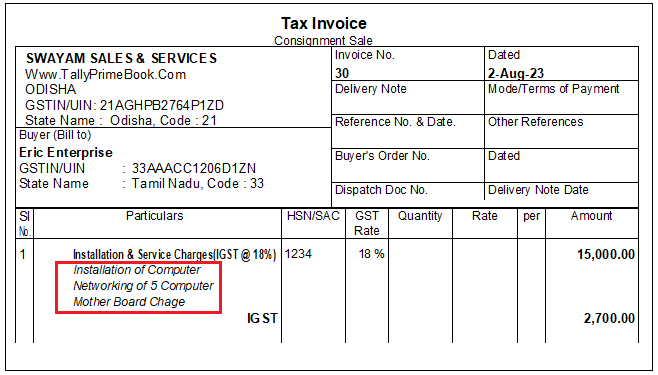
- Print the description in the invoice.
- In the sales voucher, press Ctrl+P.
Alternatively, press Alt+P (Print) > Current > press C (Configure). - Type or select Show Additional Descriptions for Ledgers and press Enter to set it to Yes.
- In the sales voucher, press Ctrl+P.

[162-Sales Process in TallyPrime-3 & Higher]
-
- Press Ctrl+A to save the changes.
- Press P (Print) to print.
The description appears below each ledger entered during the voucher entry in the printed invoice.
[163-Sales Process in TallyPrime-3 & Higher]
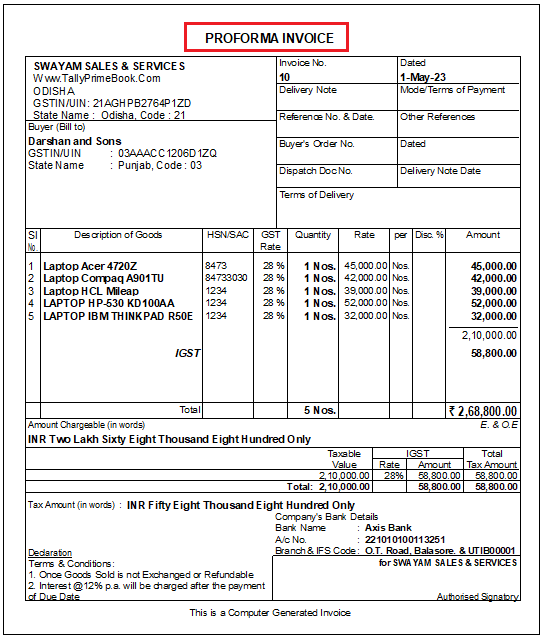
(7) Print Proforma Invoice (Optional Voucher)
In a business, it is a common practice to share a Proforma Invoice before the sales invoice is issued. A proforma invoice helps a buyer to understand better the sale deal. It contains all the details related to the sale including the item, quantity, rate, payment terms, date of delivery and so on. Based on the proforma invoice the buyer can decide on any changes or propose a price negotiation, or early delivery date. The buyer needs to confirm and agree to all the details mentioned in the Proforma invoice. Once you receive the confirmation you can work towards the sale of goods or services and issue a final tax invoice.
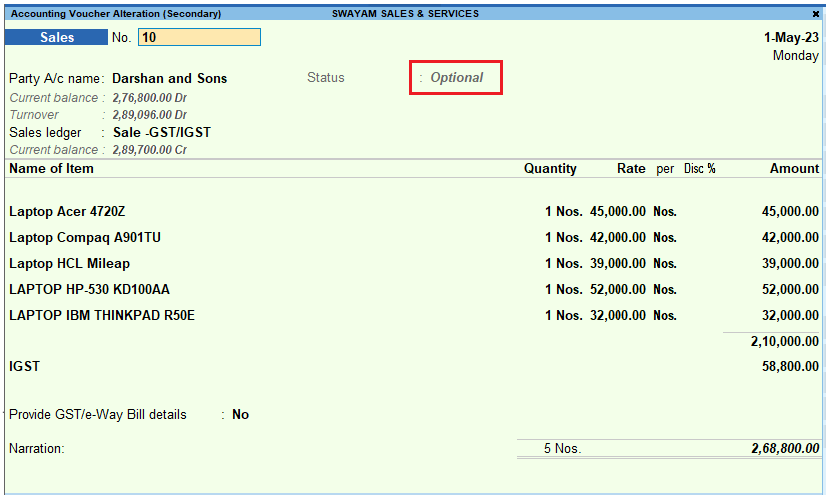
A proforma invoice in TallyPrime is a printout of an optional sales voucher. Once you mark a voucher as Optional, it does not impact your books of accounts. The seller also issues a proforma invoice to get an advance payment.
- Record optional sales vouchers.
- Press Alt+G (Go To) > Create Voucher > press F8 (Sales).
Alternatively, Gateway of Tally > Vouchers > press F8 (Sales). - Press Ctrl+L (Optional) to mark the voucher as an optional voucher. This button allows you to mark the voucher as optional or regular.
- Record the sales transaction with all the details
- Press Alt+G (Go To) > Create Voucher > press F8 (Sales).
[164-Sales Process in TallyPrime-3 & Higher]
-
- Provide Narration, if needed, and press Ctrl+A to save.
- Print proforma invoice.
-
- In the sales voucher, press Ctrl+P.
Alternatively, press Alt+P (Print) > Current. - Press I (Preview) to check the invoice before printing, if needed.
- In the sales voucher, press Ctrl+P.
[165-Sales Process in TallyPrime-3 & Higher]
-
- Press P (Print) to print.
The optional voucher gets printed as a Proforma Invoice.
(8) Print Invoice on Saving a Voucher
In TallyPrime, you can print vouchers immediately after saving or later. If you want to print the vouchers immediately, then enable the option Print voucher after saving in the Sales voucher type.
However, it may be possible that you print all the vouchers at the end of the day, or the invoices need to be approved before printing them. In such cases, you can disable the Print voucher after saving option in the voucher type.
- Enable the Print voucher after saving option.
- Gateway of Tally > Alter > Voucher Type > type or select the name of Voucher i.e.Sales Type and press Enter.
- In the Voucher Type Alteration screen, Set Print voucher after saving to Yes.

[166-Sales Process in TallyPrime-3 & Higher]
-
- Press Ctrl+A to save the voucher type.
- Record the sales voucher and save the voucher.
The Print screen appears. - In the Print screen.
- Press I (Preview) to check the invoice before printing, if needed.
- Press P (Print) to print.
[167-Sales Process in TallyPrime-3 & Higher]
You can print the invoices immediately after saving the voucher.