Cost Center
A cost centre is any unit of an organisation to which transactions (generally, revenue) can be allocated. When only costs or expenses are allocated to these units, they are referred to as Cost Centres.
Transactions are allocated to cost centres. This enables accounting all transactions for that particular cost centre. You can view the cost centre break up of each transaction as well as the details of transactions for each Cost Centre.
Some examples of Cost Centres are:
Examples of cost centres:
1. Departments of an Organisation, e.g., Finance, Manufacturing, Marketing, etc.
2. Products of a company, e.g., Tally ess 4.5, Tally eis 5.4,Tally 6.3, Tally ies 7.2 , Tally 9.0, TallyPrime etc.
3. Even individuals like, Salesman A, Salesman B, etc.
You can classify cost centres, just as you classify Group/Ledger accounts. You can have Primary Cost Centres and several levels of Cost Centres under each Primary Cost Centre.
Consider the following example.
- Primary Cost Centres – Finance, Manufacturing, Marketing.
- Under Marketing, classify the company’s sales executives (Salesman A, Salesman B, Salesman C) as Cost Centres.
This will help you track a sales executive’s performance, in terms of cost and revenue generated.
Allocate expenditure incurred on sales by the salesmen, as well as the sales generated by them, directly to their Cost Centres. The allocation is done at the time of voucher entry.
Cost Category
Cost categories are useful for organisations that require allocation of revenue and non-revenue items to parallel sets of cost centres means a transaction to more than one set of cost centres.
For example,
> Cost Centres such as Marketing, Finance and Manufacturing can now belong to a category – Departments.
> The Salesmen A, B, and C can be Cost Centres under a Category – Executives.
Matrix is as shown below :
| Cost Category >> | Branch | Department | Manager | Mob No. |
| Cost Center >> | Kolkata | Marketing | Regional Manager | 9437264738 |
| Mumbai | Administration | Area Manager | 9437264739 | |
| Delhi | Accounts | Sales Manager | 9437264740 |
1. Creating Cost Category and Cost Centre
Example : Allocate the Expenditure.
Paid Telephone / Telex / Fax Charges – Rs. 2,500 by Cash as per following Cost Centre & Cost Categories :-
| Branch | Department | Department | Mob No. | Allocation Amount |
| Kolkata | Accounts | Accounts | 9437264738 | 2500 |
Paid Travelling Expenses – Rs. 3,000 by Cash as per following Cost Centre & Cost Categories :-
| Branch | Department | Manager | Allocation Amount |
| Mumbai | Marketing | Sales Manager | 3000 |
Solutions:
1. Create following Cost Category
Branch
Department
Manger
Mob. No.
2. Gateway of Tally >Create > type or select Cost Category > press Enter.
You can also create Cost Category from Gateway of Tally > Chart of Accounts.
Alternatively, press Alt+G (Go To) > Create Master > type or select Cost Category > press Enter.
When only the Primary Cost Category is available, you will be prompted to create new Cost Category or alter the existing Primary Cost Category. Select Create or press C to create a new cost category.
354
Creating Multiple Cost Categories in one-go :
3. Gateway of Tally > Chart of Accounts > Cost Categories > press Enter.
4. Press Alt+H (Multi-Masters) > select Multi Create > and press Enter.
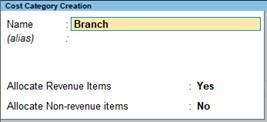
5. Enter the Name of Cost Category and allocate it to Revenue Items or Non-Revenue Items as needed.

355
- Revenue Item : Items appears in Profit & Loss Accounts
- Non-revenue item : Item appears in the Balance Sheet.
6. Create following Cost Centres under their respective category.
| Cost Category >> | Branch | Department | Manager | Mob No. |
| Cost Center >> | Kolkata | Marketing | Regional Manager | 9437264738 |
| Mumbai | Administration | Area Manager | 9437264739 | |
| Delhi | Accounts | Sales Manager | 9437264740 |
7. Gateway of Tally > Chart of Accounts > Cost Centres > press Enter.
8. Press Alt+H (Multi-Masters) > select Multi Create > and press Enter.
In case the feature is inactive, you will be prompted to activate the Cost Centres feature. Select Yes or press Y to proceed.
Enter the Name of Cost Centre and select the cost centre under which it is being created. You can also select Primary cost centre.

356
2. Applying Cost Centres to Ledger Accounts
Before recording a transaction, ensure that the option Cost Centres are applicable is set to Yes in the corresponding ledgers. By default, this option is set to Yes in the income and expense ledgers, whereas it is set to No in the asset and liability ledgers.
To apply cost centres to ledger accounts,
For example, enable Cost Center for Payment ledger – Telephone / Telex / Fax Charges & Travelling Expenses.
Go to Gateway of Tally > Alter > Ledgers > Type the name of the Ledger i.e. Telephone/Telex/Fax Charges as below :

357
3. Cost Centres Allocation in Voucher Entry
Enter the payment Voucher as per example…
Gateway of Tally Ø Vouchers Ø Payment Voucher (F5)
Cost Centre allocations have to be done in the pop-up sub-screens in the main voucher entry screen. The sub-screen is displayed after the amount fields pertaining to the ledger for which cost centers have been activated. Hence, the following is the sub-screen for the ledger Conveyance A/c.

358

359