When the order is placed with the suppliers for the supply of goods, the items, quantities, date of receipt, and so on, details are given with the Purchase Order Number. Later, when these goods are received, the Purchase Order is tracked for the Order Details either in the receipt note or in the purchase Invoice.
The Outstanding Purchase Order reports are available in TallyPrime. It is possible to know the order position of any item in the Stock Summary. Separate Purchase Order Outstanding report and Purchase Order Summary report are also available.
Example:
Raise a Purchase Order on 1-4-2020 on ACER India Ltd. (vide Order No. 1) for the following items with GST as applicable. The due date is 1-5-2020 and additional Delivery Charges on Purchase of Rs.500 is applicable before GST.
| Laptop ACER 4720Z | 1 Nos. | 32500 |
| Laptop Compaq A901TU | 1 Nos. | 38500 |
| Laptop HCL Mileap | 1 Nos. | 35000 |
1. Open the Purchase Order Voucher screen
Gateway of Tally > Vouchers > F10 (Other Vouchers) > type or select Purchase Order (Ctrl+F9).
Alternatively, press Alt+G (Go To) > Create Voucher > F10 (Other Vouchers) > type or select Purchase Order.
In case the voucher is inactive, you will be prompted to activate the Purchase Order voucher type. Select Yes or press Y to proceed.
Enter the Purchase Order Voucher like Purchase Voucher as screen appears as shown below:

324
Note :
Order No: 1 This particular Order No. field is an additional field to record the order number if different from the voucher number.
Due on: 1-5-2020 (It is the due date for the delivery of the item. This will enable the monitoring of outstanding deliveries. The order can be split for delivery on different dates). Multiple Godown is get enabled by default and you can select your godown.

325
1. Receipt Note Voucher (GRN) against Purchase Order
A Receipt Note voucher is used to record receipt of goods/items at stores. For example , the Company receives new stock item from a Supplier. If a Purchase Order exists for that supply, selecting the PO reference in the Receipt Note will display its particulars.
The details recorded in the Receipt Note are the PO reference, Ledger account, Supplier’s name and address, Name of stock item, Stock location, quantity, rate, amount and the transaction narration.
The Receipt Note is similar to the Goods Receipt Note (GRN) type of entry. When the Receipt Note is passed it updates the inventory levels.
Purchase includes Accounting and Inventory.
In Tally when a Receipt Note is tagged to a Purchase entry the whole transaction is completed.
Example :
In the earlier section, we have recorded Purchase Order No-1 on 1-4-2020 with due date 1-5-2020 with following products from ACER India Ltd. All the given Products as per Purchase Order is received on 01-5-2020.
| Laptop ACER 4720Z | 1 Nos. | 32500 |
| Laptop Compaq A901TU | 1 Nos. | 38500 |
| Laptop HCL Mileap | 1 Nos. | 35000 |
Let us raise a Receipt Note for the PO/1 raised on 1-4-2020 with due date 1-5-2020.
Solutions:
1. Gateway of Tally > Vouchers > press F10 (Other Vouchers) > type or select Receipt Note or Press ALT+F9.
Alternatively, Alt+G (Go To) > Create Voucher > press F10 (Other Vouchers) > type or select Receipt Note.
In case the voucher is inactive, you will be prompted to activate the voucher type. Select Yes or press Y to proceed.
2. Provide Supplier details to Yes in F12: Configure ( Voucher Configuration Screen)
3. Press Ctrl+A to accept and return to the voucher screen.
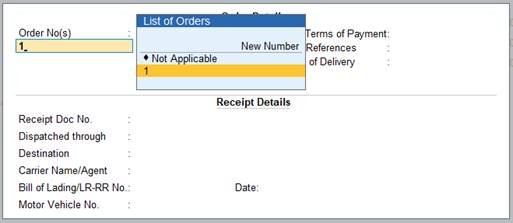
4. Select Party A/c Name from the List of Ledger Accounts .
5. Select Order No(s) from the List of Orders , if a purchase order exists for that supplier. If the Order No(s) is selected, the item name, quantity, rate and amount will be displayed automatically.
The Party Details screen appears as shown:
326
6. Enter the required information in the Party Details screen.
7. Press F12 (Configuration) and set the options Provide Supplier details and Provide Receipt, Order, and Import details to Yes to provide the supplier details.
If you need to use this option only for the current voucher, press Ctrl+I (More Details) > type or select Order details> and press Enter.
8. Press Enter . The Stock Item Allocations screen appears as shown:

327
9. Select existing Tracking No. or create a new tracking number.
| Note: A Receipt Note with Tracking No. marked as Not Applicable will be an inventory document, affecting only the inventory values. This will not affect the accounts. A purchase voucher with Tracking No. marked as Not Applicable will update the accounts without increasing the stock. The Purchase Bills Pending list is generated as Bills recd. but Goods not recd. |
10. Select the items and include the item details like quantity, rate, and any specific location
The Receipt Note appear as shown below:
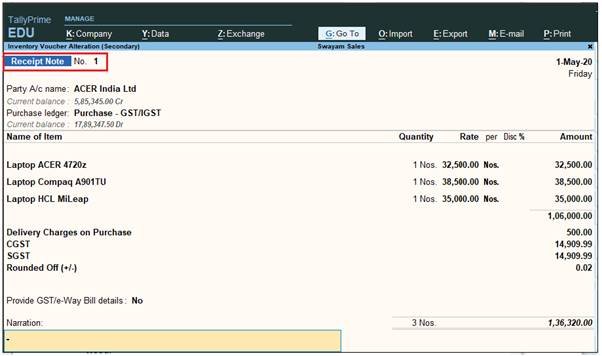
328
10. Press Enter to save.
2. Purchase Voucher against Receipt Note Voucher (GRN)
In Tally when a Receipt Note is tagged to a Purchase entry the whole transaction is completed.
- If Receipt Note is accounted but the Purchase entry is not, it is treated as Goods Received but Bills are not received.
- If the Purchase entry is accounted and the Receipt Note is not, it is treated as Bills Received but Goods are not received.
- One Purchase entry can be tagged to many Receipt Notes. Similarly, one Receipt Note can be tagged to many Purchase bills. It is not necessary for all Receipt Notes to be tagged with Purchase entries and vice versa.
- When the stock received is a part of purchase and we wish to keep track of the purchase bill for accounting, a Tracking No. is assigned while accounting the Receipt Note. The Tracking No. is selected while accounting the Purchase bill/invoice. Similarly, we can assign a Tracking No in the Purchase voucher and select it while accounting the Receipt Note.
- A Receipt Note or Purchase Entry can be prepared first. It is not compulsory that a Receipt Note should be prepared before accounting the Purchase Entry or the Purchase entry should be accounted before preparing a Receipt Note.
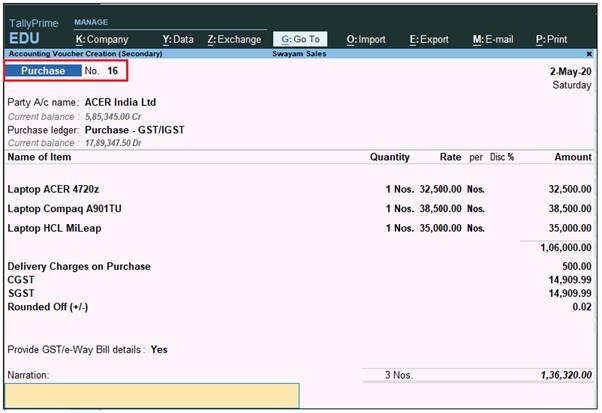
Example :
In the earlier section, we have recorded Receipt Note Voucher No-1 on 1-5-2020 on the basis of Purchase Order No-1 (recorded earlier) with following products from ACER India Ltd.
| Laptop ACER 4720Z | 1 Nos. | 32500 |
| Laptop Compaq A901TU | 1 Nos. | 38500 |
| Laptop HCL Mileap | 1 Nos. | 35000 |
Let us record a Purchase Bill for the Receipt Note No.- 1 received & entered on 1-5-2020.
Solutions:
1. Gateway of Tally > Vouchers > press F9 (Purchase).
Alternatively, press Alt+G (Go To) > Create Voucher > press F9 (Purchase).
2. Press F12 (Configuration) and set the options Provide Supplier details and Provide Receipt, Order, and Import details to Yes to provide the supplier details.
3. Press Ctrl+A to accept and return to the voucher screen.
4. Select Party A/c Name from the List of Ledger Accounts .
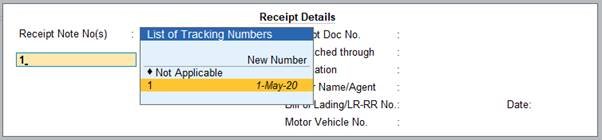
5. Select Receipt Note No. from the List of Tracking Numbers , if a Receipt Note exists for that supplier.
The Receipt Details screen appears as shown:
329
6. Enter the required information in the Receipt Details screen.
7. Select the Receipt Note No(s) . If the Receipt Note No(s) is selected, the item name, quantity, rate and amount will be displayed automatically.
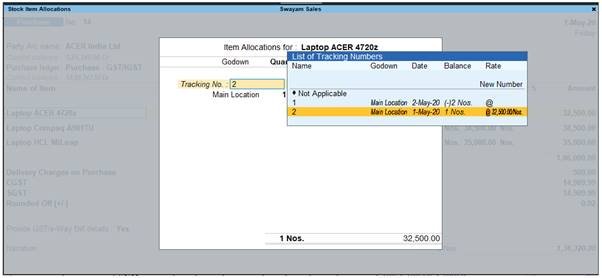
8. Press Enter . The Stock Item Allocations screen appears as shown:
330
9. Select existing Tracking No. or create a new tracking number.
The Purchase Voucher appear as shown below:
331
10. Press Enter to save.