TallyPrime provides various security options which can be enabled in this section:
All the company information and business transactions that you maintain in TallyPrime is safe. However, you can provide additional security by adding a username and password. Only users with these credentials can access your business information. Moreover, you can create users with different levels of access.
You can further protect your data by using a TallyVault password. All the information including your company name will be encrypted. Only authorised users will be able to access the company. However, if you forget the TallyVault password, you will permanently lose access to your company information.
If more than one users access your company information, you can provide role-based security rights to these users. By default, two security levels are available in TallyPrime: owner and data entry operator. Users who have the credentials for the owner security level will have the rights to access all the data and set up security, create, and update user information, and so on. On the other hand, the data entry operator will have the rights to record the vouchers, view certain reports, and so on. When you access the company with the owner credentials, you can add more users, modify existing user credentials, remove users, alter the permissions for the different users in your company, and so on.
If you want to track which user has added, altered or deleted a transaction, or want certain users to have full permission to access the data, you will have to create a username and password for all these users, and assign the rights accordingly. For example, you can provide the data entry operator with voucher entry permissions only, and restrict the viewing of reports and recording of back-dated vouchers. For an accountant, you can provide all the data entry permissions, and provide access to certain reports only.
1. Set Password in TallyPrime
Before you can set users and user roles, you have to first enable the security feature for your company.
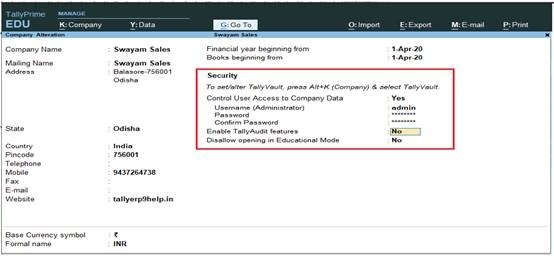
1. Press Alt+K (Company) > Create/Alter. The Company Creation/Alteration screen will open.
2. Set the option Control User Access to Company Data to Yes.
3. Set the Username (Administrator) and Password. This user will have the administrator/owner privileges.
449
4. Accept the screen.
Now when you press Alt+K (Company), you can see the user options under the User Management section.

450
2. Use Security Control
The administrator can give different permissions to different kind of users based on the company’s requirement.
By default TallyPrime has two levels of Security namely Owner and Data Entry .
Owner – The owner has full access rights which will enable him to work with all the features of TallyPrime, except for Tally Audit and Company Alteration which are reserved for the Administrator. Based on pre-defined security levels the Administrator can create other security levels and assign or restrict access based on the requirement.
Data Entry – Data Entry has restricted access but the administrator can assign or restrict the access based on the requirement.
2.1. Creating Users and Passwords
You can create users, assign security levels, restrict/allow remote access .
To create the user and assign a password execute the following steps:
1. Press Alt+K (Company) > Users and Passwords. The Users for Company screen will appear.
2. Select the User Roles for the users that you want to create. For example, Owner, Data Entry Operator, and so on.
3. Enter the relevant Username and Password.
The List of Users for Company screen appears as shown below:

451
4. Select the required Security Level from the Security List .
5. Enter the user’s name in the Username field.
6. Enter the password in Password (if any) field.
7. By default Allow Remote Access and Allow Local TDL is set to No and skipped for users not classified under Tally.NET User and Tally.NET Auditor

452
7. Accept to create the user.
4. Press Ctrl+A to accept the Users for Company screen.
How to Change User :
After the required users have been created in Users and Passwords (as shown in the previous section), the new user can now log in to the company. Let us consider that the new user is a data entry operator called sanjay.
1. Press Alt+K (Company) > Change User. The Change User screen appears.

453
2. Enter the relevant Username and Password.

454
2.2. Creating and Setting Up Voucher Type Security for Users
You can create and assign security levels to allow specific access permissions to a user. To create a new security level, you have to log in as an administrator.
Voucher Type Security will help the business owner specify both individual Voucher Type (Contra, Payment, etc.) restriction and activity level (Sales Department, Procurement Department etc) restriction for different users.
The types of functions or activities for which the control can be set include being able to Create, Alter,, Print , or have Full Access to any particular type of Voucher in TallyPrime.
With TallyPrime’s Voucher Type Security feature, the administrator can
- Provide or deny access to what level of activity can be performed on a Voucher by different users
For example : User A & User B can Create and Alter a Payment Voucher, but User C can only view the same.
- Provide access to an entire group of Vouchers like Accounting Vouchers, or Inventory Vouchers as a whole.
To create a new security level:
1. Press Alt+K (Company) > User Roles. The Security Levels screen will appear.

455
2. Select in this case Data Entry.
3. Press Enter to view the Security Levels screen.
4. Assign the applicable security settings.
The Security Levels screen appears as shown below:

456
5. Press Ctrl+A to accept.
A new security level is created with the relevant requirements.
You can see the Names of Security Levels, such as Owner, Data Entry Operator, and so on. You can accept the names as is, or enter any name you want. For example, if Rajesh is the name of your data entry operator, then you can rename Data Entry to Rajesh, and accept the screen.
6. In the Security Levels screen, assign the relevant rights for Rajesh.
- Select Data Entry in the Use Basic Facilities of option, as Rajesh is an data entry operator.
- Days Allowed for Back Dated Vouchers – By default this field is set to 0. Enter the required number of days. Alteration or insertion of backdated vouchers can be done within the given days from the date of last entry of vouchers.
- Cut-off date for Backdated vouchers – You can specify the required date. TallyPrime does not allow you to record a transaction prior to the date mentioned. This can be used in addition to Days Allowed for Backdated Voucher. This input will be useful in situations where you have completed the audit and do not want any changes in the data.
- Set Rules for Print Before Save – Use this option to prevent the printing of certain voucher type before saving the voucher, or restrict the printing all the available voucher types before saving the vouchers.
- Exclude On Account from Bill Allocations – If you set this to Yes, then the user will not get the On Account option in the list of bill-wise reference types.
- Exclude New Number from Item Allocations – If you set this to Yes, then the user will not have the option to select a new number in tracking and order references.
- Allow company to connect – Set this to Yes if you need to connect the company to the Tally.NET Server.
- Rules for Print Before Save -Set this to Yes to allow or disallow the user from printing certain voucher types.
- Under Disallow/Allow the following facilities, select the Type of Access for the relevant items.

457
7. Accept the Security Levels screen.
3. TallyVault Password
Data Security has been a matter of concern to the Business Owner as most businesses depend on the confidentiality of the information. TallyVault is a feature in TallyPrime that will help the business to maintain confidentiality of information by encrypting the data.
The user can enter the TallyVault password while creating the company or execute the following steps to provide the TallyVault password for existing companies.
To enable TallyVault
If you had already created a company without setting a TallyVault password, no worries. You can do so anytime later.
1. Press Alt+K (Company) > TallyVault.
2. In the TallyVault screen:
- TallyVault Password: Enter a password to encrypt your data.
- Confirm TallyVault Password: Reenter the same password to confirm.
Note that forgetting this password will result in permanently losing access to your company data.
3. Accept the screen.As always, you can press Ctrl+A to save.

458
4. TallyPrime displays a message Created New Company followed by the new Company Number, press any key to return to Company Info. menu.

459
Once the company data is encrypted the Name of the Company and Financial Year will not be visible in the Select Company screen.
5. The Select Company screen with the encrypted company is displayed as shown.

460
6. Select the encrypted company, TallyPrime will prompt the user to provide the TallyVault password.

461
7. Provide the required password and the company data is available for use in a readable format.
The above procedure will ensure that the data/information is available only to authorised users.
To enable TallyVault while creating a new company, you must provide the TallyVault password and repeat the password, the new company created will be secured using TallyVaul
You can change the current TallyVault password for a company.