Some of the commonly asked questions about sales are answered here.
1. How to Ascertain Previous Sales Rate of the Goods ?
You can check the previous sales rate at which the goods were sold, while recording sales transaction.
- After selecting the customer ledger and the stock item press Alt+S to view Stock Query
- This report displays the information of the selected party for the stock item along with the previous sales details.
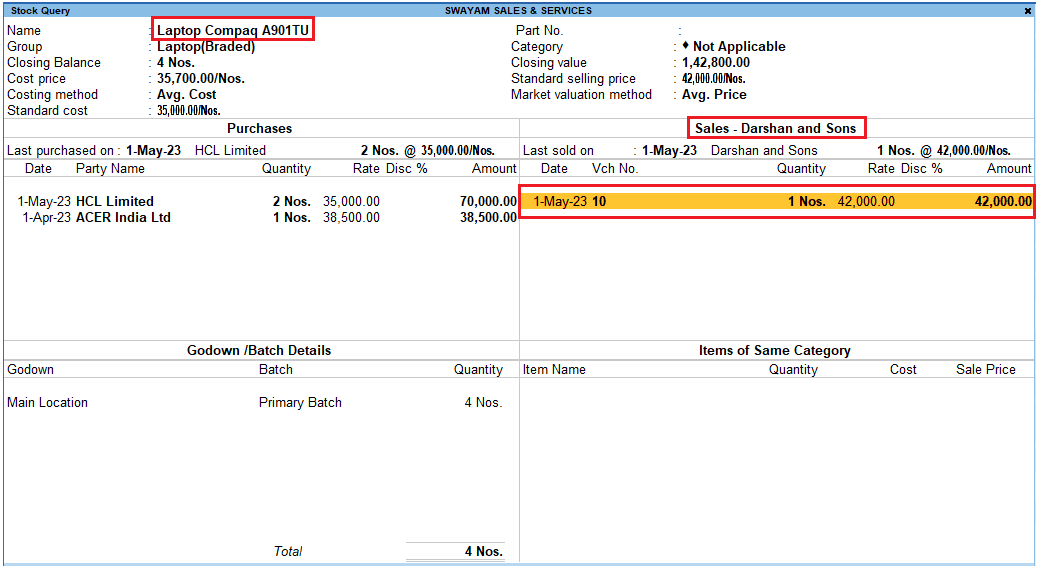
For example, on 1/5/2023, Item ‘Laptop Compaq A901TU’ was sold to Party-‘Darshan and Sons’ at the rate of Rs. 42,000, and subsequently Item ‘Laptop Compaq A901TU’ has been transacted (purchased/sold) with many customers/suppliers.
Now if you want to see the information on previously sold Quantity and Rate for Party–‘Darshan and Sons’ from sales invoice, you can select Party–‘Darshan and Sons’ and Item ‘Laptop Compaq A901TU’, and press Alt+S to view Stock Query report. In the Stock Query report, you can get the details of previously sold Quantity and Rate.
[192-Sales Process in TallyPrime-3 & Higher]
2. How to Print Two Sales Invoices in the same Page ?
To print two sales invoices in a single page, you need to configure the printer by following the steps shown:
- Select the required report/ledger to print.
- Press Ctrl+Pto print > press C (Configure) > type or select Printer > and press Enter.
- Select the required printer > select the Paper Size.
- Under the Page Format, set Pages per Sheetto 2.
- Click OK.
3. How to Scan Barcode in TallyPrime?
TallyPrime by default accepts inputs from all standard barcode scanners. Before starting the barcode scanning process, ensure that:
- A standard barcode scanner is available.
- Install barcode scanner software in the system running TallyPrime.
- The masters for stock items to be scanned are created in TallyPrime.
To use a bar code scanner in TallyPrime
- Move the cursor to the field Stock Item Name/Particularsin a voucher/invoice.
- Scan the barcode on the stock item using barcode scanner. The item details are captured in the field Stock Item/Particulars.
4. Why are Bill-wise Details Not Displayed for Outstanding Allocation in Sales Invoice?
You can do the following to enable bill-wise details.
- Set Enable Bill-wise entryto Yes in the Company Features Alteration

[193-Sales Process in TallyPrime-3 & Higher]
If you do not see this option, set Show more features to Yes.
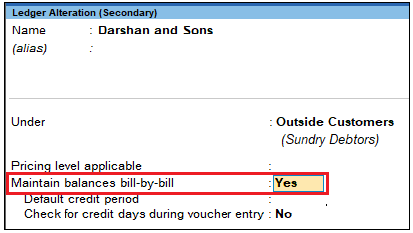
- Set Maintain balances bill-by-billis set to Yes in the ledger.
[194-Sales Process in TallyPrime-3 & Higher]
- Set Use default Bill-wise details for Bill Allocation to Noin the F12 configuration screens of sales vouchers.

[195-Sales Process in TallyPrime-3 & Higher]
Now, TallyPrime will prompt for Bill wise details in invoice entry screen.
5. How to use Barcode Scanners for Billing/Invoicing in TallyPrime?
To use barcode scanners for billing/invoicing
- Place the cursor on the Aliasfield of the Stock Item Creation/Alteration
- Scan the barcode of the item using the barcode scanner. The item/product code (barcode) will be copied to the Alias
- Save the item master.
- Place the cursor at the Particulars/Namein Item column while billing/invoicing.
- Scan the barcodes available. The Item Namewill get automatically copied.
6. How do we Get the Bill-wise Details to be Displayed during Invoicing?
Bill-wise details can be displayed during invoicing.
- Gateway of Tally> Vouchers > F8 (Sales).
Press Ctrl+H (Change Mode) > to select the required voucher mode (Item Invoice, in this case). - Press F12(Configure) > set Use default Bill-wise details for Bill Allocation to No.

[195-Sales Process in TallyPrime-3 & Higher]
7. How can we Display a Separate Column for entering Discount while Invoicing?
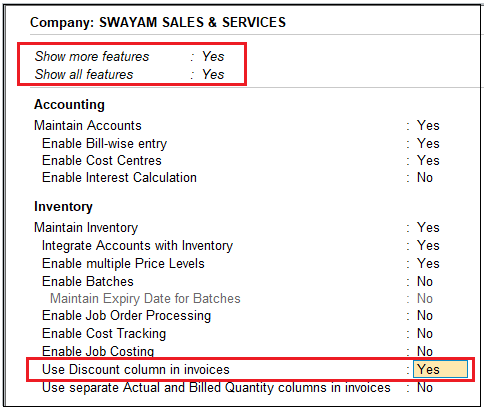
- Press F11(Features) to view the Company Features Alteration
- Set the option Use Discount column in invoicesto Yes.
If you do not see this option, set Show more features to Yes.
[197-Sales Process in TallyPrime-3 & Higher]
8. Can I change the Title of a Sales Invoice to ‘Tax Invoice’?
Yes, it is possible to change the title of the Sales Invoice to Tax Invoice.
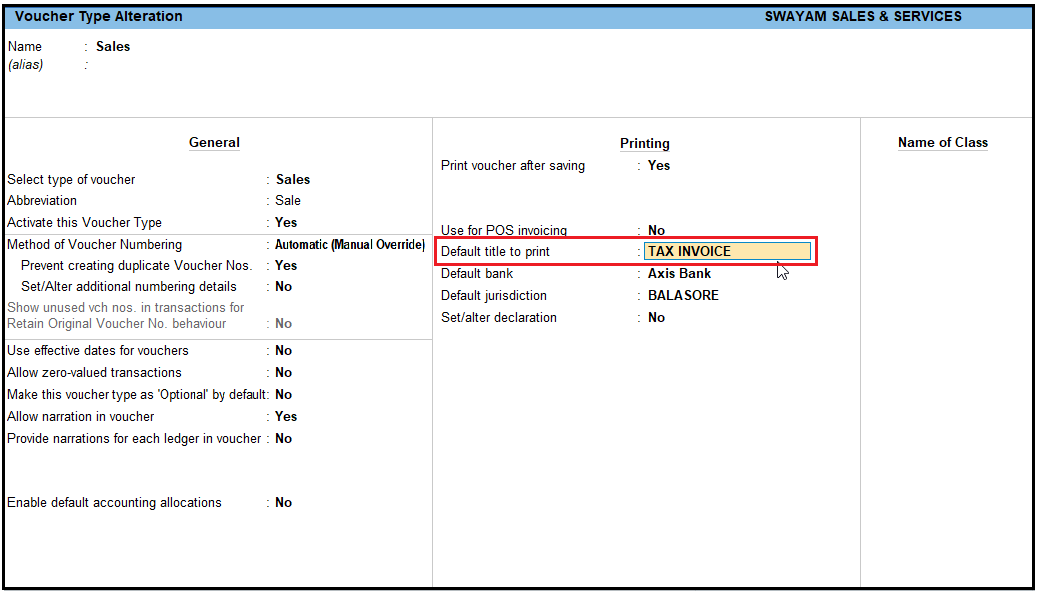
- Gateway of Tally> Chart of Accounts > Voucher Types > select Sales and press Enter.
- Enter Tax Invoicein the field Default title to print.
[198-Sales Process in TallyPrime-3 & Higher]
- Accept the screen. As always, you can press Ctrl+Ato save.
9. While Printing an Invoice, How to Set the Number of Copies and provide the Type of Copy as Original, Duplicate and So on?
It is possible to set the number of copies and mark it as original, duplicate and so on.
You can configure to print multiple copies of sales invoice/voucher from the Print Configuration screen.
- In the Voucher Printingscreen, press C (Configure).
- Type or select Number of copiesand press Enter.
- Enter the required Number of copiesand set the Type of Copy as All.

[199-Sales Process in TallyPrime-3 & Higher]
- Press Escto return to the voucher printing screen, and print the invoice.
If you want to change the default number of copies and type of copy:
- Press Alt+P(Print) > select Configuration.
- Type or select Set no. of copies for printing vouchers > and enter the details as needed.
10. How to Put an Invoice Entry on Hold, Record another Transactions, and Resume or Recall the Invoice Entry without Losing Information?
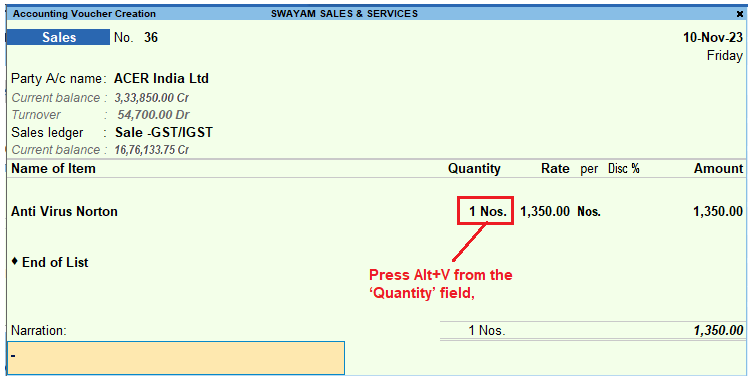
Follow the steps shown below to hold an invoice with all the information entered and recall it later.
- Press Alt+Vfrom the ‘Quantity’ field, from any of the vouchers which you would like to hold.
[200-Sales Process in TallyPrime-3 & Higher]
- The Stock Journalscreen opens. From this screen you can navigate to any of the Voucher

[201-Sales Process in TallyPrime-3 & Higher]
- After saving the new Voucher, TallyPrime will display the invoice that was put on hold.
11. Can we Print Complete Contact Details in Invoice in addition to Billing Address
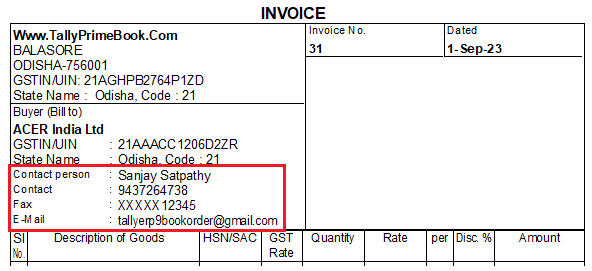
You can print complete details like contact person name, telephone number, mobile number, e-mail ID and so on, in an invoice. You just need to:
- Enter contact details in the party ledger.
- Print the invoice to view the contact details.
- Enter Contact Details
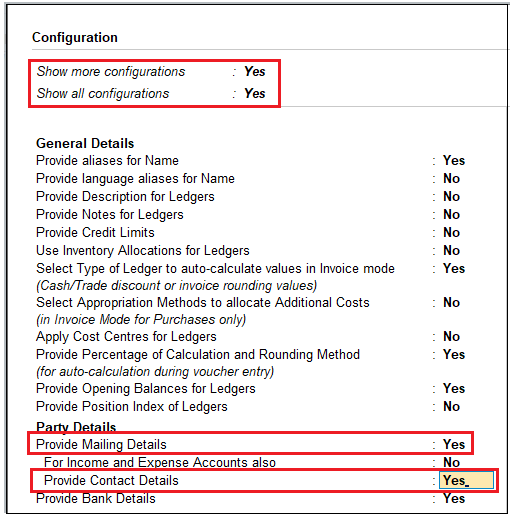
To enter contact details, while creating the Ledger Master, press F12 (Configure).
- Set the options Provide Mailing Detailsand Provide Contact Details to Yes.
[202-Sales Process in TallyPrime-3 & Higher]
- Accept the screen. As always, you can press Ctrl+Ato accept.
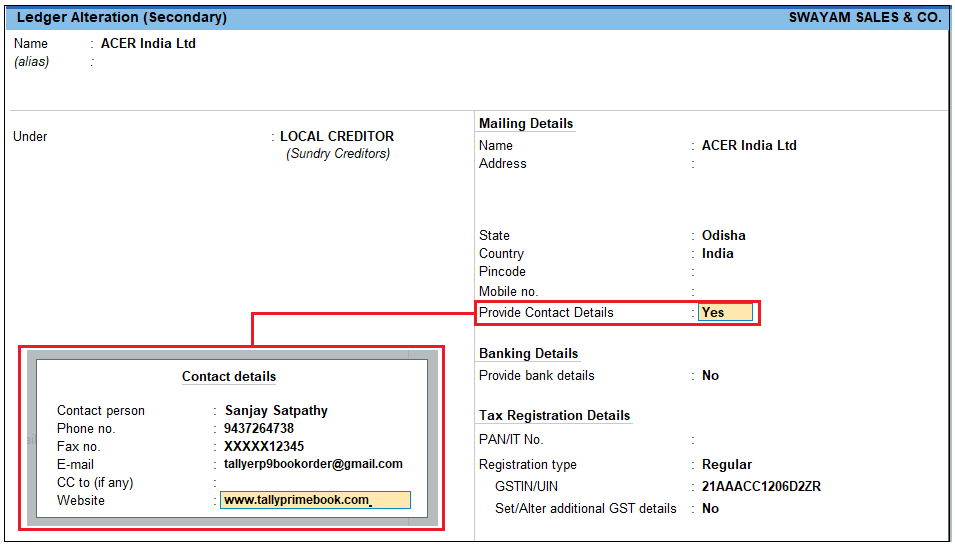
- Enter the contact details in the section provided.
[203-Sales Process in TallyPrime-3 & Higher]
Complete contact details have been entered in the party ledger. Now, let us print these in the invoice.
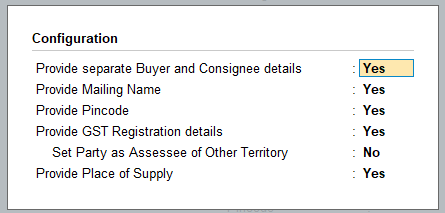
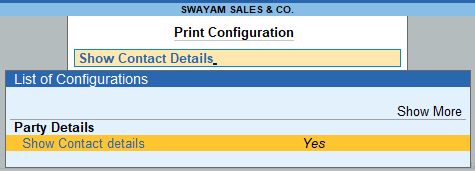
- In the Sales Invoice, In the Party Detailsscreen (after selecting Party Ledger), press F12 (Configure) > set the options as shown below:
[204-Sales Process in TallyPrime-3 & Higher]
- Press Enterto save and proceed.
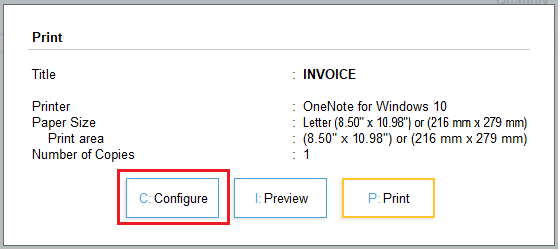
- Complete the transaction and press Ctrl+Pto print the voucher.
[205-Sales Process in TallyPrime-3 & Higher]
Press C (Configure). Set the options as given below:
- Show Name and Address from Party masterto Yes.
- Show Address in a continuous lineto Yes.
[206-Sales Process in TallyPrime-3 & Higher]
- Press Escto accept and return to the Voucher Printing screen.
- Press Enterto print. The complete contact details appear in the printed invoice.
[207-Sales Process in TallyPrime-3 & Higher]
12. Why is Sales Ledger Field not appearing during Voucher Entry?
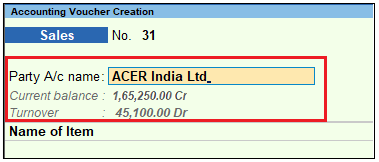
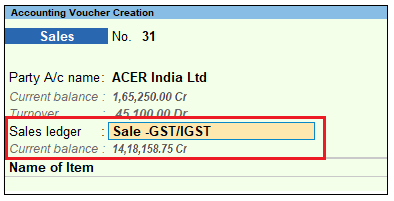
The Sales ledger field will not appear below the Party A/c name field when:
- The transaction is recorded with voucher class in the accounting invoice mode.
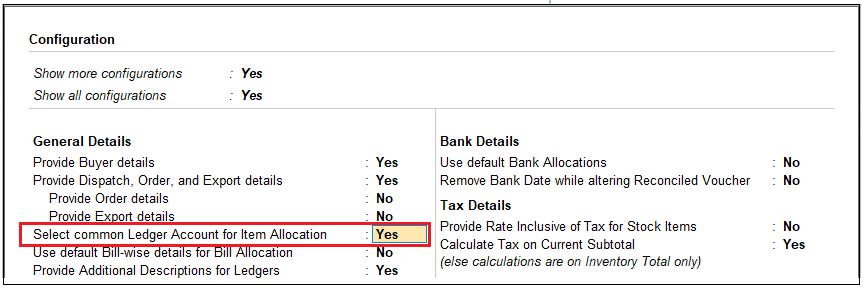
- The option Select common Ledger Account for Item Allocationis disabled in sales Voucher Configuration
[208-Sales Process in TallyPrime-3 & Higher]
To view the Sales ledger field
- In the sales voucher, press F12(Configure) > set the option Select common Ledger Account for Item Allocation to Yes.
[209-Sales Process in TallyPrime-3 & Higher]
Press Ctrl+A to save the screen. Now, the Sales ledger field will appear during voucher entry.
[210-Sales Process in TallyPrime-3 & Higher]
13. How to Disable Dispatch Details and Order Details in the Invoice?
You can disable the dispatch details and order details in the Voucher Configuration screen of the invoice.
- To disable these details in the voucher, press F12(Configure) in sales voucher > set the option Provide Dispatch, Order, Export details to No.

[211-Sales Process in TallyPrime-3 & Higher]
- To avoid printing these details in the invoice:
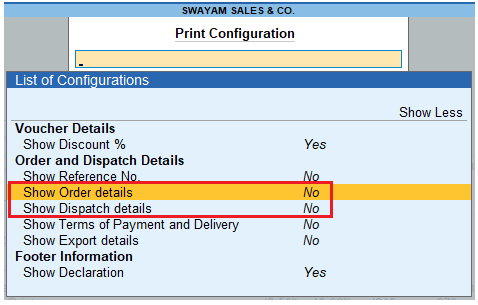
- Press Ctrl+Pin the sales voucher > press C (configure).
- Type or select Order and Dispatch Details> press Enter twice to view the options under this. If these options of dispatch and order details are set to Yes, you need to set them to No.
- Select Show Dispatch Detailsand press Enter to set it to No.
- Select Show Order Detailsand press Enter, to set it to No.
[212-Sales Process in TallyPrime-3 & Higher]
14. How to Skip the Dispatch Details after selecting the Party Ledger?
Go to Gateway of Tally > Vouchers > F8 (Sales) > press F12 (Configure).
Set the option Provide Dispatch, Order, and Export details to No.

[211-Sales Process in TallyPrime-3 & Higher]
15. How Do I Cancel a Sales Invoice?
You can cancel a sales invoice in the following ways:
Cancel a Voucher
Method 1:
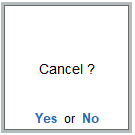
- Day Book> press Up or Down arrow to place the cursor on the voucher > press Alt+X.
- Press Yto cancel the voucher.
[213-Sales Process in TallyPrime-3 & Higher]
The voucher where the cursor was placed will be cancelled
Method 2:
- In the Voucher Alteration screen, press Alt+X.
- Press Yto cancel the voucher.
Cancel Multiple Vouchers
- Day Book> press spacebar > press Up or Down arrow > press spacebar.
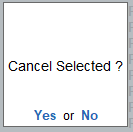
Continue this step to select multiple vouchers that you want to cancel. - In the Cancel selectedprompt window > press Y to cancel the vouchers.
[214-Sales Process in TallyPrime-3 & Higher]

