
TallyPrime also allows you to carry out e-invoicing in the offline mode, in case you do not have continuous access to the internet, or if you don’t want to send your invoice details directly to the portal. In such cases, you can export the details of your e-invoice to a JSON file and then upload it on IRP at your convenience.
TallyPrime creates the offline files in the prescribed format and size recommended by IRP. If the data size is more than 2 MB, then the information will be split into multiple files, each of which will be less than 2 MB.
So, you can also generate IRN information for invoices offline in TallyPrime.
Use Offline-generation of e-invoice feature:
- When you do not want to use the online generation option
- When the internet is not available in the system on which you are using TallyPrime
1. Offline Export in TallyPrime
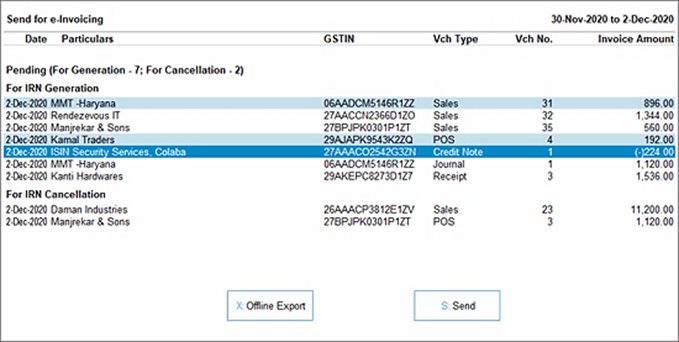
- Press Alt+Z (Exchange) > Send for e-Invoicing.

[Fig-67-e-Invoice Process in TallyPrime]
The Send for e-Invoicing screen appears. You can view the transactions that are pending for generation and cancellation.
- Select the required transactions and press X (Offline Export) to export the details. If you press X without selecting any transaction, then all the transactions will be exported.
 .
.
[Fig-68-e-Invoice Process in TallyPrime]
The following confirmation screen will appear, with the number of transactions lined up for IRN generation and cancellation.

.[Fig-69-e-Invoice Process in TallyPrime]
- Press Enter to continue. The Export screen will appear.

.[Fig-70-e-Invoice Process in TallyPrime]
- Press C (Configure), if you want to change any details, such as the Folder path where JSON files will be exported.
- Press E (Send) to export the JSON files.
The JSON files will be saved in the specified folder:

.[Fig-71-e-Invoice Process in TallyPrime]
2. Bulk Upload of JSON Files on IRP to generate Ack No., Ack Date, and IRN
After exporting the JSON files, you can upload them on IRP and generate IRN information for the uploaded vouchers.
- Open the IRP home page, and click Login with your username and password.

.[Fig-72-e-Invoice Process in TallyPrime]
- Click e-Invoice > Bulk Upload.

.[Fig-73-e-Invoice Process in TallyPrime]
The Invoice Bulk Upload screen will appear.
- Browse the JSON file and click Upload.

.[Fig-74-e-Invoice Process in TallyPrime]
You can view the details of the uploaded invoice, along with the Ack No., Ack Date, and IRN.

.[Fig-75-e-Invoice Process in TallyPrime]
- Click the Download Excel button. An MS Excel file will open, where you can see the IRN information for the vouchers.
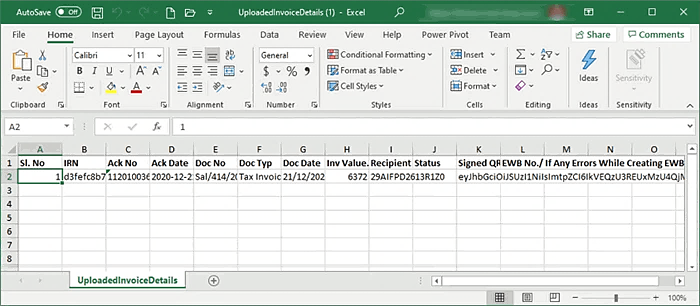
.[Fig-76-e-Invoice Process in TallyPrime]
3. Update Details in TallyPrime and Print QR Code
Now you have to update the e-invoice details, such as IRN, Ack No., and Ack Date, in the respective vouchers in the e-Invoice report.
- From the e-Invoice report, drill down from the For IRN generation section under Exported.
- Select the relevant voucher and press Alt+S (Manually Update IRN Info).

.[Fig-77-e-Invoice Process in TallyPrime]
The Update IRN Info screen will appear:

.[Fig-78-e-Invoice Process in TallyPrime]
- Enter the IRN, Ack. No., and Ack. Date. You can copy this information from the MS Excel sheet and paste it in the relevant fields.
- As always, press Ctrl+A to save the details.
The IRN info will be updated in the voucher. However, in the offline method, the QR Code will not be printed in the voucher.

.[Fig-79-e-Invoice Process in TallyPrime]
If you want the QR Code to be printed, then select the required voucher and press Alt+L (Get IRN Info). This can be done only when you have an active internet connection.
The following screen appears:

.[Fig-80-e-Invoice Process in TallyPrime]
- Press Enter to continue.
- Specify the e-Invoice Login details in the following screen, and press Enter to continue.

.[Fig-81-e-Invoice Process in TallyPrime]
You can view the status of the upload in the Exchange Summary:

.[Fig-82-e-Invoice Process in TallyPrime]
The details will be downloaded and updated in the voucher. Now you can print the e-Invoice details such as IRN, Ack. No., and Ack. Date, along with the QR code.

.[Fig-83-e-Invoice Process in TallyPrime]