TallyPrime gives you great flexibility in setting up your chart of accounts. It allows you to group your ledger accounts right at the time of creating your accounts chart. Your reports and statements reflect the desired classification at all times.
List of accounts displays the existing chart of accounts, listed as groups, in alphabetical order.
- Gateway of Tally > Chart of Accounts > select master type you want to see in Chart of Accounts.
- Alternatively, press Alt+G (Go To) > type or select Chart of Accounts > select master type you want to see in Chart of Accounts and press Enter.

32
1. Account Groups in TallyPrime
Groups are collection of ledgers of the same nature. Account groups are maintained to determine the hierarchy of Ledger Accounts, which is helpful in determining and presenting meaningful and compliant reports. Using this you can generate reports, which are meaningful as well as compliant with laws.
At the highest level, accounts are classified into Capital or Revenue – and more specifically into Assets, Liabilities , Income and Expenditure .
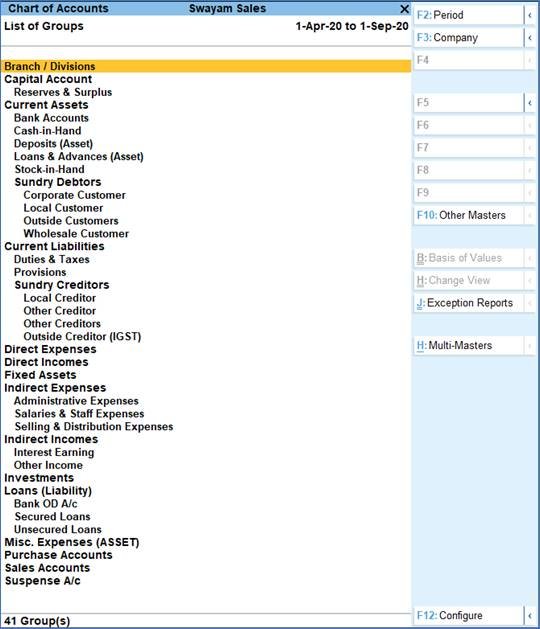
TallyPrime provides you with 41 Pre-defined Groups, of these 15 are Primary Groups and 26 are Sub-Groups . You can also create your own groups, either as Sub-groups or Primary Groups.
The lowest level would be the Ledger Account. All Voucher entries are passed using ledgers.
TallyPrime has Pre-Defined Ledgers for Cash (under Cash-in-hand group) and for the Profit & Loss A/c (under primary group).
| 15 Primary Groups | 26 Sub Groups |
| Branch / Divisions | |
| Capital Account | Reserves & Surplus |
| Current Assets | Bank Accounts Cash-in-hand Deposits (Asset) Loans & Advances (Asset) Stock-in-hand Sundry Debtors Corporate Customer Local Customer Outside Customers Wholesale Customers |
| Current Liabilities | Duties & Taxes Provisions Sundry Creditors Local Creditors Other Creditor Other Creditors Outside Creditors (IGST) |
| Direct Expenses | |
| Direct Incomes | |
| Fixed Assets | |
| Indirect Expenses | Administrative Expenses Salaries & Staff Expenses Selling & Distribution Expenses |
| Indirect Incomes | Interest Earnings Other Income |
| Investments | |
| Loans (Liability) | Bank OD A/c Secured Loans Unsecured Loans |
| Misc. Expenses (ASSET) | |
| Purchase Accounts | |
| Sales Accounts | |
| Suspense A/c |
Out of the 15 Primary Groups, 9 Primary Groups appear in the Balance Sheets that are Capital in nature and 6 Primary Groups appear under Profit & Loss account which are Revenue in nature.
26 Sub-Groups are classified under the 15 Primary Groups and Out of them 21 Sub-groups appear in the Balance Sheet and 5 Sub-groups appear in Profit and Loss Account.
- Select Groups from the Chart of Accounts and Press Enter to see the List of Groups as below :

33
2. Creating Account Groups with Advanced Configurations in TallyPrime
1. Gateway of Tally > Create > type or select Group and press Enter.
Alternatively, press Alt+G (Go To) > Create Master > type or select Group and press Enter.
2. After giving Name to the Group, In the field Under , from the List of Groups displayed, select the parent group under which the group has to be classified.
For example, Manufacturing Expenses under Direct Expenses .

34
A new group created under primary will not be reflected in reports until you pass masters / transactions for that group.
You can also View any Groups…
Go to Gateway of Tally > Chart of Accounts > Groups > Enter
You can also Alter / Modify any Groups …
Go to Gateway of Tally > Alter > Groups > Select or type Group Name and Press Enter to Alter .
3. Delete a Created Group (No Default Group) in TallyPrime
Groups can be deleted from the alteration screen, provided no transactions has been made or no sub-groups has been created .
Just Pres Alt+D in Alternation screen, and press Y.

35
1. Gateway of Tally > Create > type or select Group and press Enter.
Alternatively, press Alt+G (Go To) > Create Master > type or select Group and press Enter.
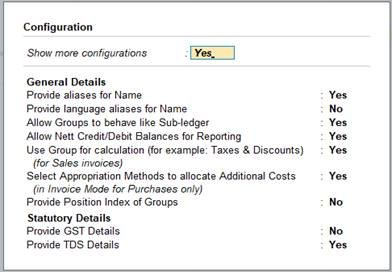
2. Select F12: Configure (Group Configuration) and enable ‘Yes’ – Show more Configurations.
The group creation screen with advanced options is displayed as shown below:

36
In the Group Creation screen :

37
1. Enter a name for the group.
2. Enter a group category. If a group is created under Primary you must select from asset, expenses, income or liability.
3. Select the Nature of Group .
4. Select Yes for the option Group behaves like sub-ledger? to allow groups to act as a ledger.
- When the option Group behaves like sub-ledger? is set to No , all the ledgers that are grouped is displayed in detailed mode.
- When the option Group behaves like sub-ledger? is set to Yes , the ledgers grouped under the same is not displayed in detailed mode.
5. Set Nett Debit/Credit Balances for Reporting? to Yes to display net debit or credit balance in the report (whichever is higher).
6. Set Used for Calculation (e.g. taxes, discounts)? to Yes if ledgers under this group have percentages for discounts or taxes to be used in invoice entry. This is displayed while passing voucher in invoice mode and for automatic calculations.
7. Select Method to Allocate when used in Purchase Invoice from the Allocation Methods list to allocate the expense of the item in the ratio of the quantity or value.
