
You can cancel the Voucher Offline by uploading JSON file inside the NIC Portal.
- Press Alt+G (Go To) > type or select e-Invoice > press Enter.
Alternatively, Gateway of Tally > Display More Reports > GST Reports > e-Invoice > press Enter.

[Fig-37-e-Invoice Process in TallyPrime]
- Drill down from the IRN generated from e-Invoice system section to open the e-Invoice – Voucher Register screen.
[Fig-38-e-Invoice Process in TallyPrime]
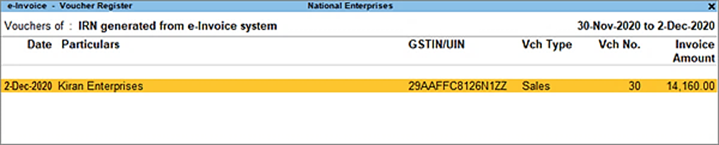
- Select the voucher for which e-invoice needs to be cancelled, and press F10 (Cancel IRN).

[Fig-39-e-Invoice Process in TallyPrime]
- Scroll down to choose cancel reason and to enter remarks.
- Under ‘Cancel Reason’, you will find four options – 1.Duplicate, 2.Data Entry Mistake, 3. Order Cancelled and 4. Others
iii. Choose anyone based on your reason (In most cases, it would be ‘Data Entry Mistake’ because there is no chance of duplication in the e-invoicing framework)
- In the ‘Remarks’ column, name the information that was entered incorrectly. Example unit change, item change, price change, etc. which is mandatory.
- As always, press Ctrl+A to save the details.
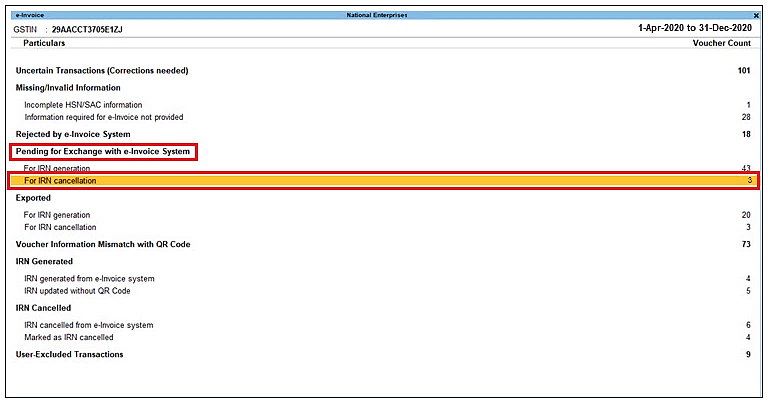
The voucher will move to the For IRN Cancellation section under Pending.
[Fig-40-e-Invoice Process in TallyPrime]
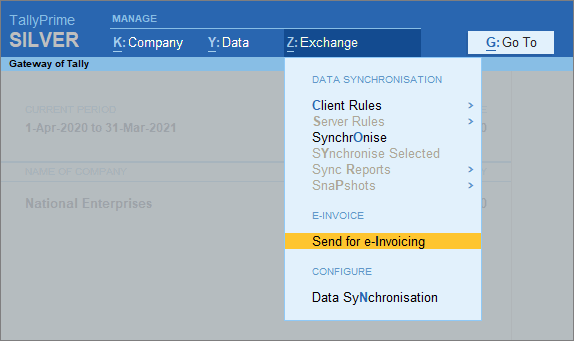
Now, you can send the e-Invoice for cancellation from the Exchange menu.
- Press Alt+Z (Exchange) > Send for e-Invoicing.
[Fig-41-e-Invoice Process in TallyPrime]
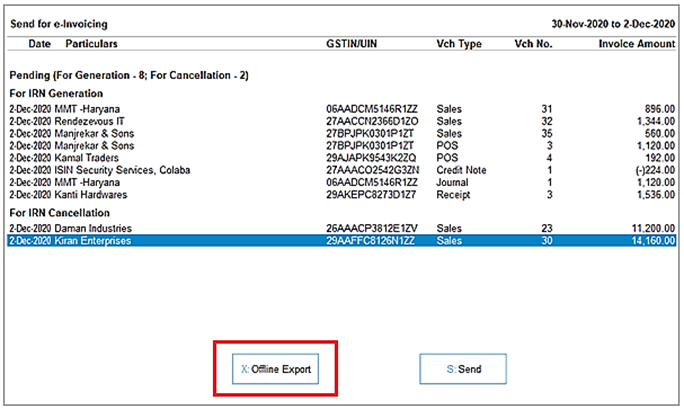
The Send for e-Invoicing screen appears. You can view the transactions that are pending for generation and cancellation.
| Note :
If you are unable to find the Transactions in the list, Press CTRL+B and Press Enter. On include Exported Transactions to set it As Yes. Already Exported Transactions will appear in the List. Press Crtl+A to see. |
- Select the required transaction (by pressing spacebar) and press X (Offline Export) to send the details.
If you press X without selecting any transaction, then all the transactions will be exported.
[Fig-42-e-Invoice Process in TallyPrime]
The following confirmation screen will appear, with the number of transactions lined up for IRN generation and cancellation.

[Fig-43-e-Invoice Process in TallyPrime]
- Press Enter to continue. The Export screen will appear.
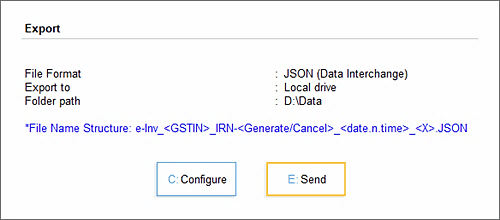
[Fig-44-e-Invoice Process in TallyPrime]
- Press C (Configure), if you want to change any details, such as the Folder path where JSON files will be exported.
- Press E (Send) to export the JSON files.
The JSON files will be saved in the specified folder:
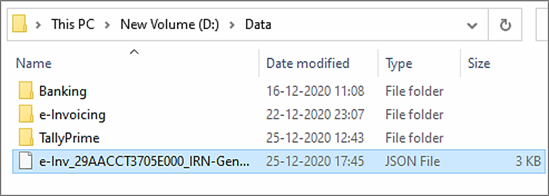
[Fig-45-e-Invoice Process in TallyPrime]
1. Bulk IRN/e-invoice Cancellation on IRP
After exporting the required JSON files, you can upload them on IRP and generate IRN information for the selected vouchers.
- Now, you can go to the IRP home page, and click Login.
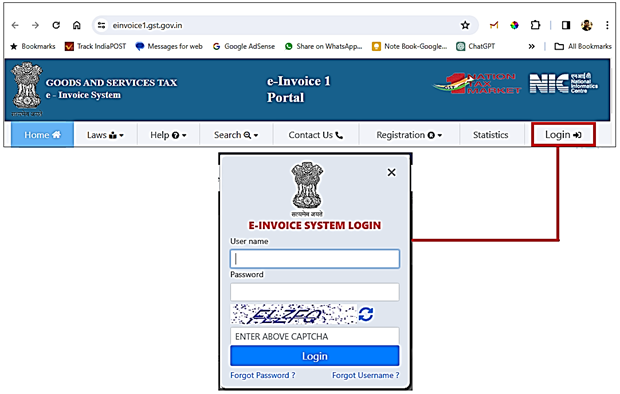
[Fig-46-e-Invoice Process in TallyPrime]
- Log in with the username and password created while registering on IRP.
- Click e-Invoicing > Bulk IRN Cancel
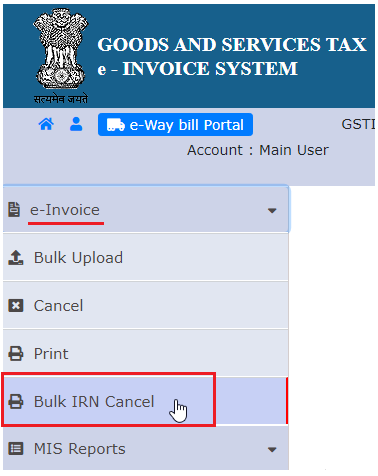
[Fig-47-e-Invoice Process in TallyPrime]
- Browse JSON file and Click Upload ( already exported previously)
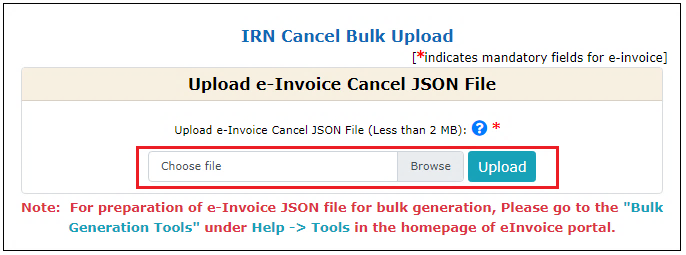
[Fig-48-e-Invoice Process in TallyPrime]
The e-Invoice will be cancelled, and you can view the details such as IRN, Cancel Reason, Cancel Date, and Status.
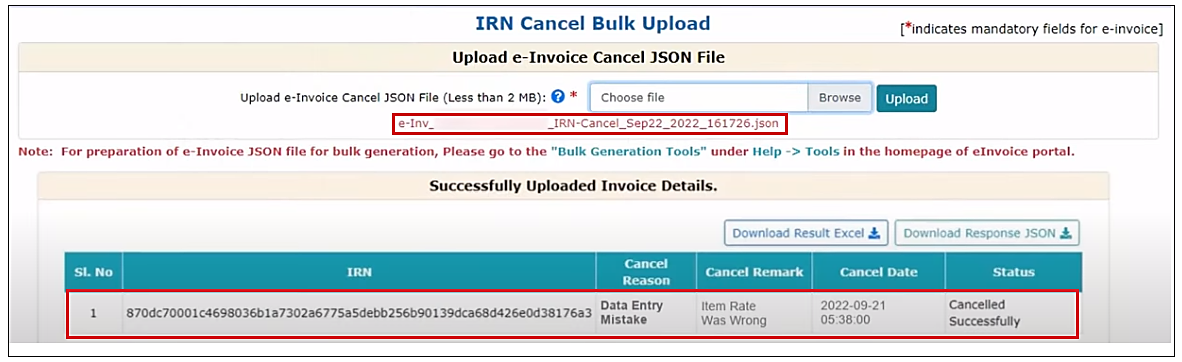
[Fig-49-e-Invoice Process in TallyPrime]
- Click the Download Result Excel button. An MS Excel file will open, where you can see the IRN information for the vouchers.
- Now when you open the e-Invoice report in TallyPrime, you can find the voucher in the For IRN Cancellation section under Exported.

[Fig-50-e-Invoice Process in TallyPrime]
- Now, select and press Enter to see the vouchers of Exported for IRN cancellation transactions

[Fig-51-e-Invoice Process in TallyPrime]
- Select the Cancelled transaction and Click or Press Alt+L (Get IRN Info), The following screen appears:

[Fig-52-e-Invoice Process in TallyPrime]
- Accept the Screen or press Y (Yes) or Enter to proceed.
- Specify the e-Invoice Login details, and press Enter.

[Fig-53-e-Invoice Process in TallyPrime]
- Now the Cancellation will be updated in TallyPrime. You can view the status of the upload in the Exchange Summary:
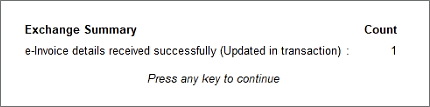
[Fig-54-e-Invoice Process in TallyPrime]
TallyPrime will fetch the latest IRN information from the e-Invoice system. The voucher will be updated and moved to the IRN Generated section.
- Later Cancel the Voucher using Alt+X (Cancel Voucher)